Flight of the Free Jacks: Dominance through Defence and Attack

The USA may be missing from the Rugby World Cup in France later this year. However  their domestic scene is thriving with yet another new winner of Major League Rugby in the shape of the New England Free Jacks. Driven by a great first phase attack, and reinforced by a physical defence the Free Jacks secured their first MLR shield.

Building a Dominant Defence

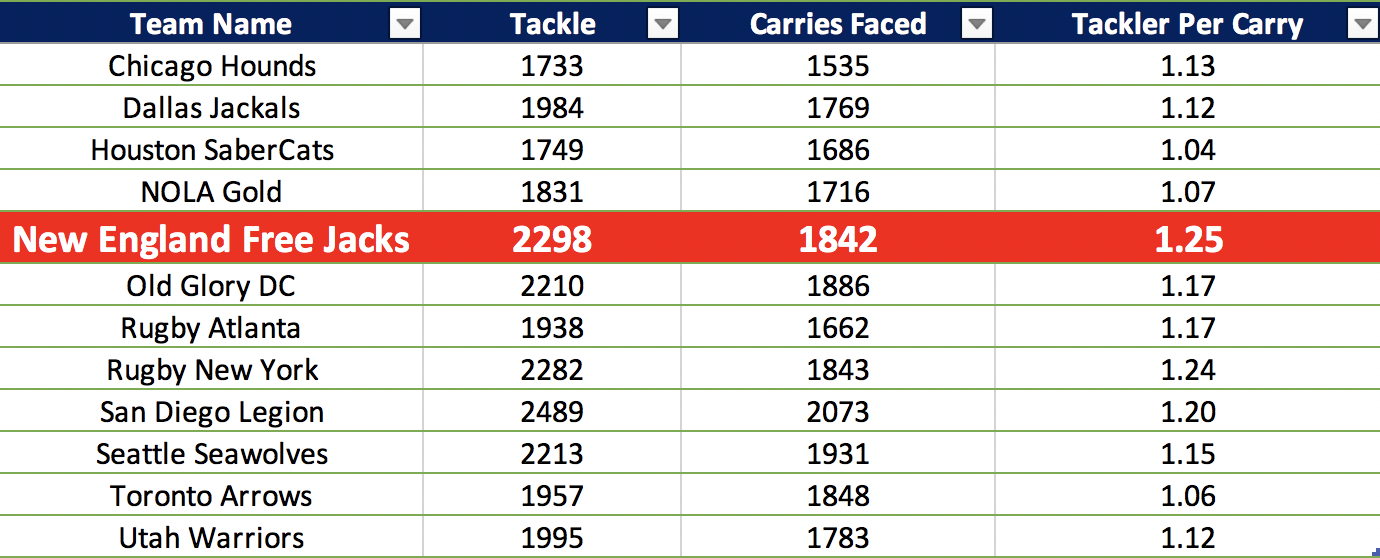
While attack is great, the main driver of New England’s success was a league leading defence. The New England defence was characterised by their use of double tackles. We can see this using data from Oval Insights by looking at the total tackles they make per opposition carry. In the MLR, New England led the way with a ratio of 1.25 tacklers per carry. 

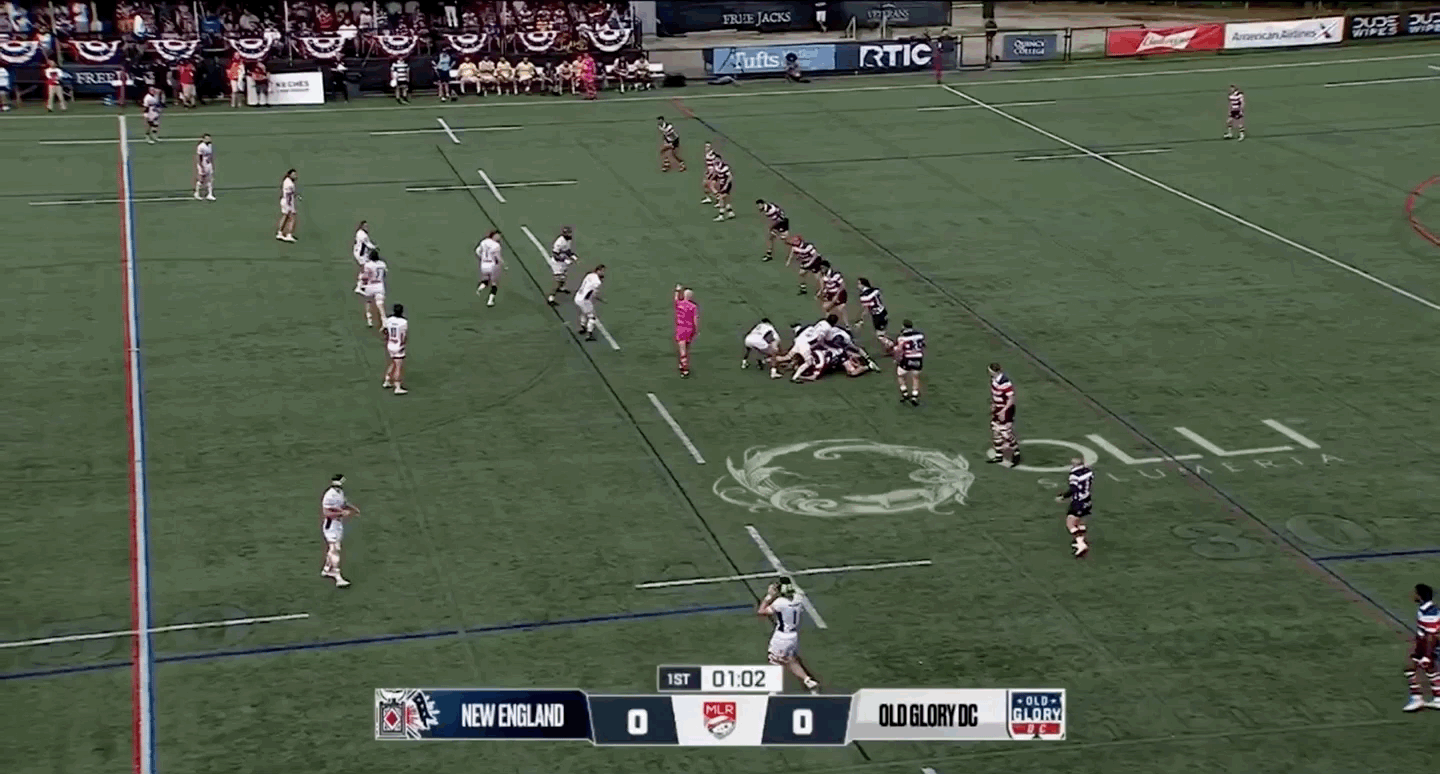
This double tackle system allowed the Free Jacks to really dominate their opponents physically. The second tackle from their semi final against Old Glory DC really set the tone and showed New England’s defensive DNA.

Line Speed and Double Tackles: The Pillars of New England’s Defence

New England’s defence starts with strong line speed pressing hard off the line to close down the Old Glory attack. Both tacklers hit high on the body but still win the shoulder battle against the ball carrier. When they first make contact they are able to absorb the force but remain on their feet and then drive through to complete the tackle.

The follow up phase is no different from New England. The Free Jacks set their width well and they look to pressure the attacking players. The initial pressure is square off the line meaning the defence takes as much ground as possible on the attack before a strong double tackle stops any forward momentum. All this results in another phase for Old Glory which finishes behind the gainline. 

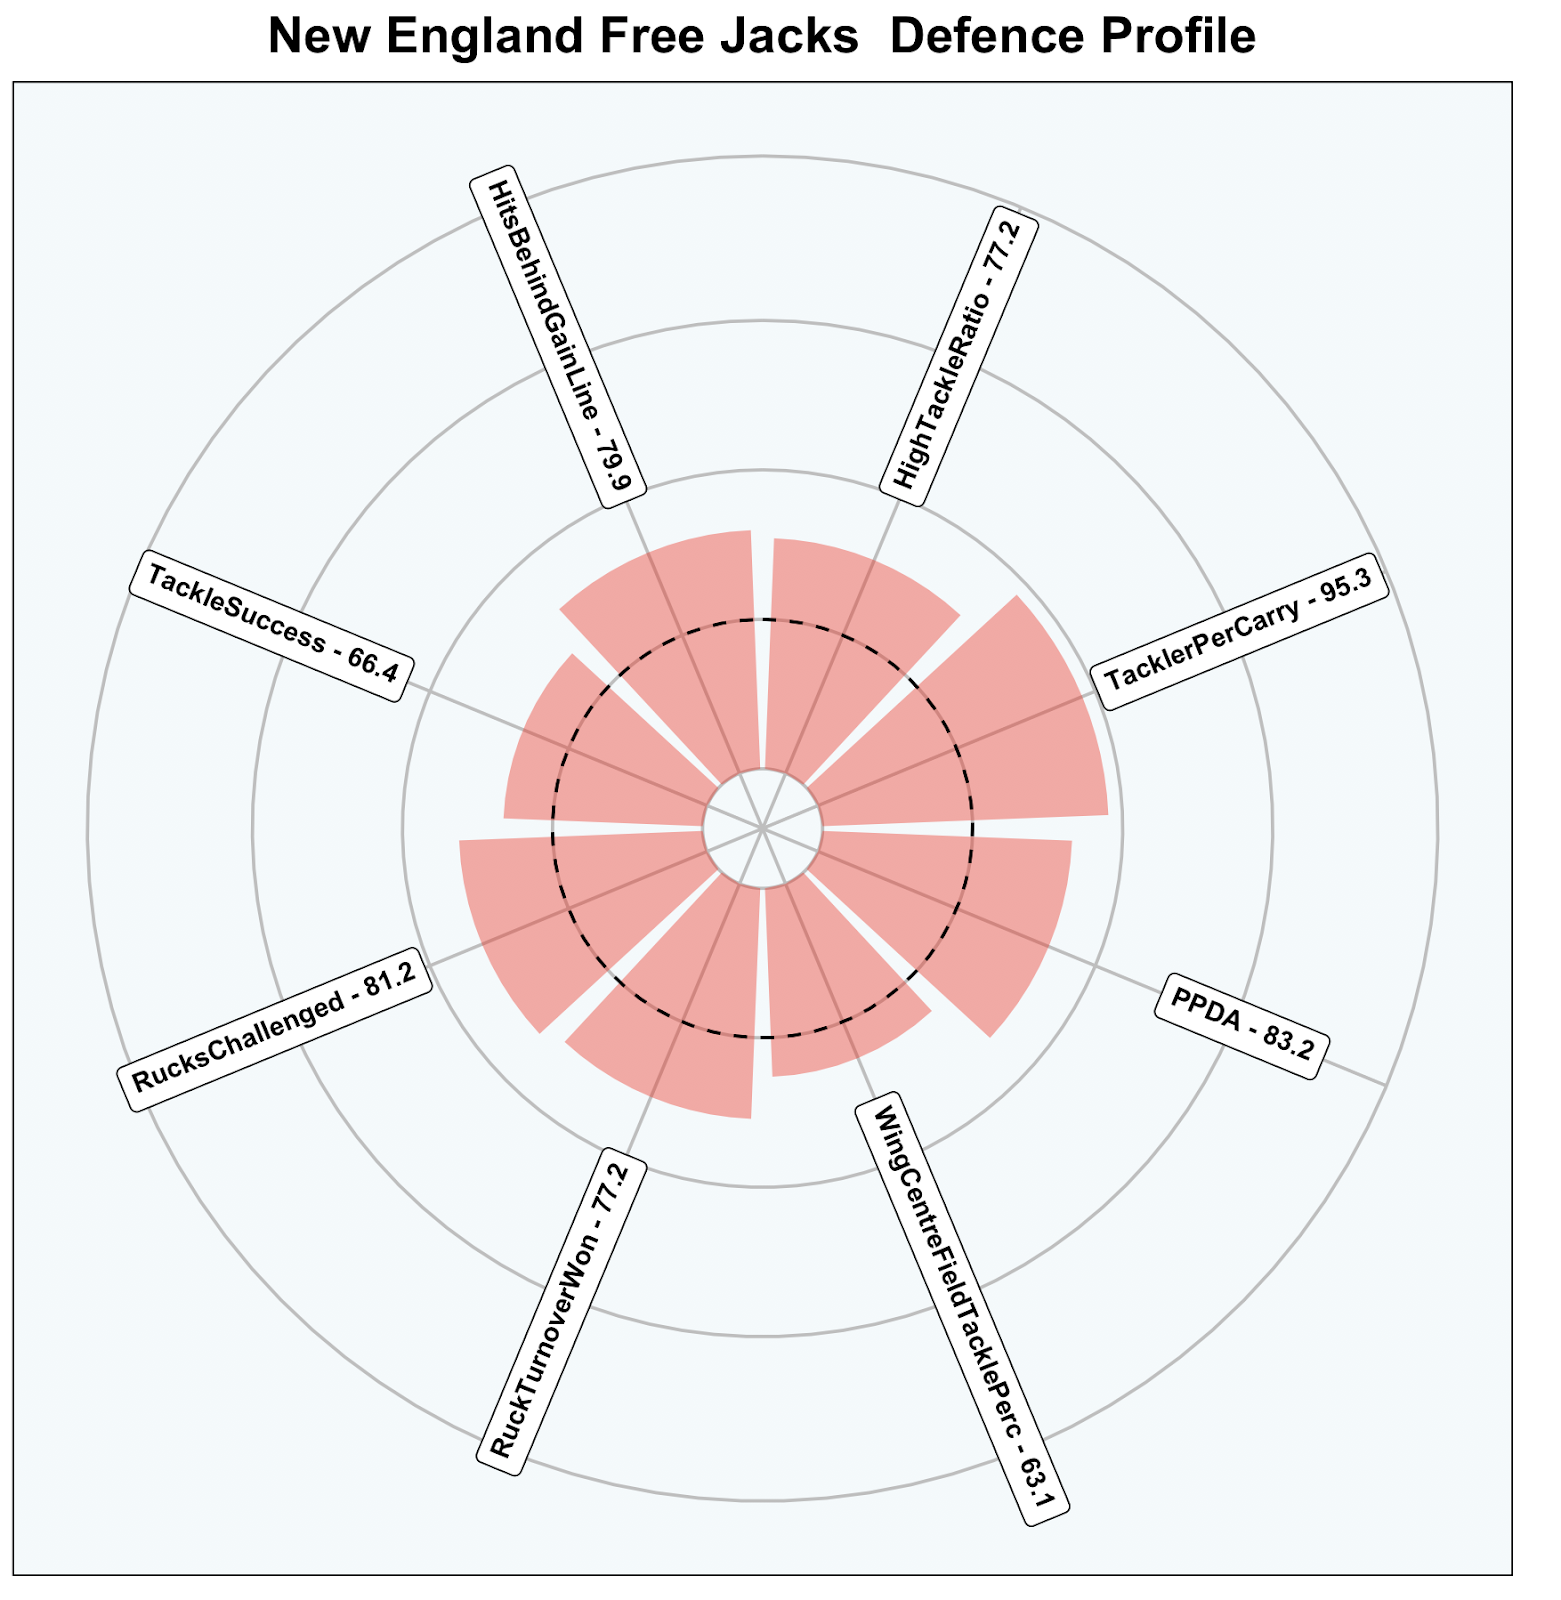
This impressive line speed is shown in the Free Jacks defensive radar. They were above average for tackles behind the gainline as well as sitting in the top 20% of sides for line speed – measured from Pass Per Defensive Action. It was this constant line speed that set the Free Jacks apart and allowed them to impose themselves on the opposition even when they didn’t have the ball. 

Turnovers: The Final Pillar

The other key part of their defence was their ability to turnover the ball as we saw above the Free Jacks claimed more turnovers than 75% of sides while they also sat in the top 20% for rucks challenged.

This steal against Houston shows how their physicality opened the chance to win turnovers. A strong double tackle stops any momentum for the ball carrier. This also means the two clearing players end up going beyond the ball opening the window for the turnover. 

This turnover against Chicago shows similar skill. A great initial press means that they make the tackle well behind the gain line.  Then a great low tackle means the carrier can’t get his legs pumping through the contact. Semisi Paea shows great skills to control the ball carrier’s fall before then snaffling the ball and winning a turnover. 

Scramble Mode: Free Jacks Defensive Resilience

However sometimes even the best defences are broken and occasionally you need to engage scramble mode. One of the benefits of the New England defence is there super aggressive press means most of the breaks occur outwide. This limits a breaking player’s option and means the cover can work towards a touchline.

Or take this incredible cover tackle from full back Reece Macdonald. The 15 is another Kiwi import for Free Jacks and you can see why they recruited the Bay of Plenty player as he makes a wonderful last ditch tackle.

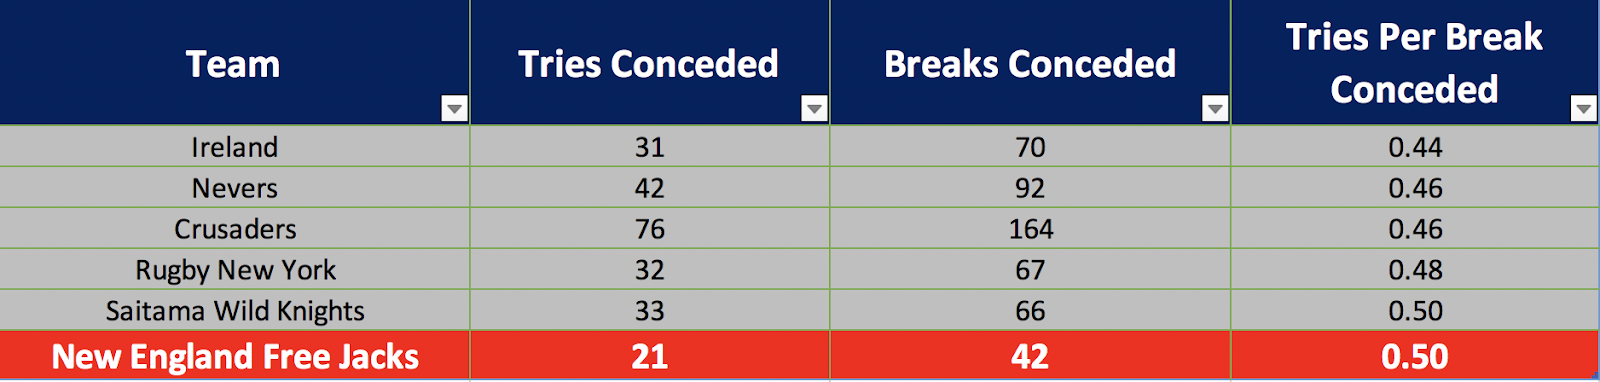
By limiting the amount of the breaks they conceded down the centre of the field alongside amazing defensive efforts meant that New England maintained a low tries per break ratio. Their tally of 0.5 tries per break was beaten by the Rugby New York Iron Workers yet conceded 20 fewer breaks. However their scramble can be appreciated even more in a global sense as they sat joint 5th overall.

Unleashing the Attack: New England’s Offensive Prowess

However while defence was the main driver of New England’s success it is only half of the game. The side from Quincy also brought an incredible attack which looked to spread the ball and led to the Free Jacks scoring 606 points, a total only beaten by the 610 points from San Diego Legion.

First Phase Mastery: Unravelling Opponents with Precision

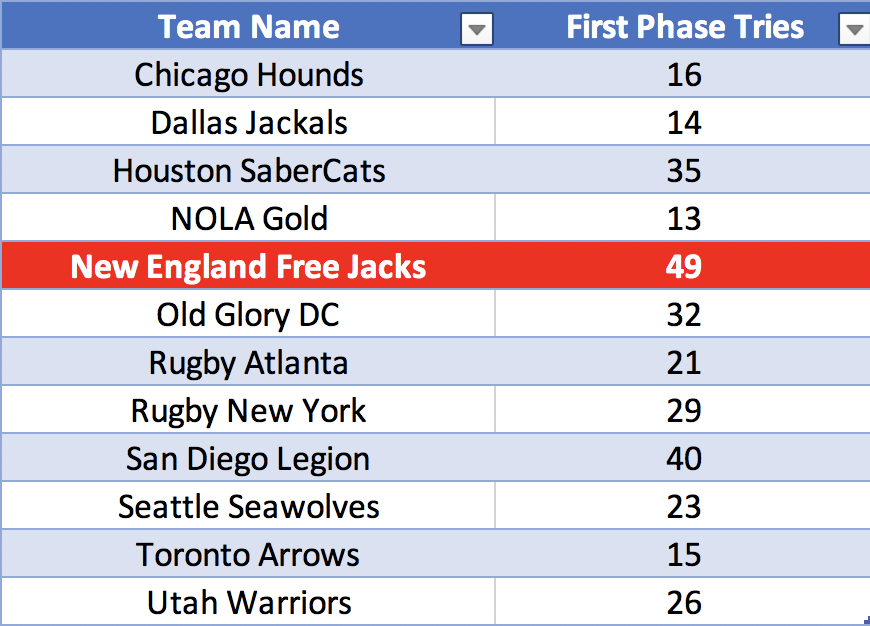
This dominant attack was underpinned by an ability to score first phase tries. The Free Jacks scored 49 first phase tries across MLR 2023, 9 more than second best San Diego Legion and over 3x as many as the lowest side NOLA Gold.

Take this try from their game versus Toronto Arrows. It starts from a lineout just inside their own half and Scott Mathie’s team look to spread the ball immediately. The play is built off having multiple layers to fix the defence.

The first layer is built around Fly Half Potroz. The New Zealand born Potroroz has an option both on his outside and inside which helps pin the initial defenders. He gives the pass early to his third, pull back, option.  This allows Le Roux Malan to  square his opposite number before unleashing the second pod.

The second pod has the same set up as the first. This play is designed to fix the widest Toronto defender. The final pull back option (pink) is able to drift out on the pass meaning Le Sage is able to evade the final defender. The end result is a superb try which helped show the dominance of New England.

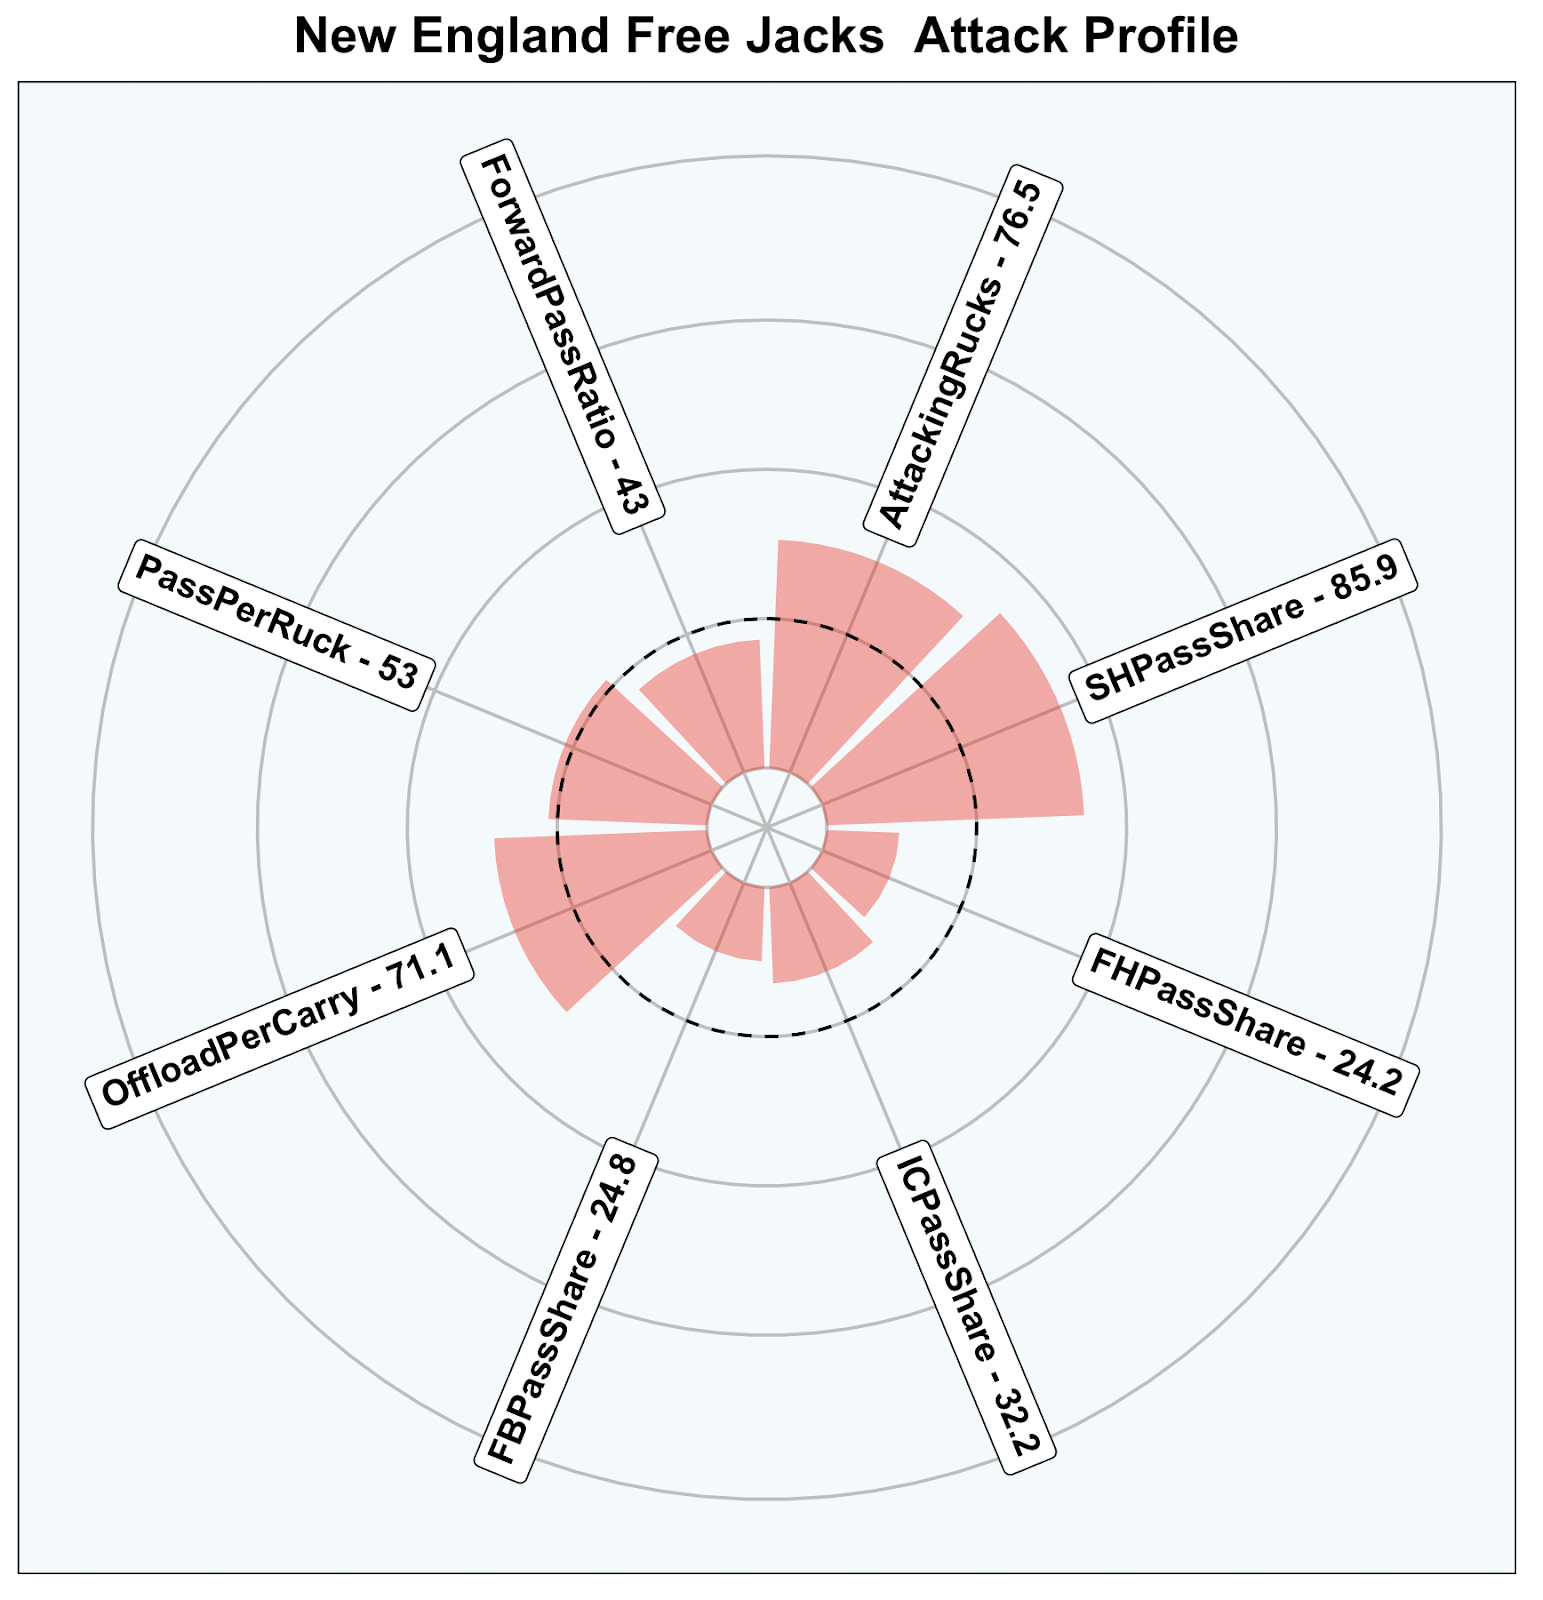
Using Oval Insights data we can also look at how New England looked to attack sides. For starters we can see how reliant they are on their scrum half as the driver of their attack, with the 9 making a higher share of passes than 85% of professional scrum halves in world rugby.

Kick Return Brilliance: Transitioning with Speed and Precision

One other key part of the Free Jacks attack is their ability on transition and particularly kick return. On kick return they were often able to beat first up defenders and get back on the front foot allowing less time to recover for the opposition.

Take this clip from the final, Jason Potroz receives the ball right on the touchline. Normally this is a difficult place to escape but the Fly Half attacks into centre field and beats a defender. The Kiwi is then able to free his hands and offload. The momentum is clearly with the Free Jacks forcing Ma’a Nonu to kill the ball. The resulting penalty extends the Free Jacks lead to 6 points.

This example from the early season match versus Old Glory DC is also a great example of how they identified the space on kick return.

Reece MacDonald collects the bouncing ball and heads in midfield on return. This gives a chance for Free Jack players to regroup after a hectic few seconds.

The carry also has the added benefit of splitting the field which adds stress to the Old Glory defence. The Old Glory defence also doesn’t do a good job of re-aligning following the carry with just 4 players covering the blindside.

Potroz notices this and swings round from the left hand side to collect a pull back play from the New England forward pod. You’ll notice the pod doesn’t attack with the ball instead just pivoting, however it doesn;t matter as Old Glory over press the ball and Potroz’s run creates a four on two outwide. Potroz makes sure to engage the defence and passes the ball to free the outside attackers.

The chance is finished off well by New England though they need a little luck with a couple of players getting tangled which removes the drift defence. The finish once they make the initial break down the tramlines is superb. The show and go by Wian Conradie means that he can attack the inside shoulder. The number 8 then floats a ball inside to beat the full back to a hard working John Poland who gets a second touch and dots the ball down. A terrific transition try.

A Deserved Triumph: New England’s Journey to the MLR Shield

New England’s title exploits were built on a strong defence first and foremost. Their charge to the top defence in the MLR was built primarily on physicality in the tackle. To achieve this they tried to use double tackles aiming to out muscle and drive back the opposition ball carrier. Their stellar attack was built off an incredible first phase launch which delivered 49 tries. The attack was boosted by their ability on transition from kick return. The Free Jacks were a formidable outfit and they received a deserved first title. Given the strong foundations they have put in place this year they could become the second side to successfully defend the MLR Shield.

New Zealand’s Strategy to Shock the World in 2023

New Zealand will enter the 2023 World Cup in an unfamiliar position. At every edition of the World Cup since 2007 the Kiwis have been world number 1. This time however they will be underdogs in France. They haven’t reached the heights of previous years but still possess a world leading attack as well as being superb on both sides of the driving maul. So today we dig deep into how New Zealand will look to shock the World.

Attacking the All Black Way

When we are examining a team’s attack we can use their pass data to see each team’s playmakers. Looking at the New Zealand attack radar below we can see how their use of the Full back stands out against the rest of professional rugby. The main advantage of this second playmaker system for the Kiwis is their ability to split the field and threaten both sides of the breakdown.

A strong blindside attack has proved a key for New Zealand over recent years, take this clip from their game v Japan. A hit up from Caleb Clarke on kick return splits the field and gives New Zealand a large blindside to work with. The play is sluggish and results in a turnover but shows the intent to reload quickly and have a two sided attack.

It was no different against the Pumas last weekend. The clip below shows how work rate underpinned their blindside attack with a cluster of blackshirts reloading to stretch to the Argentina defence. The pass from Smith is crisp for Beauden Barrett who then fires a flat pass direct to Narawa. Narawa beats the first tackler putting New Zealand on the front foot.

Their short side attack was also key for the 3rd try last weekend. Jordie Barret, Caleb Clarke and Beauden Barrett all reload to the short side and hold their width. Some quick hands and they are away with the three players then all flooding through post-break meaning that Jordie Barrett can run it over the white wash.

Their blindside attack enabled the All Blacks to change their point of attack. This ability to strike across the field was also underpinned by a strong cross kick game. The All Blacks make 1.11 cross kicks per game, the most in Tier 1 rugby.

Take for example this from their game versus Scotland last Autumn. The All Blacks are rampaging having made a break down the left wing. Scotland give away a penalty at the ruck trying to stop their momentum but this doesn’t stop a lovely score. 

The set up for the kick is slightly disjointed with the Kiwis hitting a forward pod first before Jordie Barret finally gets the ball in his hands. Barret turns immediately to find Telea and pointing his hips towards the target kicks a low kick into the expanse of the Scotland backfield for their second try.

Or take this example against England off a scrum launch in the first 10 minutes. The Kiwis have clearly identified that England use a narrow defensive press on the first phase. To expose this Caleb Clarke has kept his width hugging the touchline. This allows the winger to attack the catch zone from out to in and take the ball two handed before setting off on a mazy run which takes play into the England 22.

But the cross field kick wasn’t solely an attacking weapon with the All Blacks also using it as a more aggressive exit option. This example versus Japan shows how they looked to play to their strengths and create aerial competitions on their exit. 

Mastering the Driving Maul

A lot of the strengths we have covered so far look at the All Blacks back line but a lot of their strength revolves around their forward pack and especially their driving maul. No other side within Tier 1 rugby is better at scoring tries directly from mauls within 10m of the Opposition line.

So how did the All Blacks build this devastating weapon?

A big part of this dominance was achieved by double stacking. The idea is to slide a lifter behind the jumper protecting the ball from the defence. Stacking also boosts the stability of the maul before supporting the jumper before the team begins their drive. The tactic exploits a grey area in rugby, where if there is access to the jumper as he lands then it is legal otherwise sides can be penalised for obstruction.

This example from their game against Wales shows New Zealand’s intent with their double stack. Ardie Savea sliding behind Papalii from the back lifter . The number 8 looking to get his shoulder through the gap and dominate the space in behind jumper. Also note the twist in the All Black lift and how he looks to drop Dalton Papalii behind him. This space is known as in the pocket and is another way that New Zealand look to give their jumper space and time to set. 

We see the same pattern with this try against England.  Scott Barret is the stacker on this occasion with the All Black 6 stepping behind Brodie Retallick to allow the pivot. The pivot in a maul is an important weapon as it allows sides to avoid the opposition’s strength. England’s maul defence is a bit disjointed with players hitting at different angles, but New Zealand are able to navigate through with Scott Barrett turning the maul while the remaining All Blacks drive infield. 

Arguably however it was their maul defence which was more impressive with the All Blacks conceding just 2 tries directly from a maul in the last two years, including the one this past weekend. We can see two of the foundations behind this strength in this maul against Australia.

First, the New Zealand team look to bind up with each other (red circle) as if they were in a scrum, this connection helps preserve their strength and means that they are able to direct the power in the same direction. 

Second, they also make early contact with the Australian lifters. This is shown in the zoomed yellow circle, with Brodie Retallick grabbing the front lifter. This binding helps the second row preserve space between himself and the Australian pod allowing him to catapult into the maul. 

We can see the effectiveness of this catapult by looking at Australia 17’s body position. Initially both players try to race to fill the space and get as low as possible. Brodie Retallick wins the race and he is able to drive under Taniela Tupou. This all help prevent the Australian’s getting any momentum and they are forced to play away having made no ground. 

We can see similar tactics against Wales. Again New Zealand bind early between the New Zealand players before the contact. We also see the early binding on the back lifter, and New Zealand are able to win the initial engagement.  Wales do try and spin into the openside but New Zealand are able to pin them in. The actions of 6 Shannon Frizzel are important here with a long bind and strong angle preventing Wales access to the midfield or any go forward.

All Blacks Mission To Shock The World

New Zealand are not near the heights of the 2015 dynasty but despite this it would be folly to write them off from World Cup glory. Their performance against the Springboks on Saturday was a real statement of intent. Since 2019 the All Blacks have the third best win rate, driven by an attack which has scored 32.8 points per game, 3 points better than France who sit second in Tier 1 games. Defensively they sit second best to Ireland’s 16.6 points per game conceding a miserly 19.8 points per game against Tier 1 opponents. All this points to a side who should strike fear into any team they face at RWC 2023.

Inverted Wingers to Wide Play: Eddie Jones’ Wallabies Encounter Bumpy Start To Transition

The Rugby Championship began with a disappointing defeat for the Wallabies as they lost 43-12 against the Springboks. While the defeat will leave a sour taste we began to see the changes that Eddie Jones is looking to make this Australian side his own. Today we examine how Jones’ use of wingers varies from Rennie before looking at where the Australians will need to improve to get their Rugby Championship back on track.

Dave Rennie’s Inverted Wingers

Under Dave Rennie the Wallabies frequently used inverted wingers. This means Australia’s wingers were often used as carriers in midfield. Over the last two years the Wallabies wingers made 46% of their carries between the 15 metre lines. Teams typically defend with tight forwards closer to the breakdown and the Wallabies looked to create speed mismatches by using their wingers in an “I formation” behind their scrum half.

The clip below from Australia’s victory over Wales in the autumn shows this well. Mark Nawaqanitawase positions himself behind scrum half Jake Gordon to hide from the fringe defenders. Gordon then snipes and Nawaqanitawase fades to his outside before taking a pop pass and challenging the line. The speed and agility of the winger sees him beat 3 defenders before riding the tackle and offloading. The ball goes to ground at the end of the play but it’s a good example of how Australia tried to create mismatches with their wingers.

This example from their game versus Ireland is less pre-planned but shows a willingness to attack back towards the fringes of the ruck. A bouncing ball means the Irish defence rush up and Tom Wright beats the first tackler to get to the gain line. An offload to Foley puts the Wallabies on the front foot.

Dave Rennie’s attack also utilised wingers in the pick and go game. Marika Koroibete was a great exponent of this, helping keep defences honest with his pure physicality. Take for example this clip against Argentina with Koroibete making a pick and go before then clearing out a ruck to keep possession for Australia.

This is a trait we may see continued under Eddie Jones, who can forget the games he played with the media around Jack Nowell and the England number 7 shirt. Jones will look to have at least one of his wingers operate as a workhorse. The numbers show the similarity between how Eddie Jones’s England and Australia under Rennie used their wingers. In 2022 England’s wingers made 45% of their carries in the midfield, in the same season Australia made 44% between the tram lines. Opposition fringe defences will certainly have to remain connected to shut down the Wallabies attack.

Australia’s Tight Attack

The fringe attack didn’t just stop at their use of wingers, Australia also represented one of the most 9 driven attacks in professional rugby. Their 9 contributes more passes to the backline than 90% of other sides. 

The play around the fringes became a really key theme of the Rugby World last year, and Australia were able to expose this space frequently. One of the drivers of this was how good Nic White was in motion.

Take this play against France. Nic White scans as he’s approaching the breakdown and is able to explode from the base following good presentation from the carrier. This also allows him to draw an offside penalty while opening a space for the Australian 8 to dent the French line. 

This score (though it was ruled out) against Ireland is another good example of their fringe attack. The move has similar design to the one above versus France. Both come from Australia switching direction to attack against the grain. Against Ireland a wide pass from White to James slipper has stressed the Irish fold. This results in Andrew Porter being left defending far too much space. White spots this and darts to the left. Hooper has set himself in the “I Formation” we discussed earlier while Mark Nawaqanitawase is an option to Nic White’s left. This means Ireland are defending a 3 on 2. White’s wide arc puts him directly in the gap between Porter and  McCloskey and neither is able to stop the scrum half getting over the line.

Under Eddie Jones we are likely to see a shift from this 9 driven attack. The scrum half made 63% of England’s play maker passes compared to Australia’s 74% in 2022. The development of the Australian attack will be key for any smash and grab attempt at RWC 2027.

Merging the Two

Australia began their transformation against the Springboks with their scrum half  making 64% of their playmaking passes almost identical to Eddie’s England. It did come off a turnover ball, but the first try from Marike Korobette showed their desire to spread the ball. Two quick passes taking play from one touchline to the other, and beating the South African press to score in the corner. 

In phase play we saw the Wallabies use multi-layered plays to try and create mismatches outwide. These involve two or more options with a hard runner trying to fix the inside defence and a pull back option offering the width.

This phase shows the space they were trying to attack Saturday. Quade Cooper engages defence before snapping the ball behind for Marike Korobette but rather than carrying the winger floats one to right winger Vunivalu. They do find the edge and are able to play around the South African press on this occasion. But it was a picture that was few and far between for Australia on Saturday..

The South African Strangle: Why the Wallabies Struggled

 Australia were unable to impose themselves on Saturday and will need to tweak their game plan this weekend, maybe consider using their winger closer to the fringes as we saw under Rennie. This is because they lacked a physical punch and South Africa were able to dominate the gainline. The pivot away from their tight fringe attack to the wide game plan Eddie Jones is going to be a difficult transition but merging both weapons could well help them move forward.

However their biggest problem was not the merging of two styles of play but that they couldn’t impose themselves on the game across the full 80 minutes. The graph below shows the field tilt, or territorial dominance of each side with South Africa in blue and Australia in red. The blue dashed line shows the average field tilt for both teams. 

South Africa were able to strangle the Australians and prevent them gaining a foothold. Australia had an average field tilt of 49.73, meaning the average position of rucks was within their own half. While the South Africans field tilt was 73 so they attacked for the majority of the game from just outside the Australian 22. And apart from one small period they were anchored in the Australian half.

Eddie Jones will have a lot to tweak this week before the Argentina game but it will have to start with establishing a firm foothold and applying territorial pressure. Argentina will have no rollovers in this regard with a strong kicking game. However it will be an important challenge in Eddie’s first game in front of his home fans. 

Assessing Australia

Last weekend proved a rude awakening for Australia, there’s not much sugar coating for a 43 to 12 defeat. Part of the reason behind this is the new expansive manner of playing that Australia are transitioning to after the inverted wing and tight play of the Dave Rennie regime. Having this style of play in the back pocket will be good for Eddie moving forward though he’ll certainly be looking to stretch teams as Australia did for their first try this weekend. This will rely on more physicality in their carrying game with South Africa’s starting tight five making 44 metres from their carries over 2.5x more than their Australian counterparts. Patience is key and it is important to remember we are still at the bedding in stage for Eddie Jones but he will certainly be demanding improvement from his Wallabies as he looks for a first victory against Argentina.

Springbok Back Three: Key For Rugby Championship Success

The Rugby Championship returns this weekend and with a World Cup around the corner it forms a crucial stage of preparations. The current World Champion Springboks are playing host to the Wallabies as they begin their international year. Let’s look at how they have played and what we can expect come Saturday.

Playmaking Full Back Key To Wide Attack

Few players captured the imagination of the rugby public at RWC 2019 like Cheslin Kolbe and Makazole Mapimpi. The two Springbok wingers offered work rate, calm under the high ball and an ability to beat players with ease in the wide channels. And it’s in these wide channels that we start. The heat map below shows every carry made by a South African winger, removing kick returns, since 2021, and it paints a clear picture. Jacques Nienaber’s wingers stay in the wide channels rarely venturing inside the 15m.

Within international rugby most sides have their wingers average more than 40% of carries happen between the 15m lines, as teams look to create speed mismatches. The Springboks however differed significantly from this with 80% of their carries happening in the wide channel (between the 15m line and touchline) as they look to use their pace to create breaks out wide.The graph below really emphasises the difference, with no other international side carrying more than 67% of their ball in the wide channel.

So why do the Springboks use their wingers like this? Certainly some of it is driven by their personnel, of the top five wingers for breaks per carry in the wide channel two, Cheslin Kolbe and Kurt Lee-Ardense, play for South Africa while Makazole Mapimpi sits 6th. All helping South Africans create the third most breaks per carry in the wide channel, and second most metres per carry out wide.

But the South African wingers only form part of their back three, with perhaps the crucial Springbok wearing the 15 jersey. For South Africa, those wearing the Full Back operate as a key second play maker. One of the best ways to see this is by looking at their pass contribution, the amount of passes they make divided by the total passes of the back line. 

The graph below shows how much of a role the 15 plays in the Springbok attack. The South African 15 makes over 30% of the backline passes.

Willie Le Roux is a great asset in this regard, adding extra width to the South African attack and helping them find the space outwide. Willie Le Roux has created 18 line breaks from his passing since 2021 a total only beaten by Finn Russell. If we adjust to a per game total, Le Roux slides into fourth place out of a total of 376 players, not a bad return.

Having looked at the data, what does this look like on the pitch? The carry below from Makazole Mapimpi is a great example. Playing from edge to edge, South Africa use Willie Le Roux as a second playmaker. The Full Back does a fantastic job to attract Will Jordan before releasing Mapimpi. This allows the winger to make big gains down the edge.

The play does result in a breakdown steal for the Kiwis with Ioane doing really well to cover across but is still a great example of how South Africa looked to stretch their opponents. 

This score from Australia is a great example of how South Africa were able to expose narrow defences.

South Africa made a great break on the previous phase and spread the ball against a disjointed defence with Mapimipi receiving the ball just inside the Australia 22 from Le Roux and scoring well in the corner. However it’s the role of Le Roux here that is all important who shows great subtlety to outflank the Wallaby defence.

In the graphic below we see how the edge of the Australian defensive line is incredibly narrow. The winger, has also pressed ahead of the main line and is incredibly focussed on the ball. This allows Willie Le Roux to fade outside and flank the defender. This creates a South African 2v1 in the 15m channel and even though Marika Korebete nearly makes it across, Mapimpi finishes the chance well. But the try all comes from the subtlety of Le Roux’s outside arc.

So what have we learnt about the Springbok Back Three? Firstly they leave their wingers incredibly wide and prefer to use them to stretch sides and occupy the 15m channel, while their Full Back operates as a second playmaker. It’s certainly a system which suits the Springboks – and the pace they have outwide as well as maximising Willie Le Roux’s talents with the ball and his distribution. If the Springboks are to deliver a second world cup on the bounce they will need the connection of their back three to fire on all cylinders.

Risk and Reward: The Springbok Defence

The most vaunted aspect of this Springbok side however is their defence. It was the primary weapon as they strangled and suffocated opposition en route to the world cup title 4 years ago. So what is the profile of the Jacques Nienaber system?

There are two very clear focusses for the Springboks – they are heavily reliant on their outside press and then when they make the tackle look to disrupt the breakdown. This outside press is something I explored in a deep dive into the Crusaders and the mechanics are similar for the Springboks. This outside press is shown by how often their wingers and centres to get high even going beyond the ball to try and force the opposition inside. 

This clip from their game versus the All Blacks is a great example of how they want to defend.  From a midfield ruck the Springboks on the outside look to get high, and narrow on their press. Mapimpi, the winger tracks down the 15m line and accelerates as the pass goes to Reiko Ioane forcing the step back inside.

This outside press is high risk, high reward and does leave them vulnerable. This clip from their trip to Argentina shows how the Springboks mitigate this risk. The defence relies on the inside defenders to slide under the aggressive outside press.  Doing this means even if the opposition beat the press and can get the ball outwide the Springboks are able to minimise their losses.

The second element of their defence is the focus on the breakdown. A big influence on this was their prioritising of the second action. Take this clip from their match versus the Kiwis last year. The Springboks make the tackle on first phase on the gain line. But rather than settle for that Damien De Allende and Kwagga Smith immediately disrupt the breakdown. The counter drive is superb and the Springboks secure possession. 

Summing up the Springboks

With the Rugby Championship starting this weekend the Springboks will look to hit the ground running. Crucial for that will be getting their attack to the next level and consistently firing. The Springboks have only scored the most points in the Rugby Championship once in the last 4 years and they went on to win the World Cup in Japan later that year. Crucial to their attacking success will be Willie Le Roux and the link up play he offers. If Australia can’t contain him this Saturday they could be in for a long day. On the other side of the ball expect South Africa to bring their high risk high reward defence. The trust and work rate in their system is something to be marvelled at and could propel them to a second World Cup in a row later this year. 

Deconstructing Dominance: Analysing the Crusaders’ 7th Title Triumph

The Crusaders are the standard setter in Southern Hemisphere rugby having underlined this status with a 7th Super Rugby title in a row. Today we dive into the building blocks behind their triumph. First we look at how they use forwards in their attack before focussing on their ability to change the point of attack. Afterwards we turn our focus to their kicking game, before examining their defence which conceded 36 tries across the competition – the fewest in Super Rugby Pacific. 

Stretch And Speed: Crusaders Attacking Mindset

The Crusaders had the fourth best attack in Super Rugby before the playoffs recording 32.6 points per game. The basis of this attack was their ability to stretch teams the Crusaders made more passes per ruck than 95% of top level professional teams. 

One of the driving forces behind this wide attack was the ability of their forwards with ball in hand. What is noticeable is that most Super Rugby sides have their forwards pass more per carry than average. Given this it’s no surprise the Crusaders sit in the top 20% globally. 

Dynamic Forward Attack

The use of forwards helped to maintain the flow of their attacks, for example in the build up to their 8th minute try versus the Waratahs. 

Having played outwide the Crusaders look to spread their attack. The first pass goes to Richie Mo’Unga who then hits Sam Whitelock in the middle of a forward pod. The set up isn’t perfect but Whitelock is able to attract the Waratahs press before pulling the ball behind allowing Fergus Burke time to make the wide pass.

From the touch line the Crusaders then strike into the midfield. Having crossed the gainline ont the previous phase Sam Whitelock is able to move onto the ball against a Waratahs defence on the backfoot. The second rower’s tip pass allows a half break and keeps the Crusaders moving forward.

The scoring phase, a little later in the attack, shows how strong the Crusaders are when they have momentum. They strike off the left edge, with scrum half Mitchell Drummond hitting Cullen Grace. A great line from Fergus Burke means he appears unsighted. 

Burke then passes to Sam Whitelock, allowing the lock showing his class. The 143 cap All Black breaks the first tackle before offloading to blindside Lio-Willie. The number 6 accelerates through and one final offload sees the Crusaders open their account.

The use of offloading particularly among the forwards really helped the Crusaders pick teams apart. It allowed them to keep the pace in the attack and alongside tip passes also meant they could find soft shoulders enabling them to build momentum by winning the gain line battle.

Swing To Win: Maximising the Second Play Maker

Another key factor behind this try is the Crusader’s use of secondary playmakers. Both their Full Back and Inside centres sit above average on their passing contribution. The use of a second playmaker was also key in enabling their swing attacks.

This swing attack was particularly effective against the Blues during the Semi Final. 

The 11th minute try comes directly from the work rate of Will Jordan. Initially the full back positions himself on the blindside but noticing the change of direction Jordan loops around to be behind Richie Mo’Unga. The impact of this late appearance is clear as the Blues Winger shoots out of the line to tackle the wrong man allowing Jordan to break through. 

Using the overhead angle we can see how the Crusaders change the point of attack which shocks the Blues defence. Mo’unga hits up a forward pod just outside the right hand post. The fly half then positions himself behind the ruck before switching to attack against the grain. Will Jordan notices this change and runs a very flat arc, hiding behind the forward pod, to get become an option outside Mo’unga. 

Later in the game we see how Mo’Unga takes advantage of a mismatch against a prop to break through. Again the Fly Half starts directly behind the ruck, before moving to launch the attack The swing is well timed with Drummond hitting Mo’Unga early to keep the element of surprise. This allows the 10 to receive the ball in motion and isolate the prop before stepping back on the inside and creating the line break. 

So as we round this section to an end, what can you steal from the Crusaders attack to make your attack more effective. Firstly their ability with the ball in hand. Having 15 players comfortable with the ball allows them to stay fluid in attack. Second, their use of the swing attack and especially the starting position of the Fly Half allows the Crusaders to change the point of attack with ease. This coupled with excellent individual play and skill allowed the Crusaders to be one of the leading attacks in Super Rugby.

Kick To Victory

The Crusaders also had an incredibly strong kicking which helped lay the foundations for their attack. The main driver of this kicking game was control, a trait they showed to great effect against Fijian Drua in the Quarter Finals.

We can use a metric called Field Tilt to show a team’s control. In the quarter final game we can see that the Crusaders Field tilt dropped below 50 just once, while their opponent had just 5 small periods which scraped across the halfway line. A truly dominant display.

So let’s look at how the Crusaders used this kicking game to apply pressure and strangle sides out of the game. One of the main driving forces was simply the quantity of kicks that the Crusaders made with more kicks per game than any other Super Rugby side. While kicking is not a silver bullet the Crusaders add another piece of evidence that it is often the foundation of a title winning side.

This kick versus the Drua though is a good indicator of one way they looked to apply pressure. Starting from a centre field scrum the Crusaders spread the ball and then kicked down the tramlines. The Drua are unable to gather the ball and the Crusaders start an attack less than 10 metres out from the try line.

Kicking down the tramlines was an important part of the Crusaders building pressure on the opposition. This example from their game versus the Brumbies doesn’t result in a turnover but shows a willingness to kick once they enter the 15m.

They also used kicks to move down the field during transition. This from the 1st minute from the Semi Finals demolition of the Blues is a great example. The Crusaders kicking down the tramlines and win a 50/22. 

The strength of the Crusaders kicking game is that it applied pressure and often created a chance to win turnovers. This is backed up in the Oval data with the Crusaders retaining the most kicks of any side in Super Rugby. 

Controlled Aggression: Crusaders Defence

The saying “Defence wins championships” has become a common phrase in sports, and the Crusaders demonstrated how defence can lead teams to glory, even in the high-scoring world of Super Rugby. Under the guidance of Scott Robertson, the Crusaders proved their defensive prowess by allowing a meagre 36 tries, the lowest in the entire competition. Their outstanding defence was built upon a foundation of aggression, with their wingers and breakdown threats playing crucial roles in stifling the opposition’s attacks.

The radar shows this aggression. The Crusaders challenged more rucks than over 94% of teams, while recording more turnovers than any side in Rugby’s top professional leagues. Their wingers also made more centrefield tackles than 90% of teams, an aggressive trait that helped the Crusaders rank in the top 20% for tackles behind the gain line.

One of the main traits in the Crusaders defence is how high their wingers get. A trait that is also synonymous with the Springboks and their run to world cup glory. By allowing their wingers to get higher defensively the Crusaders looked to impose themselves on the opposition. But what does this aggression look like on the field?

The Crusaders are defending here following a kick chase and set up narrowly. The winger (red circle) sits outside of the 15m ready to angle in on the Waratahs playmaker (yellow circle). By targeting the playmaker the winger aims to shut down the attack and prevent them utilising their numerical advantage.

This aggression is rewarded with the winger making the tackle behind the gainline allowing his teammates to attack the breakdown and win the penalty.

We can see the mechanics of the defence better  by looking at a play from the Final v The Chiefs. The Chiefs, shown in Orange, are set up with pod options before and after 10. The second pod will see the Number 11 loop out the back.

To defend this the Crusaders again use their winger aggressively. Starting well inside of the 15m line, Fainga’anuku looks to shut down the attack early. The Crusader’s 11 decision to fly early places the emphasis on the 6 and 2 to cover the space left behind. These are the catch up defenders and try to prevent any huge gains if the Chiefs are able to play around the pressure. 

In the video of the play we can see this in action. Fainga’anuku flies out the line to apply pressure but is beaten by the ball. This allows us to see the work rate of the catch up defenders who minimise the ground gained by the Chiefs. 

The catch up defenders are a crucial element of this defensive set up allowing the Crusaders to tilt the risk reward balance in their favour. Using Oval’s data we can see how well the Crusaders minimised risk by calculating Tries Conceded Per Line Break. No other professional side stopped breaks as well as the Crusaders, with a rate of just 0.48 tries per line break conceded.

The other key part of the Crusaders defensive system was their ability to turn over the ball. 

Super Rugby had plenty of sides all looking to target the ruck. The Melbourne Rebels ranked last but still challenged more rucks than 65% of top level professional teams. The Crusaders were a clear part of this trend challenging the fourth most rucks in Super Rugby.

While the targeting of the ruck is clearly a part of Super Rugby’s DNA, the Crusaders were particularly effective. Scott Robertson’s chargers recorded more turnovers per game than any other side in top tier club rugby. 

Defensively the Crusaders looked to choke their opponents out of the game. Whether it was with their wingers restricting access to the wide channels or at the breakdown. The Crusaders brought a great desire to their defence as well, restricting their opponents conversion rate. All this created an incredible defence with the Crusaders conceding the fewest tries in Super Rugby.

A Dominant Dynasty: Summary

The Crusaders’ title-winning journey was forged through a formidable wide attack, enhanced by the exceptional skill level of their forwards. Sam Whitelock’s masterful touches in their try against the Waratahs epitomised the momentum-generating prowess that fuelled their success. Their ability to swing and shift the focus of their attack added another dimension to their already potent offensive arsenal. Their dual playmaker set up helping exploit the gaps in opposing defences. Alongside this they brought a strong kicking game and suffocating defence which applied relentless pressure to their opponents. In the Quarter Final against Fijian Drua, they applied a strangle hold which paved the way to success. While across the season aggressive wingers and ruck pressure system stifled their opponents.

Scott Robertson and the rest of the Crusaders coaching staff have created a legacy in Christchurch that very few professional sports teams can match. The title this year represents a great sign off for one of rugby’s most dominant set-ups.

Kick to the title: A Leicester Story

In the final written piece of this deep dive into Leicester Tigers, we look at the strength of their kicking game.

One of the key parts of any rugby side is their approach to the kicking game. As the modern game has developed controlling territory and “playing in the right areas of the pitch” has become even more important. Today we will take a journey examining Leicester’s own approach, before looking at why kicking is important, and then moving onto Leicester’s specific kicking tactics.

Kick To Win Rugby

The reasons for a high kick game have not always been best explained, with some finding it easier to call it boring and move on. But today we will look deeper. Using my database of 138 pro games covering leagues from the MLR to the Premiership to the International game, we can look at the kicking traits of winning sides.

A summary of kicking data from games including both Leicester Tigers and games which didn’t involve Leicester. Teams clearly kick to win.

Winners (in the non-Leicester Games) averaged 24.29 kicks per game, compared to the losers who recorded just over 21. By kicking more teams can turn the screw and move themselves up the pitch trying to get to areas where they can be most effective with their attacking weapons. This effect was even more marked in Leicester’s game with the Tigers averaging 36 kicks in the games they won but this fell to just 27.5 in the two games they lost. 

This hopefully establishes why teams including Leicester have a high kick approach. However, team’s need also need to be able to kick well and on their way to the title the Tiger’s exhibited kicking skill in droves.

Kick To Pressure

We can divide their approach into two different types of kicking game. Firstly kicking to apply pressure, and secondly, attacking kicks. 

Let’s start with how Tiger’s kicked to apply pressure.

A strong kick chase from the Leicester winger Guy Porter against Northampton Saints in their Premiership Semi Final.

This clip from the semi final against Northampton shows a great example of Tigers kick chase was able to exert significant pressure. The passage started with Tigers stealing a Saints lineout in their own half. Richard Wigglesworth kicks looking to gain territory but off the turnover there is no chance to organise their chase line. This means Tigers rely on their work rate to apply pressure and kill any chance of a counter attack.

Harry Potter makes a huge perfectly timed hit driving back the catcher. After a dominant tackle the remaining chasers get straight to work attacking the breakdown. Driving past rather than for the ball. This counter ruck secures an impressive steal, although Chessum is unable to gather the ball cleanly afterwards.

The following clip from the final against Saracens shows an even better example of their breakdown work post kick. 

Leicester pile the pressure on to Sean Maitland and win the turnover

Here Richard Wigglesworth kicks from the back of a maul, aiming for distance rather than a competition in the air. He manages to kick over the head of Maitland buying extra time for the kick chase.

The wide angle shows how Leicester arranged their kick chase. The length of the kick hits a perfect zone particularly powerful as it forces Sean Maitland to adjust.

The kick distance also enables Tiger’s to organise their chase.

In the still above, we can see a huge gap between those in the 5m channel and Tommy Reffell at the tip of the spear. From this position Tommy Reffell only overtakes one Saracen’s  player instead giving the rest of the chase time to catch up. 

Ollie Chessum makes a good tackle on Maitland who is isolated. He falls just in front of Julian Montoya who pilfers the ball well

Maitland initially shows some good feet to get around Chris Ashton but only runs into a swarm of Leicester Tigers shirts. Ollie Chessum and a recovering Ashton combine to make a double shot, chopping down Maitland right in front of the Puma-cum-Tiger Julian Montoya. The Argentine pouncing immediately to snaffle the ball and make the turnover.

There is a bit of luck in this turnover for Leicester with Saracen’s hard work at the maul spinning it in such a way that both Chessum and Montoya get a head start on their chase. But it is also another clear example of the pressure that Leicester exerted with their kick chase.

Kicks To Attack

In the past two blogs I have examined ways of how sides may tame the Tigers. However in this piece, we will look at something coaches may want to add to their play book as pre season winds down and the real rugby returns. 

During the season Tiger’s developed a range of attacking kicks to apply pressure to opposition defences. Let’s begin with their kicking on the first phase.

One of Leicester’s powerful tools is there ability to compete in the air as shown on the way to one of their tries v Clermont

In this example Leicester Tigers play off the top of a four man lineout. Wigglesworth receives the ball early. The players in the lineout form an NFL-esque screen buying time for Wigglesworth to fire a pass to the Fly Half.

George Ford receives the ball and has time before the defensive line is able to apply pressure. This allows him to place a superb cross field bomb. The kick is aimed towards the right wing at JJ Hanrahn.

Freddie Steward has quickly become a household name in rugby and this is a superb take from the Leicester Full Back. The support and finish by Porter is also supreme

Steward dominates the air, leaping early and turning his back to JJ Hanrahan. This allows him to cut off the Clermont player’s access to the ball. tFollowing the superb take by Steward Leicester flood through in support. Another benefit of their superb work rate that’s been a feature throughout this series. 

Harry Potter shows great awareness to support Steward. Holding his feet, ready for the offload from his Full Back. Steward does really well to release the ball, and Potter can take advantage. He then shows his finishing instinct, swerving the final defender to score.

Another example of Leicester using cross field kicks to attack the space

This try away at Connacht is another great example of their attacking kick repertoire. Freddie Burns takes the ball from Wigglesworth. This gives the Leicester Fly Half time against the flat three press of Connacht. Murimurivalu has held his width, leaving himself acres of space in the 15m channel. It’s a superbly well taken try and is another example of Leicester’s kicking game on the first phase.

George Ford puts a delicate kick over the Exeter Chiefs defence.

In this first phase kick by Tigers away at Sandy park we see a distinct change in strategy. Whilst in the first two clips we have seen the East Midlands side kick wider on this occasion they aim at the posts.

When defending in their own 22, some teams prefer to use a flat line and will typically have just a single player sweeping in behind. This means that the space around the posts can often be unguarded. And while spectacular Henry Slade defence prevents a score, it is an indication of a trend within Leicester’s kicking game.

Another kick into the middle zone behind the front line defence. Leicester’s kcik chase pressure wins the turnover.

On this occasion against Clermont, Leicester kicked following a couple of lateral phases. The kick from Jack Van Poortvliet is aimed into the centre field region dropping short of Clermont’s backfield coverage. This causes the sort of havoc that Leicester will have planned.

Clermont’s defence with a 13-2 has left the space and the kick finds the grass. Morgan Parra chases across to try and gather but can’t make the grab. This leaves a bouncing ball within the Clermont backfield. Leicester are then able to regather and attack inside the Clermont 22. 

Another kick from the Scrum half again angle into the space behind the defensive line leading to a great Leicester try.

For the final example we return to the Leicester Tigers game at Sandy Park. George Ford has only just stumbled back into line having taken some medical treatment so Ben Youngs asserts control. 

Youngs angles his kick towards the posts and splits the Exeter back field yet again. The kick is perfectly directed It bouncing away from Josh Hodge who was working the same way as the attack and has distanced himself from team mate Olly Woodburn. This distance forces Olly Woodburn to race across the backfield and play catch up.

This means all momentum is with Freddie Steward as he chases after the ball. Steward shows awareness to slow down his feet allowing Woodburn to run past. This means he is the first to react and regather the ball. It’s a strong finish from Steward and shows the benefits of attacking kicks being aimed at the posts. 

Summary

The kicking game of the Tigers is simply a masterpiece, playing a key role in returning the Premiership trophy to Welford Road.

First they developed a kicking game based around pressuring their opponents and turning their defence into an attacking weapon. This was built primarily around a strong kick chase, and breakdown pressure. This suited their playing squad perfectly, especially with jackal specialists Julian Montoya and Tommy Reffell.

Secondly, they built a strong repertoire of attacking kicks. Whether it was first phase, or during phase play the Tigers added another level of threat with their attacking kicks. This is a weapon that teams at all levels can look to add to their repertoire ahead of the next season. 

It was a joy to watch a team embrace the kicking game and be so precise in how they used it as a weapon. I for one am certainly looking forward to watching how Tigers develop this skill set further in the coming season. 

Chop, Jackal and Scramble: How Tigers Designed Their Title Winning Defence

Welcome to the second part of this series breaking down Leicester Tigers. Today we take a look at the formidable Leicester Tigers defence. 

The defence built by the superb Kevin Sinfield were the only side to restrict their opponents to below 20 points per game. A superb achievement given some of the attacking talent in the Gallagher Premiership.

Over the following piece we examine how Sinfield used chop tackling to get the best out of his jackal threats, before moving onto their scramble defence which ranks as one of their most impressive traits. Then we will look at how teams may well look to break them down next season. Before all that though it’s time to stop off at the Chop and Jackal.

The Chop and Jackal

The main cornerstone of the Leicester defence was their chop tackle approach. While many teams in the past have looked to apply huge line speed in order to kill attacks, Tigers prioritised targeting the ball on the floor.

The table above summarises how many tackles each team made, the carries they faced. This allows us to see how many players were committed to the tackle. Thanks to Sam Larner for the data.

But what are the nuts and bolts of this strategy? Firstly the Tigers try to avoid over committing players to the tackle. This graphic shows how many players each side committed to each tackle, with Leicester ranking 3rd lowest.

This approach has two main effects: First it allows Leicester to pack their defence, by limiting the players on the floor after each contact, secondly it also allows them to jackal more effectively.

A table summarising the amount of steals each player in the Premiership won last season. Players filtered to the top 5 and must have played at least 1000 minutes. Thanks again to Sam Larner for the data.

Tigers ended the season with 2 of the top 25 players for Steals Per 80 of those players who had over 100 minutes on the pitch. A great sign of their effectiveness over the ball.

An example of Leicester’s single tackle against Leinster

This defensive set against Leinster is very indicative of their approach. We join the attack after Leinster have put the Tigers on the ropes with a few momentum building phases. Despite being on the back foot Tigers manage to cut down the Leinster carrier in the 15m channel.

Leicester show defensive pressure and continue with their single tackle approach.

The tackle on Ronan Kelleher by the Leicester left wing is a simple low tackle, and while Genge gives a helpful pat on the way down Tigers keep 14 men on their feet for the following phase. This gives them a chance to apply the heat as Leinster attack from the touchline. 

The next tackle, made by Callum Green, is a perfect tackle from a Leicester perspective. Green manages to wrap up Lowe, and control how he falls without the need for an assisting tackler. Montoya is then able to threaten the ball and while he doesn’t win a turnover Leicester are now on top.

Leicester work round the corner to continue battling with the Leinster attack. Again they used low chop tacklers and tried to get someone over to slow the ball.

Leinster continue to the same way but the Tigers have done well with their fold. This allows them to go and meet the Leinster attack as the ball is passed from the breakdown. Leinster play through Sexton but a low chop by Guy Porter brings the hard runner to ground. Again this means Tigers have committed just one tackler.

Jasper Wiese gets involved only to guide Doris to his feet before jackalling. This slows down the ball for Leinster, while also giving Guy Porter time to regain his feet. This allows Leinster to push one player wider on the next phase, and that allows them to create more pressure with their defence.

Moroni does well to harry Jamison Gibson park into a mistake here. Leicester then target the ruck and win the ball.

Again Leinster play the same way trying to gain an edge before bouncing back but Tigers are up to the task. A low chop tackle by Moroni on Hugo Keenan is a great piece of defence. Reacting quickly to Keenan attacking his outside shoulder before rebounding to the edge of the line. Chris Ashton also does well here, cutting off the pass to Conan before assisting Moroni and disrupting the Leinster ruck. 

On the following phase Moroni harasses Jamison Gibson-Park, preventing him from throwing a pass and forcing him into a welcoming committee of 3 Tigers defenders. Moroni is again the sole tackler, launching into the scrum half’s ankles, while the rest of the fringe defenders cushion the blow and latch onto the ball

This passage is a great example of the Tiger’s single tackler policy. Prioritising getting the attack to ground before then disrupting and hunting on the floor. However it is not the only string to their bow, in the next section we examine arguably their greatest strength.

Scramble: Tiger’s Rubber Band Defence

A graph showing how many points each side conceded per linebreak against the total linebreaks they conceded. (Min. 2 Games/Club Teams)

The graph above shows this trait perfectly. Leicester conceded slightly more line breaks than other club teams i’ve covered. But crucially they restricted their opponents conversion to significantly below average.

This comes down to a trait I’ve called the rubber band defence. Leicester being very capable of absorbing huge pressure without snapping. This is driven by Tiger’s prioritising the ball carrier’s channel, a strategy which is enhanced by their ability over the ball.

An example of Leicester’s rubber band defence against Clermont

This clip from their match away at Clermont is a perfect example. Clermont sliced through thanks to a superb step from Alivereti Raka. Raka then passes to Fritz Lee, who get tackled just inside the Leicester 22 by Jack van Poortvliet who has shown an incredible work rate.

Following the tackle Leicester swarm the breakdown, Tommy Reffell especially , who locks on to the ball. This buys time for the rest of the defence, who are prepared to defend again before Parra has arrived at the base of the ruck. The Tiger’s flanker however goes one better and remains unmoved by the Clermont cleaners to win the penalty.

Another example of Leicester’s rubber band defence against Leinster.

In their game against Leinster we see similar desire and work rate. Leinster make a break through Hugo Keenan down the left hand side. The Tigers respond by working hard to  cover all of Keenan’s main passing options. Ford makes the tackle but Leinster play away quickly with Ronan Kelleher picking a great line to keep the East Midlands side moving backwards.  However despite being on the back foot Tigers still manage to steal the ball.

The main workings of Leicester Tigers defence was flooding the breakdown immediately after the line break. Here they outnumber Leinster 5 to 2.

This counter punch is enabled by Tigers swarming the tight channels with 6 players forming the defensive line. Leinster on the other hand have just two ready to secure the ball, and play it away. Gibson-Park does get over to form some sort of shield, but the actions of Tommy Reffell make his contributions futile.

The turnover from Reffell is a thing of beauty. The openside first covers nearly 80 metres to make the cover tackle on Kelleher. He then immediately gets back on his feet, and counter rucks against Gibson-Park. This is a huge defensive effort and shows the quality of the Openside. 

Tommy Reffell counter rucks well before making a great tackle on James Lowe and winning the turnover.

The counter ruck itself is maybe not all that effective. But allows Reffell to close the distance on James Lowe as he picks up the ball. This positioning is perfect for Reffel who barely needs a step to lock his arms onto James Lowe and effect a turnover. A great way to cap off such sterling defensive work.

This defensive work epitomised Tigers. The defensive desire and work rate making every opportunity difficult to convert for their opponents.

Breaking Through

As we’ve clearly shown throughout this piece, the Tigers have a supreme defence. However, no defence is unbeatable. Rugby is a game played on a pitch which is 70m wide, which gives plenty of room to stretch and manipulate opposition defences.

Playing to width can help beat the Leicester Tigers defence

In the clip above we see a small chink in the Tigers armour. Having played a phase into midfield Chiefs are presented with an opportunity to just skirt around the Tigers defences. The opportunity arises as Exeter have won the race to fold. Tigers, through Freddie Burns, do well to contain the threat.

This weakness is a necessary evil caused by how their wingers defend. The Leicester Tigers wingers are responsible for holding the width and neutralising any wide attacks. To do this the Leicester Tigers wingers position themselves in between the two edge attackers, leaving space inside them for catch up defenders to fill should the Opposition spread the ball.

Leicester Tigers employed an interesting system with their winger on defence. The wingers looked to split the two edge attackers in order to manage the Leicester defensive width.

This picture is taken from the phase after Harlequins have regathered a box kick. We can see Nadolo beginning to set the width. Harlequins are yet to fold round so he has support close on his inside, but on the second phase (shown below) we see how this system really comes into it’s own.

Leicester are evenly numbered on defence. Nemani Nadolo (numbered 4) splits the widest Harlequins attackers.

Tigers are evenly matched with the opposing Harlequins attack but Nemani Nadolo is still splitting the edge attackers. The idea seemingly to prioritise connection, and allow the catch up defenders (those numbered 2 and 3) to push across and assist if Harlequins attack in the 15m channel.

This system typically works well, helping to push attackers inside as they know Tigers will rarely leave multiple men unguarded on the outside. However, if teams can beat the fold then opportunities arise. This tactic works because it isolates the Leicester wingers in the 15m channels.

Clermont have been going lateral but Alivereti Raka makes a strong carry in the wide channel. This gives them momentum to start their attack.

The clip above is from the phase before Clermont’s first try. Alivereti Raka makes a powerful burst in the outside channel. Getting beyond the gainline and kick starting, a previously lateral, Clermont attack. Now we can see how Clermont go about attacking Leicester in the far 15m channel.

Clermont play wide off the edge. Sebastian Vahaamahina pulls it back late to Camile Lopez who is able to expose a dog leg in the Tigers defence.
The diagram above explains why the dog leg appears. Ellis Genge not expecting the pass from Vahaamahina to give the pass plays a key role.

Playing off the edge, Clermont strike at the Leicester midfield. Tigers try to counter this with strong line speed, but Lopez has held his depth and is able to release a forward into the heart of the Tiger’s defence. The width of Clermont’s attack is helped by the quality of Morgan Parra’s pass. The pass from the base cutting out five Leicester players, with an additional two Tigers on the floor. 

Tigers do make the tackle on Fourcade but are now under stress as they try to fold and keep pace with the Clermont attack. But the French side are able to generate quick ruck ball, clearing Tommy Reffell with ease while their attack fans across the rest of the pitch. 

Clermont win the race to fold. This gives them an opportunity to attack Leicester’s weakness out wide.

The speed of ball creates a five on five, with 60% of the pitch for Clermont to attack. As expected above the Leicester Tigers winger (5) splits the difference on the 15m sitting as close as he dares to the inside defenders. But the speed of the ball beats Leicester’s fold and means that after just two passes, the five on five becomes a three on one with quick passing isolating the Leicester Tigers winger.

Clermont shift the ball well and manage to outflank the Leicester defence. A mix up between the Winger and Full Back allows Clermont to break through in the wide channel.

Clermont have unpicked one of Leicester’s weak points, folding faster and managing to isolate the Leicester Tigers winger. It’s a scenario teams can look to recreate next season, through use of a quick folding attack while hugging the width and executing their passes. If teams can manage this then we can expect them to create opportunities outwide.

Summary

Tigers have built a nearly immaculate defence under Kevin Sinfield’s watchful eye  It is a defence fundamentally built around single man tackles shown by the Tigers committing the 3rd lowest amount of players per tackle. This system also benefited their large array of jackal threats who wreaked havoc and turned the ball over for fun this season. 

The Tigers defence did give up opportunities with sides able to find joy in the 15m channels.  But even though Tigers gave up these chances, they were still able to recover, and kill the attack even if they look beaten. Targeting the pressure point to turnover ball or buy time while they regained their structure. The exploits of the Leicester rubber band defence were a key factor in their title winning exploits.

The Tigers defence is sure to play a key role in any league title challenge next season. With this in mind the steps that Kevin Sinfield takes to future proof his charges will be fascinating. 

The Brutal Attack behind Leicester’s Title Winning Season AND How to beat it

Our story begins with a side languishing second from bottom. At the end of 2019/20 season Leicester were a side who had won just 6 games, and scored under 400 points. To resurrect themselves, in the space of two seasons is an admirable feat. But what exactly is behind the Tigers’ return to glory?

In this piece we will look at the attacking foundations behind their surge to the top. Leicester’s attack was built on three core ideas: winning the physical battle, shape on shape wide attacks, and kicking game which requires its own individual focus. 

Physical Tigers

Leicester Tigers have played their own unique brand of rugby this season. Basing their style around dominating the gainline and winning the physical battle. This begins with their set piece attack.

Nemani Nadolo carrying hard off 10 on first phase. Strong carry beats one Exeter player and makes metres.
A GIF showing Nemani Nadolo being used direct on first phase. A primary attacking weapon for the Tigers.

Leicester loved releasing big carriers directly into midfield. The Tigers threw just 1 or 2 passes over 85% of the time on Lineout first phase attack. And with weapons like Nemani Nadolo it helped provide a solid platform, allowing Leicester to fold quickly around the corner.

They maintained their physical approach during phase play too. The main way they did this was their choice of play maker.

A graph covering the Play Maker balance of teams across the club game. (2 games in database minimum)

What we can see on the above graphic is that Leicester love playing off the Scrum Half. They averaged the third highest % of play off 9 of the sides within my data base. They also played the second lowest percentage of their phases off the Fly Half. This helped reduce the impact of high pressure defences with Leicester aiming to bang the blitz. 

Tigers round the corner attack. A sign of their directness.
Leicester play around the corner using direct carriers off the Scrum Half. This was a key part of the Tiger’s identity last season.

As can be seen in the GIF above, Leicester have a very simple pattern wrapping round the corner. There is certainly nothing revolutionary about the shape of the forward pods used by Leicester. 

However there is an interesting tweak. Leicester have turned the directness up to 11. Where most teams look to move the ball within their pods, Leicester’s forwards prioritise clearing the rucks. This helps generate the quick ball modern teams use for their attacks.

Pod balance across the same club sides as earlier. All based on the forward pods used by teams.

The data backs this up. While Leicester don’t carry the most, the South African sides take this privilege, the lack of tips inside or outside is quite clear. Leicester shifted the ball within their forward pods, the second least of all club teams I have covered for a minimum of two games. 

Tigers Baring Their Teeth

While Leicester’s are more than happy to break the barn door down, they also played some scintillating rugby. Scoring more than 700 points requires more than one method of attack. The main way Tigers varied their attack was through their use of Pull Back passes in order to play shape on shape rugby. 

Example of how Leicester attacked the Corner in opposition defences. Primary tool was shape on shape attack as they looked to spread the ball.

Here we can see an example of Leicester’s wide attack. Typically Leicester have utilised a 3-1 or a 3-2 set up. This describes the alignment of their forwards, with a pod of 3, (dark blue line) and then a second pod outside a ball player. That Leicester are happy to play with a single player in the second pod is a sign of their intentions to spread it wider rather than crash it up. Instead the single man pod is designed to target the corner defender (circled in red).This helps divert their attention inside, leaving space out wide for Leicester to attack.

GIF showing how Leicester used shape on shape attack to out flank the Clermont defence.

This attack eventually peters out, but it does provide a clear example of Leicester’s shape on shape attack. 

This shape on shape attack becomes even more effective when married with the brutal approach we discussed earlier. In their game against Connacht we get a clear picture of Leicester’s attacking DNA.

The Melting Pot

Leicester attack from turnover ball against Connacht in their European game earlier in the season. A great example of Tigers shape on shape attack.

Leicester begin their attack from a turnover just inside their own half, first using a small pick and go from Wells to get them on the front foot. Jasper Wiese then steps into Scrum Half and floats a pass straight to the number 13 Matt Scott. The centre is standing deep behind the pod of 3 we discussed earlier giving himself time to pick his pass.

Scott chooses to throw a long pass to Bryce Heggarty who has time to drift on the pass. This creates a disconnect in the Connacht defence. A small pass from the Heggarty to the charging Dan Kelly then beats the Connacht defence and Leicester scythe through. 

Leicester flood through in support carrying their momentum into the Connacht 22.

Tigers maintain their width as they flow through following Kelly’s break. This passage provides a great example for teams to follow with multiple options for each ball carrier after the initial break. This support play enables Leicester to reach the Connacht 5 metre line.

Strong carry directly off the scrum half keeps Leicester moving forward. Great way to set a platform in the Connacht 22 from which they can continue to build pressure.

Following this break, Leicester releases a flat pod of forwards into the Connacht defence. This forces Connacht to fold and adjust their defensive alignment. The width on the pass from Wigglesworth really helps add to the pressure on the Connacht defence by cutting 4 players on the blindside.

Leicester spread the ball wide to challenge the defence.

Leicester are really on the front foot by this stage. George Ford then utilises his forwards in a 2-2 set up to screen the backline, giving Leicester time to attack Connacht’s widest defenders. They can’t quite make a break but some great footwork by Steward keeps the pressure on.

Following a further carry around the corner by the Leicester backs, the Tigers have reached the touchline.

Leicester look to attack off the touchline with a direct carry.

To bounce back off the touchline they carry with a forward pod a phase. Connacht do well to hold up Wiese in the tackle slowing down the Leicester attack.

Leicester wrap around the corner following their traditional blend of physicality

Recovering from a slow ruck this close to the line can be difficult as the opposition defence can apply extremely high pressure.  To counter this Leicester revert to type as they work hard around the corner. The first carry is as direct as they come. With a near immediate latch. The second carry by Ellis Genge is superb. The Prop uses great footwork pre contact footwork to get a softer shoulder. Rather than angling back towards the previous ruck, the Bristol bound loose head curves out with his carry, allowing him to attract Connacht’s 4th, 5th and 6th defenders to the tackle. This reduces Connacht’s width significantly on the next phase. 

Leicester beat the Connacht fold, some great passing allows them to crash over in the corner via Kini Murimurivalu

The final phase may look simple, but how often have you seen your side spurn an overlap and get bundled into touch. Ford carries to the line, and fires a great pass directly to Steward. Steward then attacks the winger, managing to turn his shoulders inwards. Some solid handling by Steward then sees Murimurivalu down the touch line to score past despite the desperate challenge of Aki.

The marrying of Tiger’s tight and wide attacking in this passage is highly impressive. However Tigers attack is not infallible. In the next section, we will take a look at a small chink in the Tigers armour teams may look to exploit next season.

Beating The Tigers

Every side in rugby has an achilles heel and Leicester no different. For the Tigers this weakness is driven by their pass selection to their Forward pods. As discussed earlier, Leicester rarely shift the ball within their pods, instead prioritising the ruck clear. This is fine, except on occasion Tigers found themselves too flat meaning their inside man was the only option for the pass from the ruck.

Leicester typically used a 3 man pod off the scrum half. However the inside man could get over promoted leading to a weakness in the Leicester Tiger’s attack

In the GIF above we can see this trait of hitting the inside option. On this occasion inside option Julian Montoya has cut off access to the rest of the forward options by getting too flat. This means the Argentine only has clearing options on his outside. This is where the problem stems from. By having the cleaners stuck on one side, a good tackler can manipulate the carrier to present jackal opportunities.

Here Leicester again have an over promoted inside man. Api Ratinyuwara makes a solid hit and forces the carrier to fall inwards.

This clip from the Semi Final fixture with Northampton Saints is a great example of the problems Tigers face when they hit the inside man. Wiese makes a decent effort in carry, trying to run towards the supporting Montoya. However a strong chop from Matavesi and a solid hit from Api Ratinyuwara on the outside forces Wiese to fall inside. This means Wiese falls in a compromised position just in front of Juarno Augustus. The Northampton Number 8 immediately locks onto the ball and makes the steal.

This is a little detail in the larger scheme of Leicester Tigers attack but does show a small chink in their armour. Whether we see Leicester change their shape slightly and prioritise hitting the middle player next season will be interesting. This could also allow additional variation in their attack as they look to reach new heights next year.

 Summary

Tigers built a fearsome attack scoring over 700 points scored last season. Fundamentally it was built on gainline dominance and a strong forward carrying game. They based their attack primarily off their Scrum Halves. However, teams shouldn’t underestimate their ability to strike outwide. Tigers successfully certainly brought a cutting edge to match their brutal tight game. But they aren’t invincible, with their tendency to hit the inside man on their carrying pods presenting an opportunity for opposing jackallers. But Leicester will certainly bring a strong attack next year as they launch their assault to be back to back Champions.

Thanks For Reading. You can subscribe to get future parts of the series straight to your inbox below.

Analysis: How Italy Shocked Wales

Italy provided the shock of the Six Nations beating the Welsh in Cardiff. The Azzurri won their first game in seven years off the back of a new-found pragmatic attack, and their suffocating defence.

The Pragmatic Approach

Italy adopted a more pragmatic approach in the 2022 Six Nations. They were previously a side happy to fling it about anywhere on the field. Everyone loves running rugby but the best sides kick to make sure they play beautiful rugby in the right areas of the field.

A breakdown of kicking across the Six Nations in 2021 and 2022. Italy jumped from 80 kicks in 2021, to 159 kicks in 2022

As shown in the graph above, Italy jumped from just 80 kicks in the 2021 Six Nations to 159 kicks in 2022. This more pragmatic approach allowed them to move up the field, escaping the pressure in their own half and applying it to Wales.

1:31 – Italy kick from a centre field scrum. It places huge pressure on the Welsh backfield.

Take this kick from the second minute by Paolo Garbisi. The centre field scrum has caused problems for the Welsh backfield leaving McNicholl trying to cover half the pitch. This leaves plenty of space for Garbisi to aim for, and with the new 50:22 rules in play, he angles his kick towards the touchline.

Garbisi keeps the kick low, reducing the time McNicholl has to cover the ground. The bounce is lucky, but it allows Ioane to hunt the Welsh Full Back. McNicholl does well to prevent the to reel it in. But Wales are pinned deep in their 22 and have to escape. The passage ends with a Welsh kick to touch, an early shot fired by the Italians.

However it is the kick that followed the Lineout attack that impresses me the most. Italy start with a pretty standard, off the top midfield crash from the lineout. They then play around the corner reaching the 15m line. Nothing spectacular, and they have lost all their momentum by the second tackle.

2:33 – Calum Braley shows great game control with a delicate chip over the Welsh defence

This is where teams can lack nous, and try to overplay. Italy plays one more phase and get caught behind the gain line by the Welsh defence. This well and truly kills the Italian attack. Braley takes one glance and chips a lovely box kick into the Welsh backfield again finding grass. 

While the outcome may not be as dramatic as the first, it is the kick that symbolises a new Italian approach. A side with a more pragmatic, and efficient approach.

Shows a team’s attack completion versus their progression in the Six Nations since 2021. Completion = Attack which doesn’t end with a turnover or error. Progression = An attacks ability to move up the field

The effects of this pragmatism are shown in the data. The only 3 games in which Italy secured above average Attack Completion and Progression were in 2022. Attack completion is a measure of how many attacks a team doesn’t give up a turnover, while progression shows their ability to move up the pitch.

The progression part is key here. Italy boosted by their newfound kicking game began to really move up the field and place other teams under territorial pressure.

Italy combined this desire to move the pitch with a sensible approach to penalty decisions. Unlike the Welsh who chased tries, Italy instead kept the scoreboard ticking over. Of the five penalties they kicked over, four of them were outside the 22. 

This low-risk approach is admirable, you can only imagine how tempting it must have been to chase tries as they started to believe.

55:18 – Capuozzo and Monty Ioane combine for a linebreak in build up to final penalty.

Don’t take this as an attack on teams that prioritise flair, and expansive attacking. The Italians certainly treated us to some fantastic off the cuff attack. Such as the effort above which led to their final 3 point score, the only one in the Welsh 22.

Mixing their pragmatism with this incredible flair and attacking the talent allowed them to tear Wales apart in key moments. While the penalties keep them in touch long enough for these key moments to be more than footnotes.

Attacking the Edge

However, they were not just reliant on magic moments. The Azzurri had success deploying shape on shape attacks when reaching the wide channel. This game however wasn’t a flash in the pan for their edge attack, with the same shapes on show against Scotland.

Italy v Scotland – Italy use an edge shape with a hard runner and out the back option to attack the Scottish edge defence

The Italians use a double-layered attack to attack the Scottish in this second-minute attack. I call the move ‘The Storm’, as it includes players that bring the thunder, carrying hard, and those that offer the lightning, to get outside the defence. 

The Italians use this to attack the channel between Scotland’s 13 and 14l. By having a thunder option the Italians are hoping they can cause one player to bite in and get either a two against one or a physical mismatch to attack back from the touchline on the front foot.

Italy v Scotland – Italy too deep so edge shape is well shut down by Darcy Graham and Chris Harris who remain patient.

The problem here for the Italians is, they begin their shape too deep giving Harris and Graham plenty of time to read the shape and make their decisions. The Scotland pair hold their feet before Italy reveal their plan. This nullifies Italy’s attack and Luke Pearce calls it back for an earlier Scottish offence.

But what relevance does this have to the game in Cardiff? Italy were able to target the Welsh defence effectively, using this shape to make half breaks stress the Welsh defence in trouble.

11 – Italy use a late transforming pod to surprise the Welsh attack. They force a penalty for an off the ball tackle and open their account.

In the GIF above we see a small variation on the Storm shape. Italy start with a 3 man pod before transforming late. The Welsh defence is actually well prepared for the 3 man crash, but the late transformation cause significant problems.

Watch the actions of the two Welsh defenders outside the players who make the tackle. They both accelerate hard as the Italy shape transforms worried about getting outflanked. This leaves Brex running hard at two front-rowers with Garbisi on his outside.

Brex breaks through the first contact. The late transformation is a powerful tool and puts Italy on the front foot. Wales tackle Garbisi off the ball. This is a sign of the stress Italy placed on the Welsh defence and leads to the first points of the game.

Suffocating Italian Defence

However it wasn’t just superb attack that led to Italian victory. Italy also bringing a suffocating defence. The Italian defence definitely benefitted from Welsh mistakes, but the system itself also forced turnovers.

The main component of this suffocating defence was their two-man tackle system. Across the game, Italy made 175 tackles forcing 109 Welsh rucks. The Azzurri committed an average of 1.6 players per ruck. The highest of any side on Super Saturday

26:30/36:50 – Italy used double tackles to great effect shutting down the Welsh attack and winning turnovers.

As these two GIFs show, the Italians had a great effect with their double tackle system. Forcing the Welsh attack backwards and creating slow ball or turnovers.

However, their defensive strategy wasn’t just focused on killing the ball with two man hits. They also used single man chop tackles, particularly close to their line. The only player they didn’t chop near their own line was Alun Wyn-Jones. A sign of how Italy varied their defence based on the Welsh threats. This chop tackle strategy did appear outside the 22, especially when Danillo Fischetti was on the prowl.

14:17 – A low chop tackle by Ignacio Brex allows Danillo Fischetti to lock down on the ball and force a turnover.

The prop was a threat at the breakdown throughout the tournament recording 5 steals. He was particularly dangerous against Wales. The GIF above is a great example. Brex makes a wonderful low chop tackle on Seb Davies. Brex locking the legs and controlling the fall of the Welsh 6. 

Brex delivers him right to Fischetti’s feet. The Italian loose-head immediately locks onto the ball, and the Welsh can’t move him. The resulting penalty moved the Azzurri 6 points in front. A great start on their way to their famous victory.

There are many tales from this particular game. The final try by Carpuzzo will live long in the memory. It was a victory built on a pragmatic approach to the game, mixed with a dose of Italian flair. Italy defended suffocated the Welsh attack. However, their development with the ball and their pragmatic approach stands out to me. Setting the platform for a famous victory.

FORZA AZZURRI

How the Scarlets tamed the Lions

In the second round of the United Rugby Championship, viewers were treated to a clash between the Lions and the Scarlets. A fascinating clash, as the Lions looked to keep their winning record, while the Scarlets looked to bounce back.

The fixture also saw Dwayne Peel return to Llanelli. He has begun to imprint his DNA all over the Scarlets, and their attacking shape. This new style and the variations brought in by Peel will be our main focus today.

Let’s start at the beginning. The Scarlets directed their opening kick-off deep into Lions territory. The Lions return fire, escaping their 22. The Lions kick gets the Scarlets Back Three into the game early. As Jonny McNicholl catches the ball and carves his way to centrefield.

By running into the centre of the Lions defence, Scarlets split the field forcing the Lions to react rather than being in their settled kick-chase formation. The Scarlets on the openside immediately aim to attack and launch their opening salvo.

From the ruck, Scarlets immediately settle into their attacking shape. They start by forming a three-man forward pod that can be hit by Kieran Hardy. We get the first indication of Dwayne Peels style in this image. Hardy has a pod of three to hit, but they are flowing in, rather than being set. The “tip” (outside runner of the pod” is still in behind and running around, yet Hardy is freeing the ball from the ruck. An indicator of the pace Scarlets will use to beat the defence this season. 

Another interesting addition to this set-up is where Fly Half, Sam Costello positions himself. Costello playing flat to the line just off the lead runner of the pod. We will examine the positioning of the Scarlets playmaker in further detail later.

On the following phase, the Scarlets continue to play the same way. Some teams are afraid to play into the 15m, using it as a reference point to reset their attack. There are some good reasons for this, primarily the risk of being driven into touch. However, Scarlets use this space to overload and stress the Lions defence.

The Scarlets attack in the 15m channel reaps immediate returns. Good hands from Sione Kalamafoni maintain the overlap. The speed of transfer allows Jonathon Davies time in the wide channel. Davies drives into the space, committing the last Lions defender, and gives Steff Evans a chance on the outside. Evans eats up the ground, however, he is aware of his surroundings, close to the touchline, and with approaching defenders.

Given the pressure, Steff Evans kicks ahead. This keeps the attack alive and allows the Scarlets to apply pressure to a scrambling Lions defence. The pressure exerted from the kick is clear to see.. The Scarlet’s job isn’t finished though until the play has been killed. Evans connects with Kieran Hardy and Dan Lewis on the inside. The trio close the net winning a scrum 5m out.

From this 5m scrum, the Scarlets enter a series of pick and go’s eventually crashing over and securing their first try in under 5 minutes. 

However, while the pick and go game is interesting, we will jump to the Scarlets’ second try. It all starts from a 6+1 Lineout, 10m from the Lions line. The “plus one” tag denotes a forward is standing in at Scrum Half. Dan Lewis acts as the “plus one”, with the flanker stood behind the middle pod. The Scarlets use a 1-3-2 structure for their pods, wanting to avoid driving from the front. The middle pod are marked, so Scarlets avoid going directly up, which appears to be the primary call, instead, they relying on movement to change the picture.

The first stage of this movement is called a “slip”. The slip simply means that one part of the lineout moves forward while another forward(s) “slips” behind to a new position. 

Rob Evans is the “slipper” here, with the prop moving to lift Blade Thompson, with Sione Kalamafoni toward the back of the lineout. The space that Rob Evans targets is opened as the middle Scarlets pod jolts forward. The movement of Blade Thompson (Red Scrum Cap) here is crucial. He initially follows the middle pod forward, dragging the opponents forward. This motion trick the Lions lineout and opens space in behind for the Scarlets to lift in.

However, the Scarlets have used a double bluff, aiming to disorientate the Lions. As Rob Evans, joins the back pod, Dan Lewis (the plus one) joins the front pod. The front pod then use a non-jumping pod to set their maul. This speeds up the attack and they get a head start on the Lions.

This drive starts well, but, the Lions react to get a counter drive on. The Lions Front Marker is key to stopping the drive. He remains at the front, throughout all of the Scarlets’ lineout movements. This stops the Scarlets from using a front peel to beat the Lions counter drive. The Lions’ counter drive is strong and forces the Scarlets sideways. The Lions can’t avoid collapsing the maul which gives the Scarlets an opportunity to strike without consequence.

The Scarlets begin their strike with a rather typical setup. Arranged with 10 and 12 flat, with 13 Jonathon davies slightly offset, and blindside winger Steff Evans out the back.

However, they work to transform the picture. 

The positioning of the Scarlets’ first receiver was a key part of their general attack against the Lions. Here the Welsh region hide Scott Williams (Spotlighted) with Sam Costello (Blue Link) sliding and revealing him late. This gives additional width to the Scarlets’ attack. 

However, their width does not originate with the slide. The Scarlets’ backline trusts Kieran Hardy remaining wide even as the forwards drive towards the touchline. The resulting pass from Kieran Hardy cuts out 5 defenders in one fell swoop. This allows the Scarlets to outflank the Lions defence.

The hard-line from Jonathon Davies, shown in orange, helps contract the Lions defence. preventing an early drift. The hard-line from Davies is instrumental in manipulating the Lions defensive hinge. The hinge is the weak point of any defence. Attacking the hinge primarily forces the defence to go passive, and give ground to the attack. The hard-line from Davies rattles the hinge, giving space for the Scarlets’ second layer (blue links) to attack.

The second layer contains Sam Costello and Steff Evans. The sweep from the second layer places huge pressure on the Lions defence. As the pair run with great pace, against defenders already travelling sideways. The second layer target a small disconnect in the Lions defence. This forces the outside Lions defender to step in, but by now the damage is done.

To expose this space, Costello plays flat to the line. The Scarlets’ Fly Half letting the pass go, only after Odendall has fully committed. This allows Evans to attack the space, and make the remaining Lions defenders commit to him.

With the penultimate defender committed, Stef Evans resorts to a basketball pass to free Jonny McNicholl. The final Lions defender is caught in no mans land. The quick hands earlier in the move make it easy for the Scarlets to finish the chance. 

The try is a perfect example of a double-layered attack disrupting a defence. However, while the Scarlets scored two first phase tries against the Lions, they have also innovated during phase play.

Early in the second half the Scarlets get an opportunity to flex their phase play muscle. Starting from a kick caught by Sione Kalamafoni, they set a ruck just outside the 5m channel. The Lions are well set in defence, stopping Kalamafoni early, and getting their defence aligned. They are slightly narrow, a theme throughout the game, and one the Scarlets will target later in the passage.

From this wide ruck, the Scarlets’ use a typical pod comprised of three forwards. The pod forms a flat line so that Kieran Hardy can make a choice from all three runners. This phase is designed to nullify a teams rush defence. By playing to the 15m, the Scarlets open up a blindside, which forces a less aggressive defence from the Lions. This allows the Scarlets to play wider on the next phase, and expose the narrow Lions defence.

The shape Scarlets use to play wide is fairly common. The Fly Half, Sam Costello starts on the inside of the three forwards, highlighted in blue, who form an arrowhead. This shape aims to give Costello access to as many runners as possible. The slight lag between the lead and inside runner of the forward pod opens a tunnel, that Costello uses to spread the ball to Scott Williams. 

The position that Scott Williams begins from is interesting, with the inside centre positioned a lot wider than normal. The Scarlets’ centre setting behind the centre of the forward pod, rather than the inside option. This means he drifts wider and deeper as Costello receives the ball to open the tunnel. Costello has also drifted, as a result, Williams has to match his speed, and angle in order to receive the pass.

Looking at the phase in its entirety we can see the power of this slightly lateral running. Focussing on Scott Williams we can see how he is always aiming to interest the 13, Simelane, on the outside of the Lions defence. The Lions have become narrow, which allows Williams to run forward. However, Francke Horn (wearing a red scrum cap) for the Lions does well to get reconnected after the screen runners.

This attack is a great indicator of the Scarlets’ philosophy, always aiming to stretch the opposition. This expansive rugby is what Dwayne Peel will want to encourage, trying to reinforce the Scarlets DNA.

In the following phases, we see similar pictures. The Scarlets have a pod of three forwards, ready to be used by the Scrum Half. Behind this pod, they position a backline ready to add another layer to the attack. 

However, the image above shows a worry for the Scarlets coaching team. The Scarlets’ showing a lack of shape, because of a failure to work hard and to set early. 

For example, the final member of the red forward pod is barely connected with the rest of his runners. While the second pod is barely recongisable. This lack of urgency means the Scarlets’ lack options on the attack.

The Scarlets’ lack of urgency almost punishes them. Hardy hits Rob Evans, the only viable option within the first forward pod, who pulls the back to Costello who is immediately put under pressure. The young Fly Half does well to fire his pass away to the second forward pod who form just in time. 

The carry from Jack Price makes contact about 5 meters behind the gain line. The pressure from Lions and lack of work rate has almost punished the Scarlets. Price does manage to free his hands after the tackle and offload which generates the forward momentum the Scarlets were aiming for. A lucky escape.

This phase of attack from the Scarlets shows two things. Firstly they are trying to play wide to wide rugby. Which will certainly allow their fans to watch a spectacle. However, they will need to increase their urgency to stretch better defences. 

Summary

There were some fantastic moments during the game between the Scarlets and Lion, and plenty I haven’t managed to cover here. They will certainly be an exciting team to watch during this season as Dwayne Peel really installs his philosophy of high speed, high width rugby. The main takings from this game should be their multi-layered attack, the ease at which they spread the ball, and their willingness to attack. 

I leave you with this, a fantastic coast to coast try, after some fast thinking by Dan Jones.

Link To URC Highlights: https://www.youtube.com/watch?v=sQRX5i8tEVs

Link To Thread Of Match Stats: https://twitter.com/analysisguy0502/status/1446136247739629568?s=20

Design a site like this with WordPress.com
Get started