Munster and Benetton are the two most effective defensive sides in the URC this season, with both conceding under 125 points in the URC this season. This miserly tally is built on consistency, with neither side conceding over 30 points in a single United Rugby Championship game this season. While these facts alone make them interesting sides to learn from, how both sides defend is perhaps even with two differing styles achieving similar outcomes.
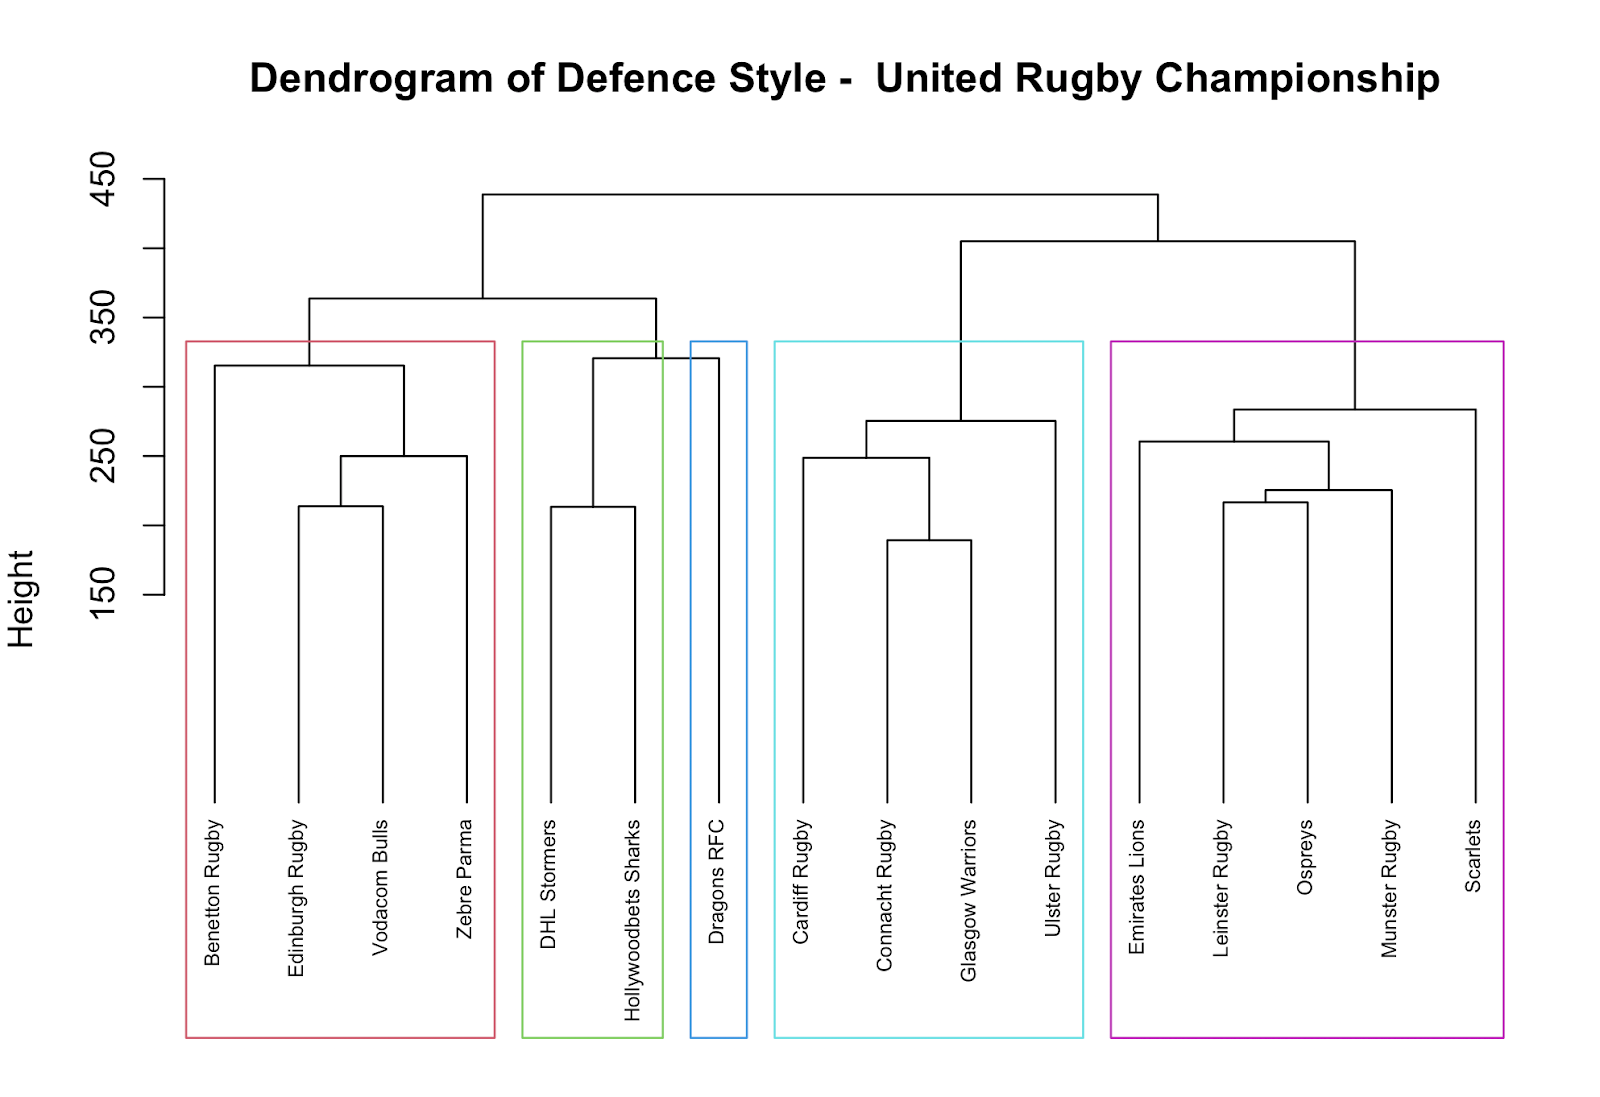
We can see this difference incredibly clearly in this dendrogram, which plots the different defensive statistical clusters of the United Rugby Championship using data from Oval. These clusters aim to give an idea of what a team is doing on defence rather than how effective they are. Showing Munster has similar traits to provincial rivals Leinster while Benetton is grouped with Zebre – perhaps a sign of a national style filtering through.
A dendrogram which shows the different defensive clusters within the United Rugby Championship based off Oval Insights data
There is a clear difference between the two sides so let us dig into the statistics and understand why.
Munster: Defending with intent
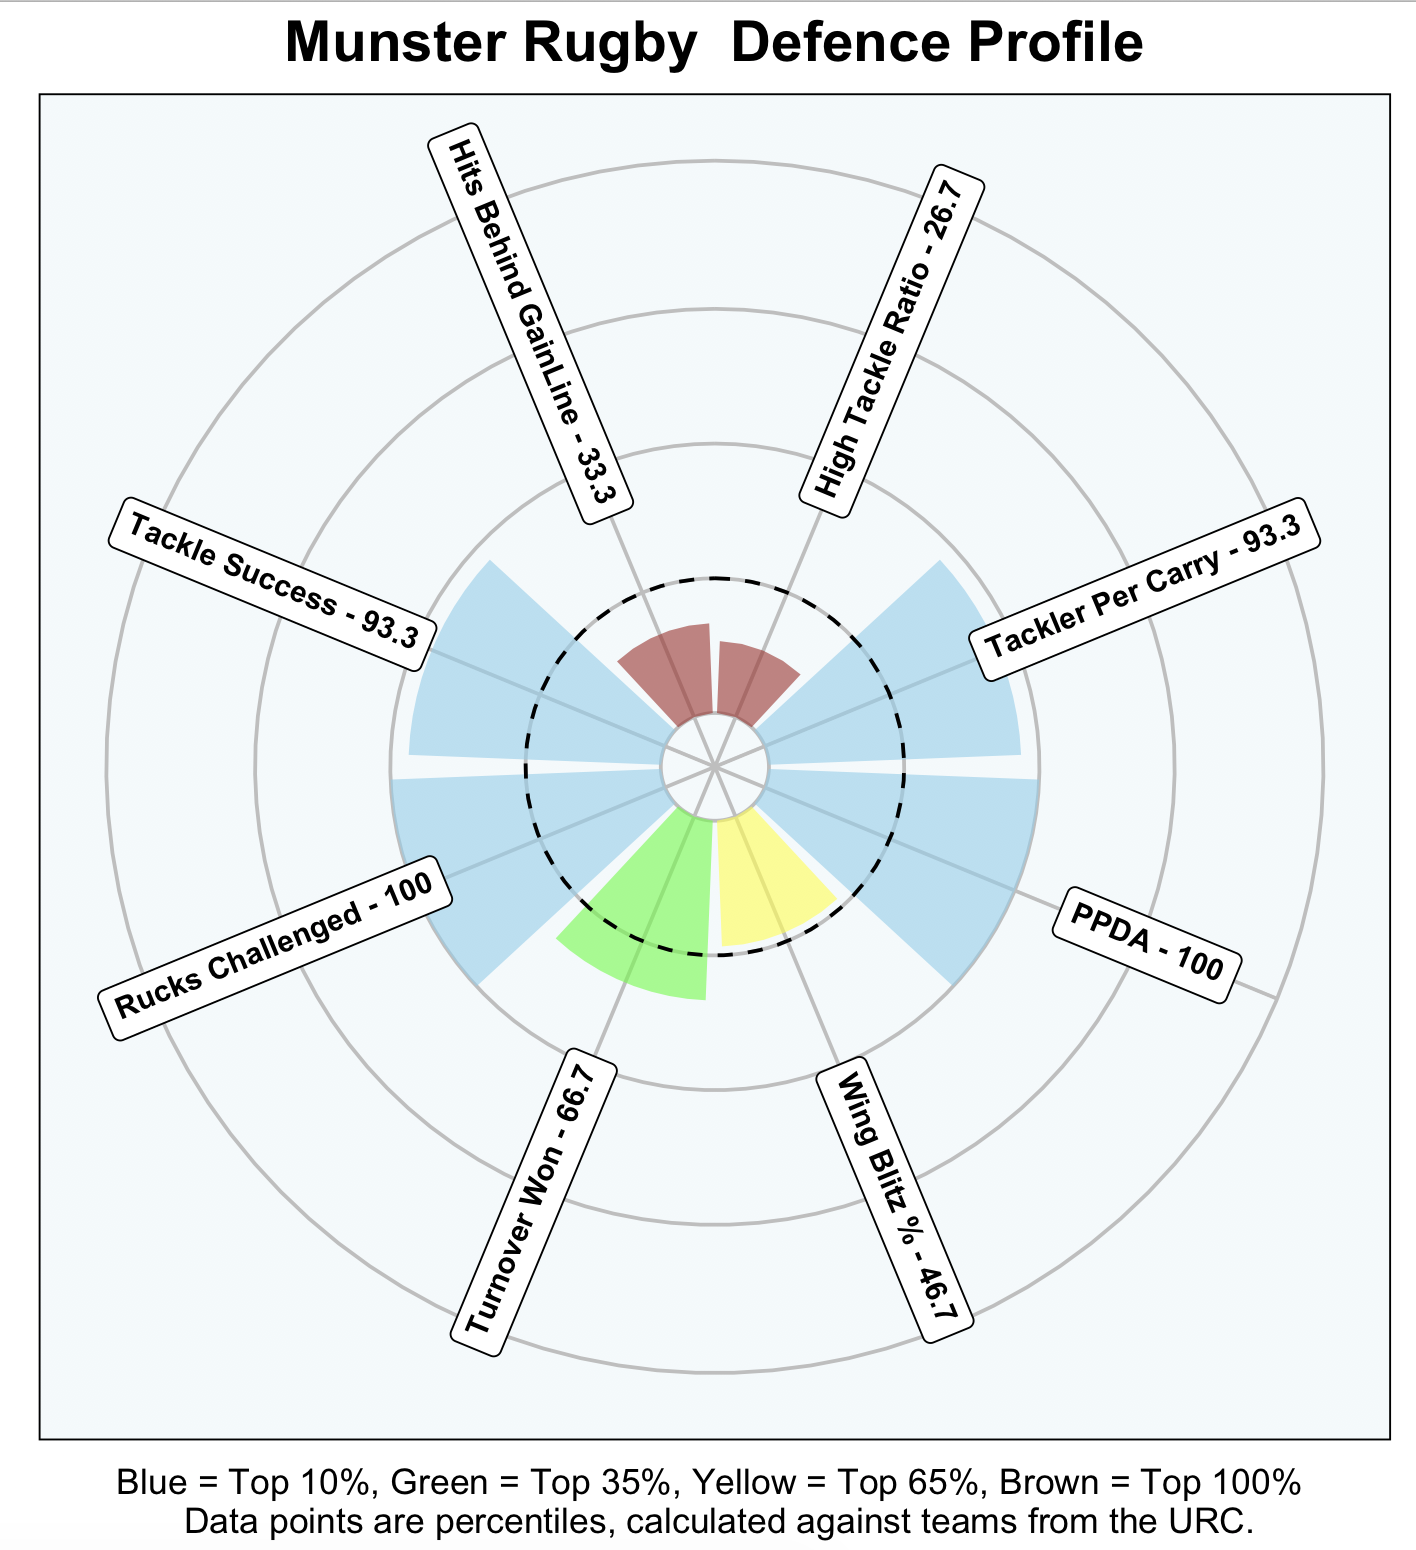
Munster has based their defence on physicality, looking to dominate their opponent in the collision. Their primary method to achieve this is by forcing their opponent to attack tight to the breakdown. We can see this from their PPDA ranking. PPDA (Pass Per Defensive Action) is a metric which measures the amount of passes a defence allows to their opponent before attempting a tackle. Teams which allow fewer passes tend to have a higher line speed closer to the ruck.
A chart which breaks down the defensive traits of Munster Rugby, using Percentiles to compare to the rest of the URC. Inspired by @BeGriffis
We can see their DNA clearly in this passage against Leinster. Defending in the 22 and just before halftime raises Munster’s intensity and encourages Leinster to be a little more conservative to try and build the phases. Initially, Leinster were dominant, with their carries around the corner coming thick and fast. However, bouncing back off the far touchline Munster can apply pressure of their own. A dominant sack tackle by seven John Hodnett behind the gain line stops the attack’s momentum. Before Jean Kleyn, wearing number 4 makes another hit behind the gain line. Leinster then play around the corner again and while a lovely pass from Frawley enables a dominant carry they are stuck where they started and eventually make a mistake which ends the half.
We see a similar pattern against Glasgow. The Warriors initially start on top and can sling the ball to width. However, a strong tackle from Munster’s two-second rowers prevents Glasgow from building on this momentum. The Scottish side do try and find the edge on the next phase, however, they only continue to lose more ground, with Munster’s defence continuing to impose itself. Glasgow in the end is forced to kick back from inside their half after several more negative phases.
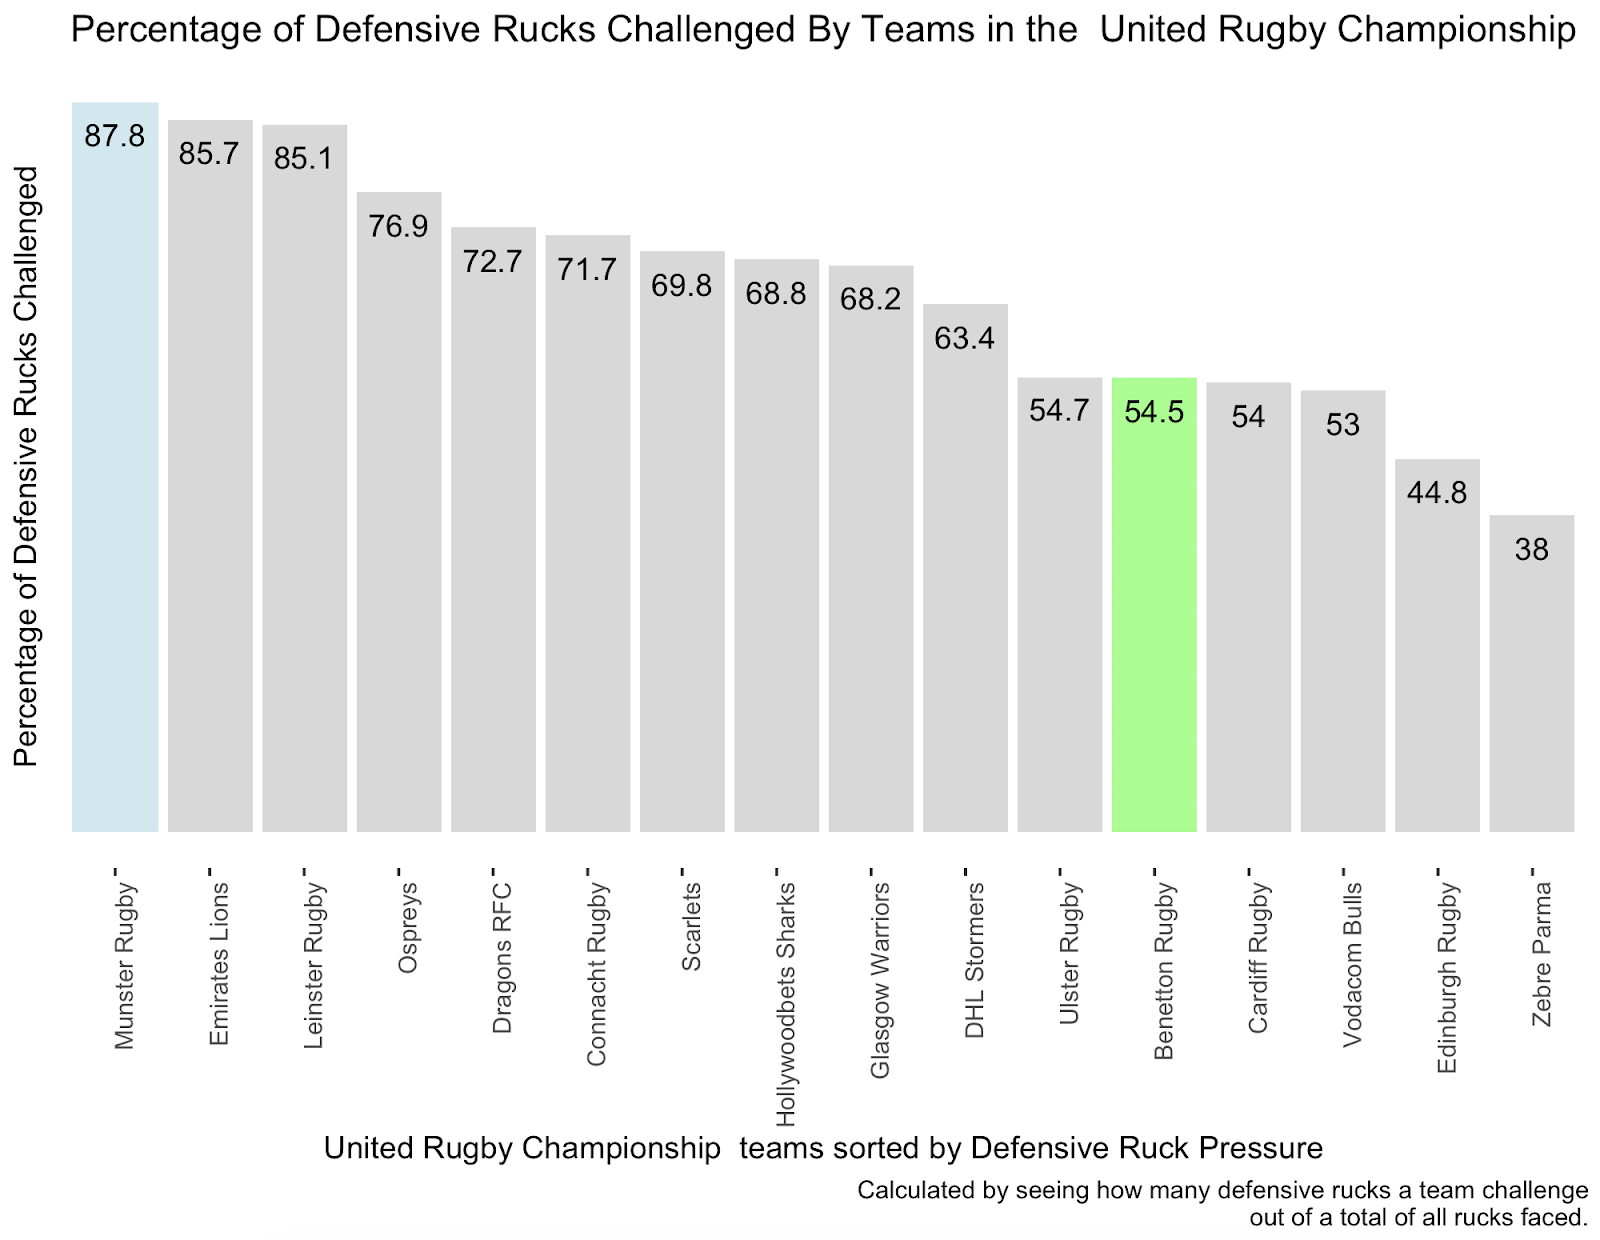
What you can also see in the defensive sets above is Munster’s policy at the defensive breakdown. No team in the United Rugby Championship attacks more of their opponent’s rucks than Munster. This buys them time to get their line set making it easier for them to suffocate their opponent’s attack.
A ranking of sides by the amount of defensive rucks they challenge. Munster are shown in Blue and challenge more rucks than any other URC team.
In this clip from their game against Glasgow, we can see how Munster combines both their high line speed and desire to restrict an opponent’s width with a constant attack policy at the breakdown. Firstly we see John Ryan attacking through the ruck slowing the ball, and dragging a Glasgow player to the ground before being called off by the referee. This slows the ball down forcing Glasgow to carry in a brick wall. The Warrior’s second rower tries a tip to avoid the initial pressure but Josh Hodnett is well-connected as the fourth defender and delivers a crushing tackle behind the gain line. Munster then attacked the breakdown again with John Ryan swooping in late to steal the ball.
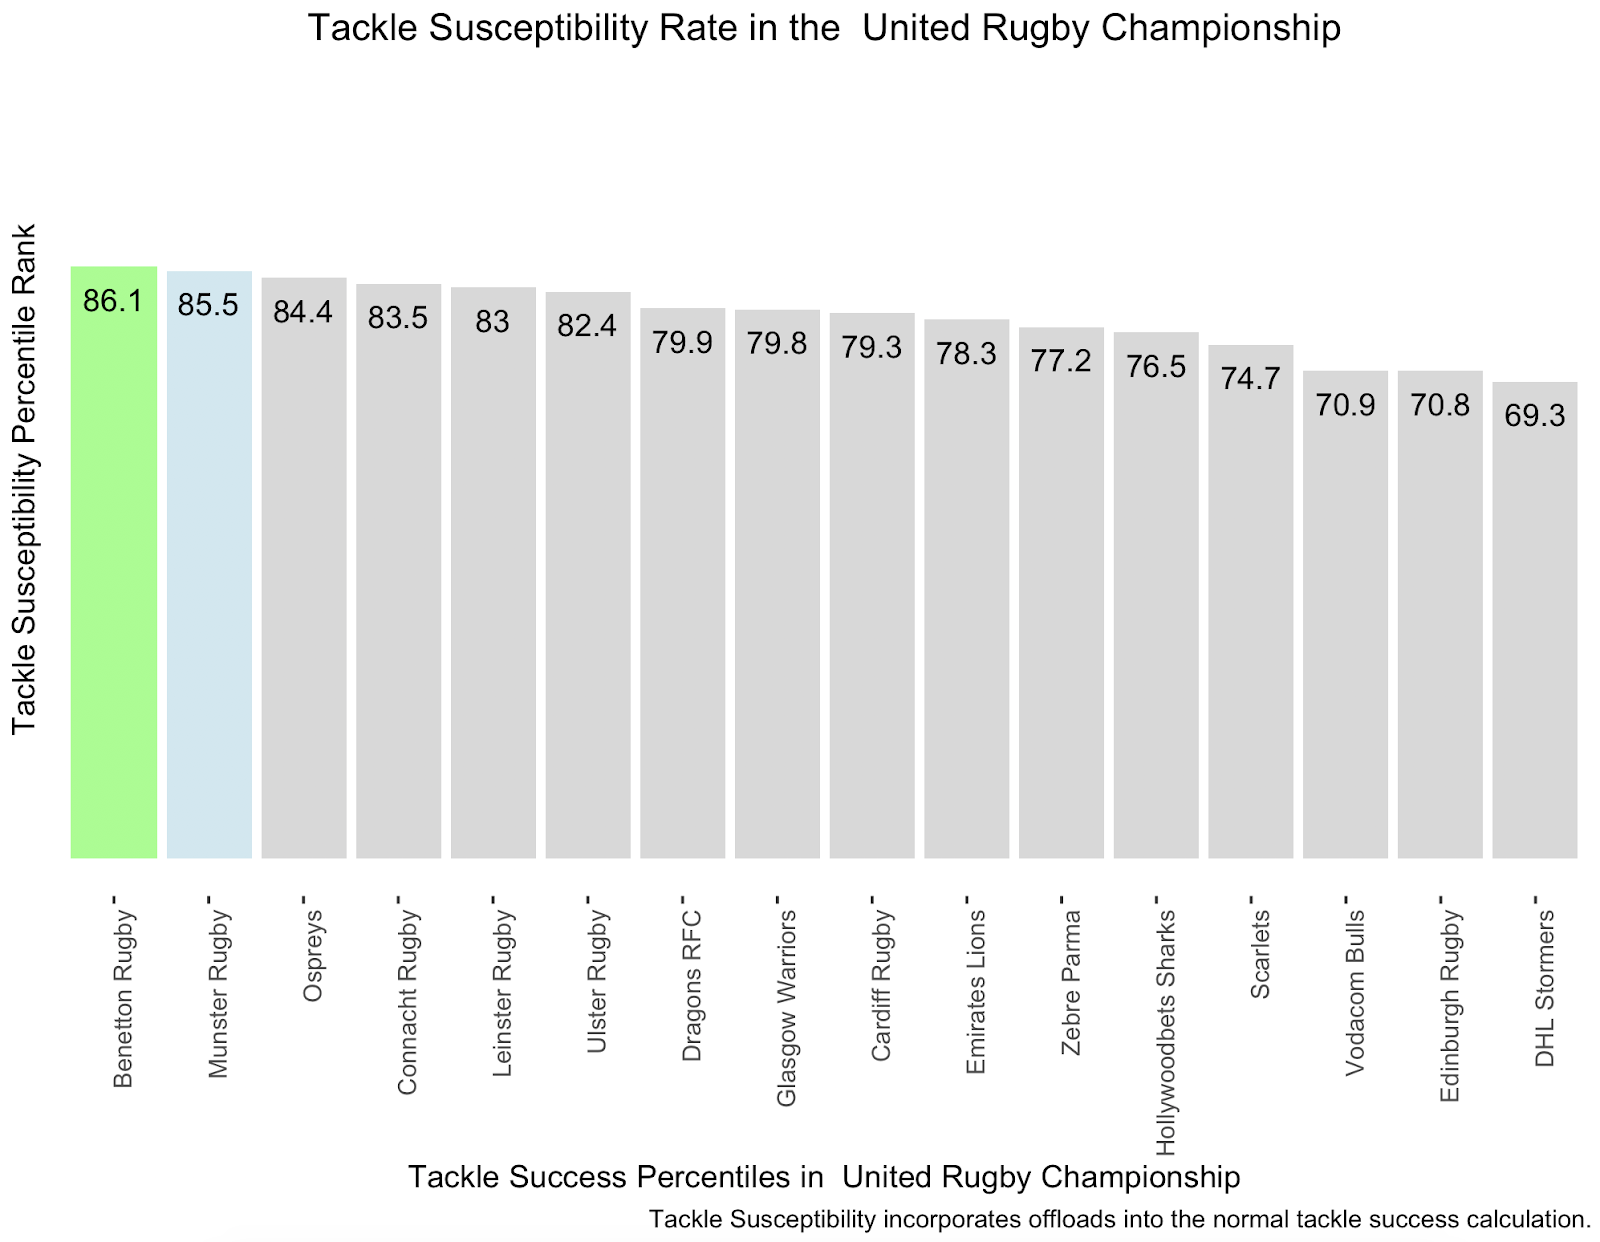
The final element in building their red wall has been the success and style of Munster’s tackling. Under Dennis Leamy, Munster has adopted a primarily two-man tackle system, helped by their ability to restrict the opponent’s width while they also miss the second-fewest tackles in the United Rugby Championship only beaten by Benetton.
A leaderboard of URC teams showing their Tackle Susceptibility rate, created by @dj_williams4, which accounts for offloading within the tackle success equation
Benetton: Flowing like a river
However, it’s not just highly effective tackling that has set Benetton on the road to defensive success. The side from the North of Italy also brings their style of defence which enables them to have the second most effective defence in the United Rugby Championship.
A graphic which shows the defensive profile of Benetton Rugby compared to the rest of the URC.
Benetton uses a more zonal defence compared to the rest of the URC, as shown by their PPDA which is lower than 60% of sides and their wing blitz which also sits below average. Part of the reason behind this is that they look to get numbers on feet, as shown by the low rate of breakdown attacks.
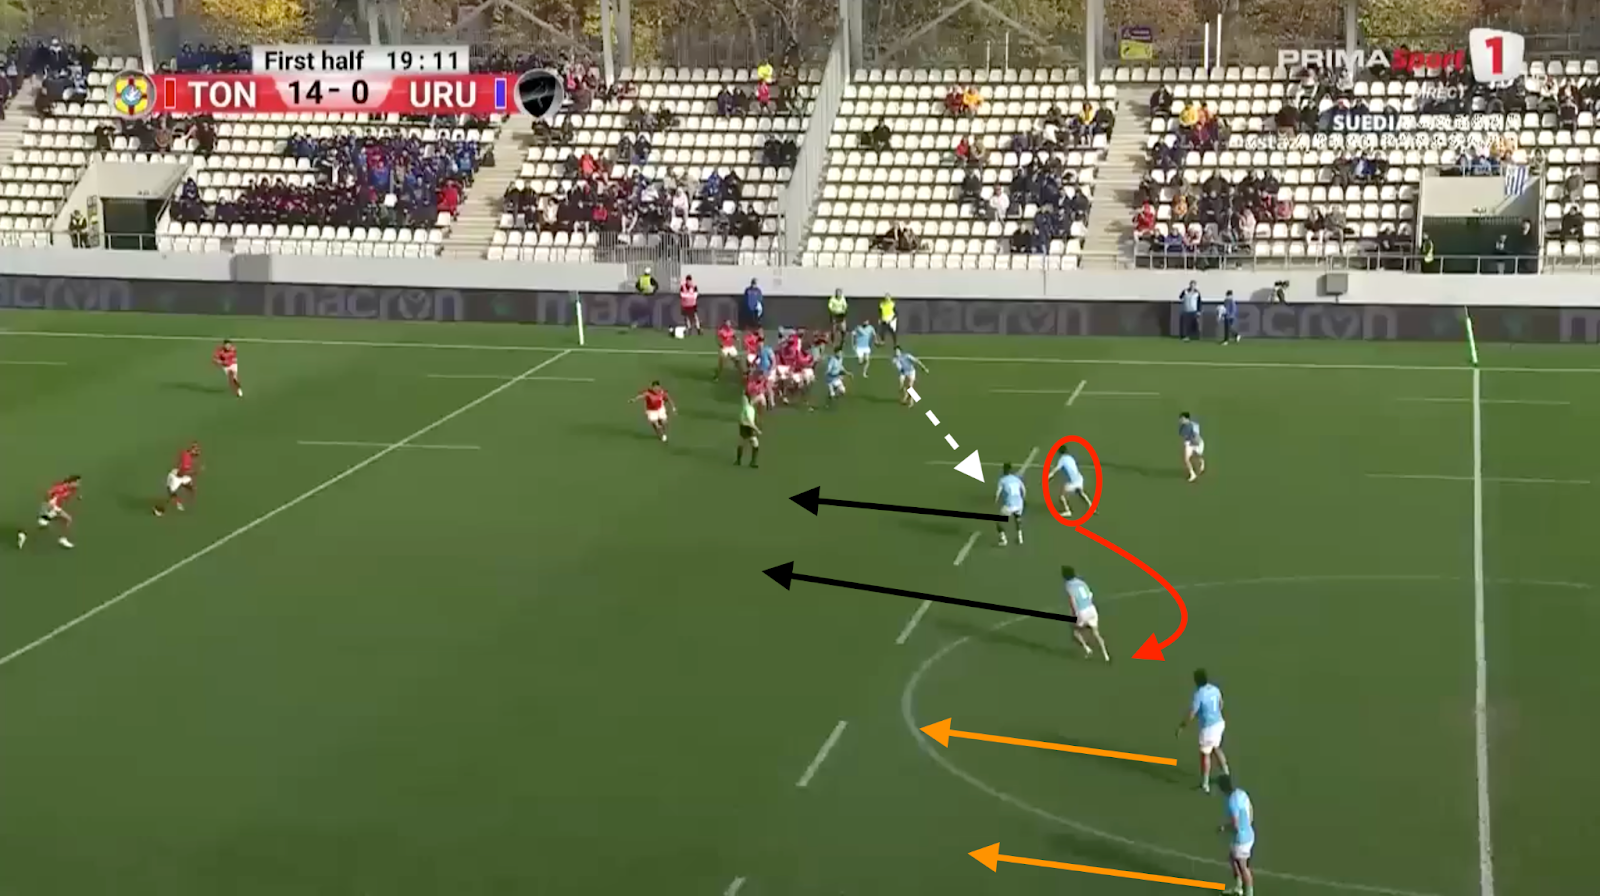
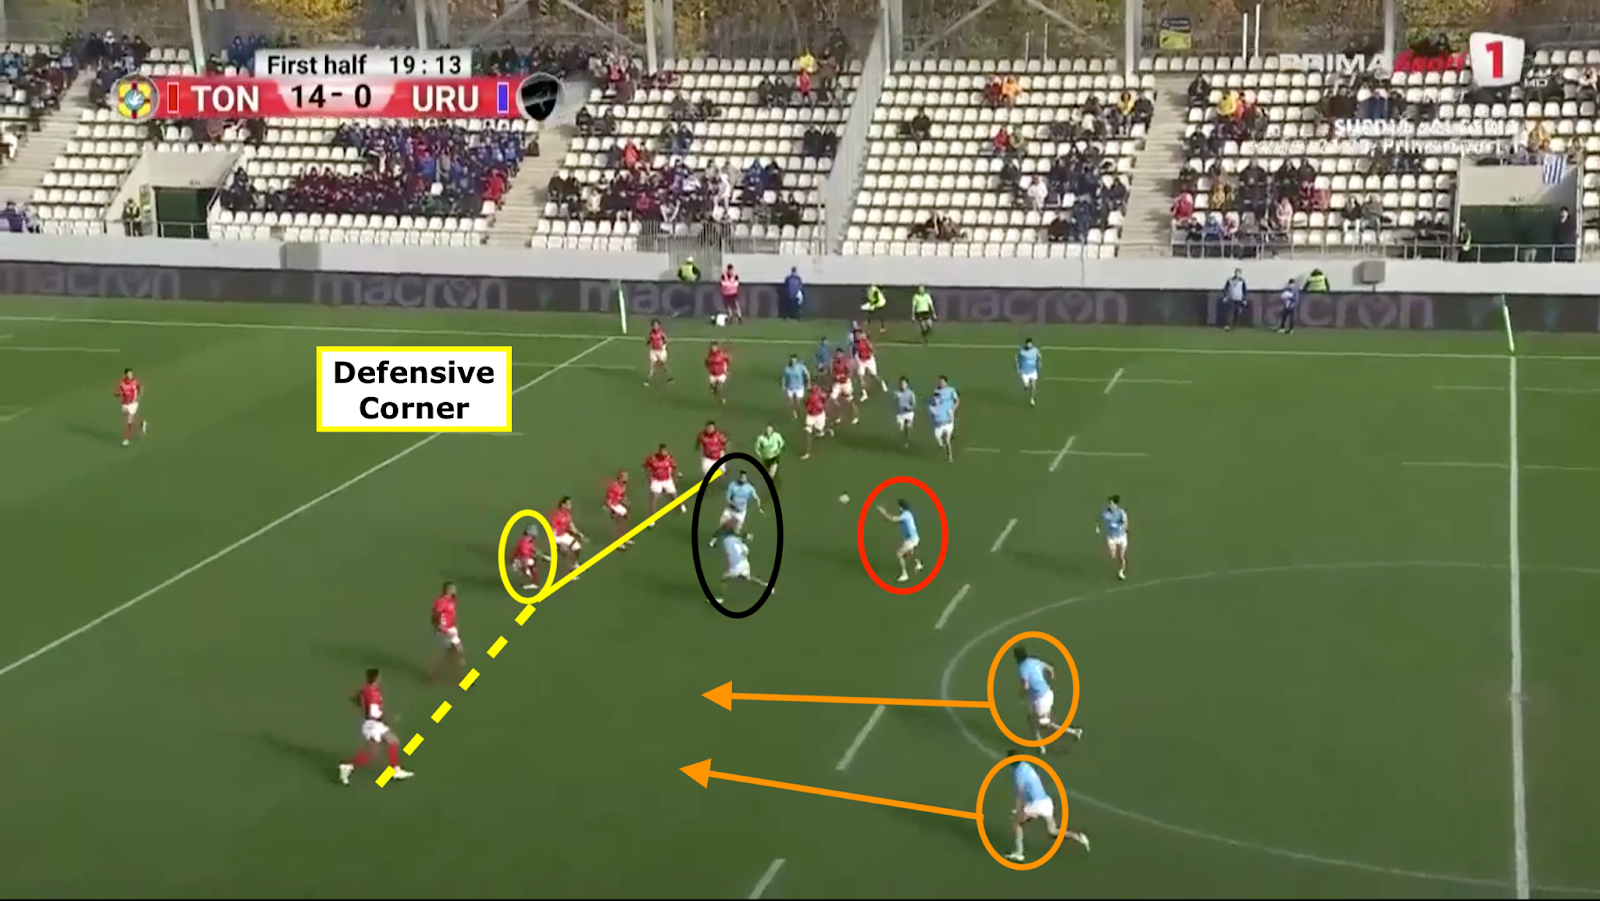
We can see this defensive system at work against the Osprey’s in their Challenge Cup clash. Starting from a kick chase the Benetton defence pushes the Welsh region to an edge which allows them to get set and establish a wall of pressure. The tackler Ratave transitions well to disrupt the ruck putting the Italian side on the front foot. However while we may have expected Munster to fire off the line, from the following ruck Benetton trusted their connection with no player going beyond the defensive line. This prevents any soft shoulders being exposed and the Benetton defence can comfortably deal with Ospreys attack. As the attack develops we see how they prioritise a fight within the tackle but don’t commit any additional players settling into a rhythm and just presenting a well connected defensive line.
The defence is based on constant flow and allows them to shut down Edinburgh in the following sequence despite being a man down. Coming off the back of a dominant maul you’d expect Edinburgh to take advantage but the Italians can recover. Not challenging the breakdowns means the ball is quick but their fold is exceptional meaning they can put bodies in front of the carrier. Once the Edinburgh attack has hit the 15 and bounces back the Benetton defence is well prepared and starts driving the Scottish side backward. The final phase almost sees Edinburgh expose the edge but Benetton can apply pressure and the pass goes to the ground.
Ferocity and Flow – two approaches to solving the same problem
The beauty of rugby is in the approach to building a side, there is rarely ever one solution to a problem. In the URC this is incredibly true with the rugby traditions and strategies of five different nations creating a melting pot of styles. These differences are visible within Munster and Benetton’s setups. While Munster bases themselves around hard work and trapping an opponent close to the ruck, Benetton are more patient and force their opponent backwards waiting for a chance to turn the ball over. This is also shown in their attacking characteristics with only Connacht making more carries than Munster while Benetton sit lower than the United Rugby Championship average. Munster are violent and intense immediately in their defensive sets looking to win the ball back early, while the Italian side are happy for others to run into a brick wall. Neither method is right nor wrong, but certainly, both are managing to solve the problems posed to them by URC attacks this season.
The World Cup is fast approaching, and it’s time to turn our focus onto the hosts. France enter the tournament as one of the major favourites, and play one of rugby’s most attractive brands of rugby. But to look just at the impressive back line and wide attack is to miss the crushing physicality and pragmatism that enables this France side to enter a home world cup as a legitimate favourite.
Joué Joué: The French Attack Under Galthié
There is perhaps no better place to start when examining how France play than with their charismatic coach Galthie. In this interview given to Nik Simon in the Daily Mail he describes his philosophy and his desire to play with speed. ( Galthie Interview in Daily Mail) This intent was clear on the field with over 30% of French rucks in the Six Nations completed in under 2 seconds, the most in the competition.
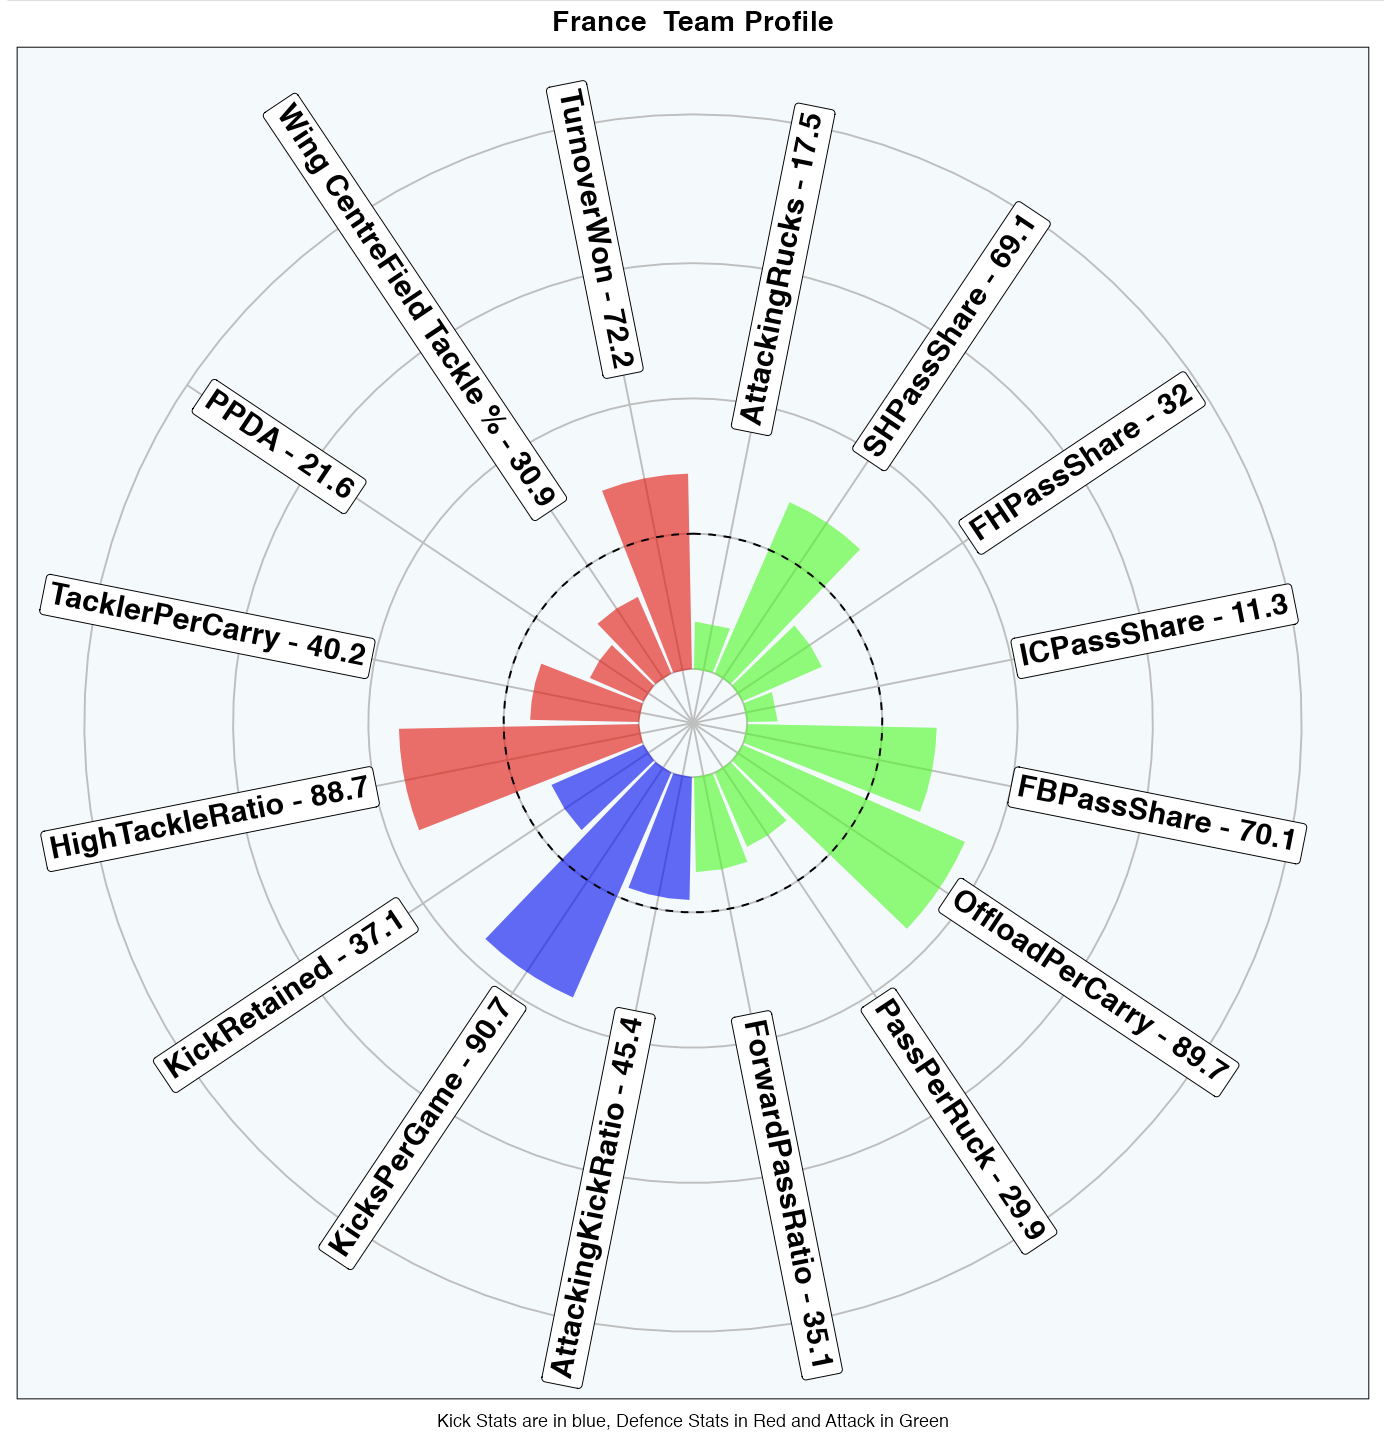
Team Profile Wheel – metrics shown in percentiles compared to Top Level Pro and International Rugby generated using data from Oval Insights
A big part of the French game plan is offloading, as Les Bleus throw more offloads than 89% of teams across Tier 1 club competition and International rugby. This helps allows them to avoid rucks and stay on top of their opponents.
Take the opening try from the game against England earlier this year. Ollivon carries first and picks a hole between two English tacklers before getting his hands free. Thibaud Flament loops around to take the ball on Ollivon’s shoulder, making ground before offloading again. A simple two on one for Penaud sees Thomas Ramos score in the corner.
What’s remarkable is that the offloading is spread across the team. The French forwards offload the 2nd most per game across International rugby with minimum 10 games. With New Zealand the only international side who bested them. The clip below shows this ability well, Gregory Alldrit breaks from a scrum and has support on either side. He controls the ball well in contact and lifts the ball into the hands of Charles Ollivon who can crash over and score.
Lighting Fires: France’s Pick and Go Game
The French prize continuity in their attack, a by-product of speed, another tool they use to keep this continuity is their pick n go game. No International side, with a minimum of 10 games, pick and go as much as the French. Their pick and go game is particularly effective when they are on the front foot, allowing them to stay on top of their opponents.
Take for example this passage of play against Japan, where France used their tight attack, including multiple pick and go thrusts to keep momentum in the attack. The first comes from Julien Marchand who takes the ball and immediately challenges the Japanese defenders folding around the corner.
Then after a couple of carries behind the gain line, France reverted to the pick and go, helping them get over the gain line thanks to Romain Taofifenua. This gives them some momentum again tying up the folding defenders. Julien Marchand then picks again and beats the first defender. The hooker’s control on the floor isn’t great but France win a penalty.
The roots of this pick and go game can be traced back to Galthie’s attacking intent:
“You try to create small fires around the ball in attack and defence. The French team tries to do that by putting a small company around the ball. About five players. We try to be quick.“
France’s company of pick and goers around the ball is clear in that attack against Japan. The presence of the company means that rucks are well resourced and France are able to keep the speed in their attack.
Line And Length: The French Kicking Game
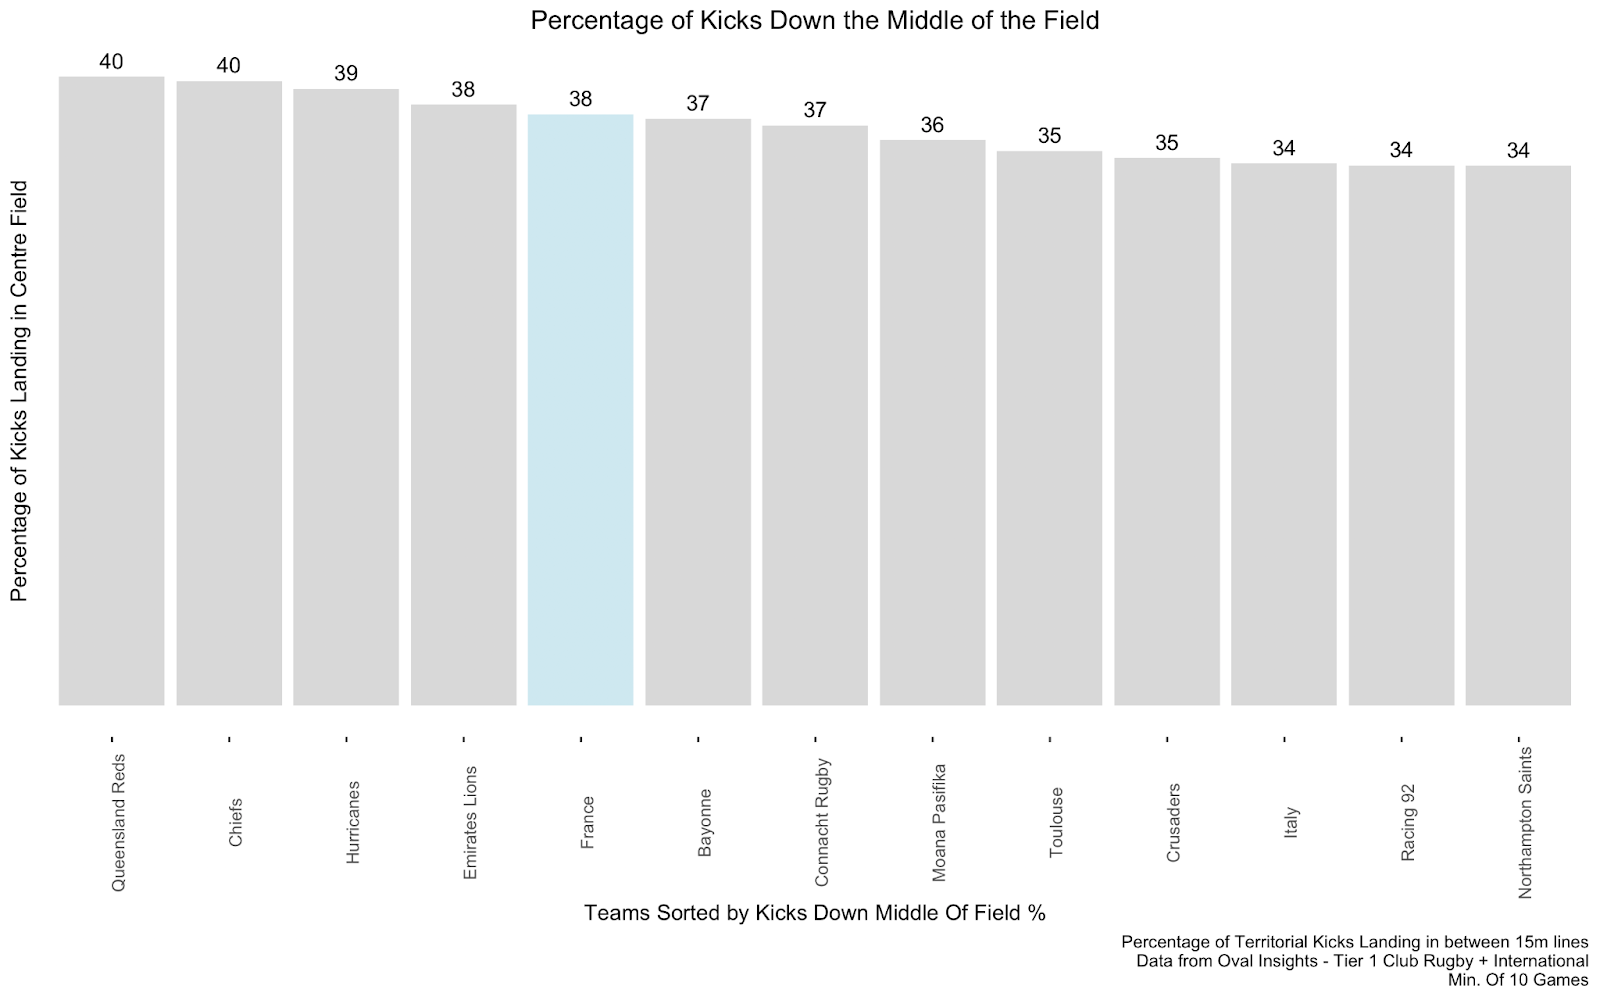
What’s great about France is they have found a good blend of pragmatism alongside their fearsome attack. When the attacks slowed down Les Bleus resorted to kicking the ball allowing them to shift pressure onto the opposition. The style of kicking employed by Les Bleus is an interesting: the French kick down the middle of the park more often than any other international side sitting 5th across high level pro rugby.
The reason behind this kicking strategy is to help Les Bleus control the backfield and apply pressure to the opposition. This strategy is very effective as it targets the space left by the 13+2 defence. Typically in a 13+2 defence, the two backfield defenders sit wide protecting kicks angled into the 15m channel, limiting the chance of the 50/22. France instead kick deep into the backfield maximising distance and forcing the two backfield players to retreat and return fire from a less advantageous position.
Take this kicking battle against New Zealand, the All Blacks start having received a box kick just inside the 15ms and then return fire. Ntamack collects the ball but is under a little bit of pressure so fires back a low kick splitting the backfield. Jordie Barret is forced to turn and NZ start this second attack 10 metres further back, with France beginning to establish control. The French stranglehold is then confirmed as Jordie Barrett kicks the ball out on the full having attempted a brave cross field kick to try and get back into the kicking battle.
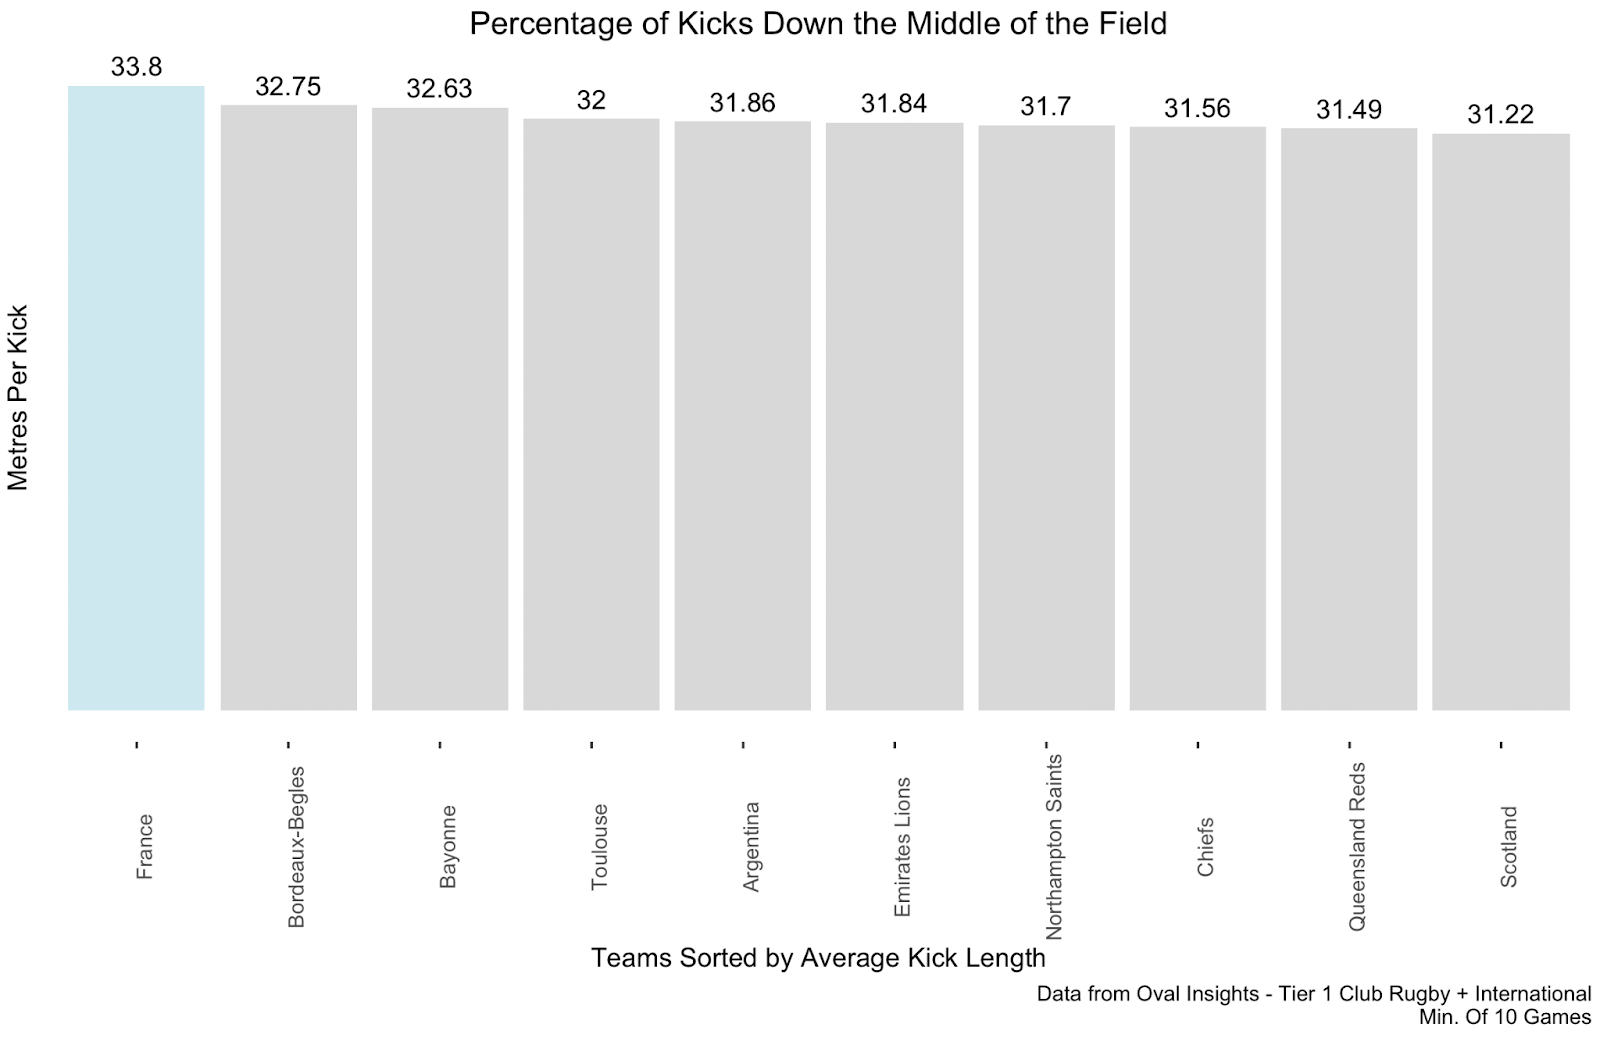
The final element of their kick pressure game is simply the length of kick that France uses. Les Bleus averaged 33.8 mètres per kick, more than any top level side with a minimum of 10 games.This allows them to keep opposition pinned within their half, and unless opponents can match the distance then France can attack from higher up the field.
Does Glory Await?
Despite losing Fly Half Romain Ntamack , France remains a strong contender for the World Rugby’s top prize. Their attacking style exemplifies the French approach, featuring dynamic offloading, ball retention, with a focus on quick ball. While Galthie’s fire lighting pick-and-go companies aid the desire for momentum. Their kicking game allows them to gain the upper hand and control opponents. Despite a challenging draw, including an opener against New Zealand and potential tough quarter-finals, France could break the Northern Hemisphere’s World Cup drought and secure victory.
Scotland had a disappointing 2019 Rugby World Cup as they exited in the pool stages having been defeated by hosts Japan and Ireland. However reaching the quarter finals this time around will be incredibly challenging with South Africa and Ireland (again) for company. The Scots will need a little luck but they do have strong foundations that could help spring an upset in the pool of death.
Steven Tandy and Zonal Defence
While Scotland’s reputation is built around their attack, driven by a Finn Russell its actually their defence that has arguably been more effective. Of all the Six Nations in this world cup cycle the Scots have given up 18.4 points per game, second behind Ireland.
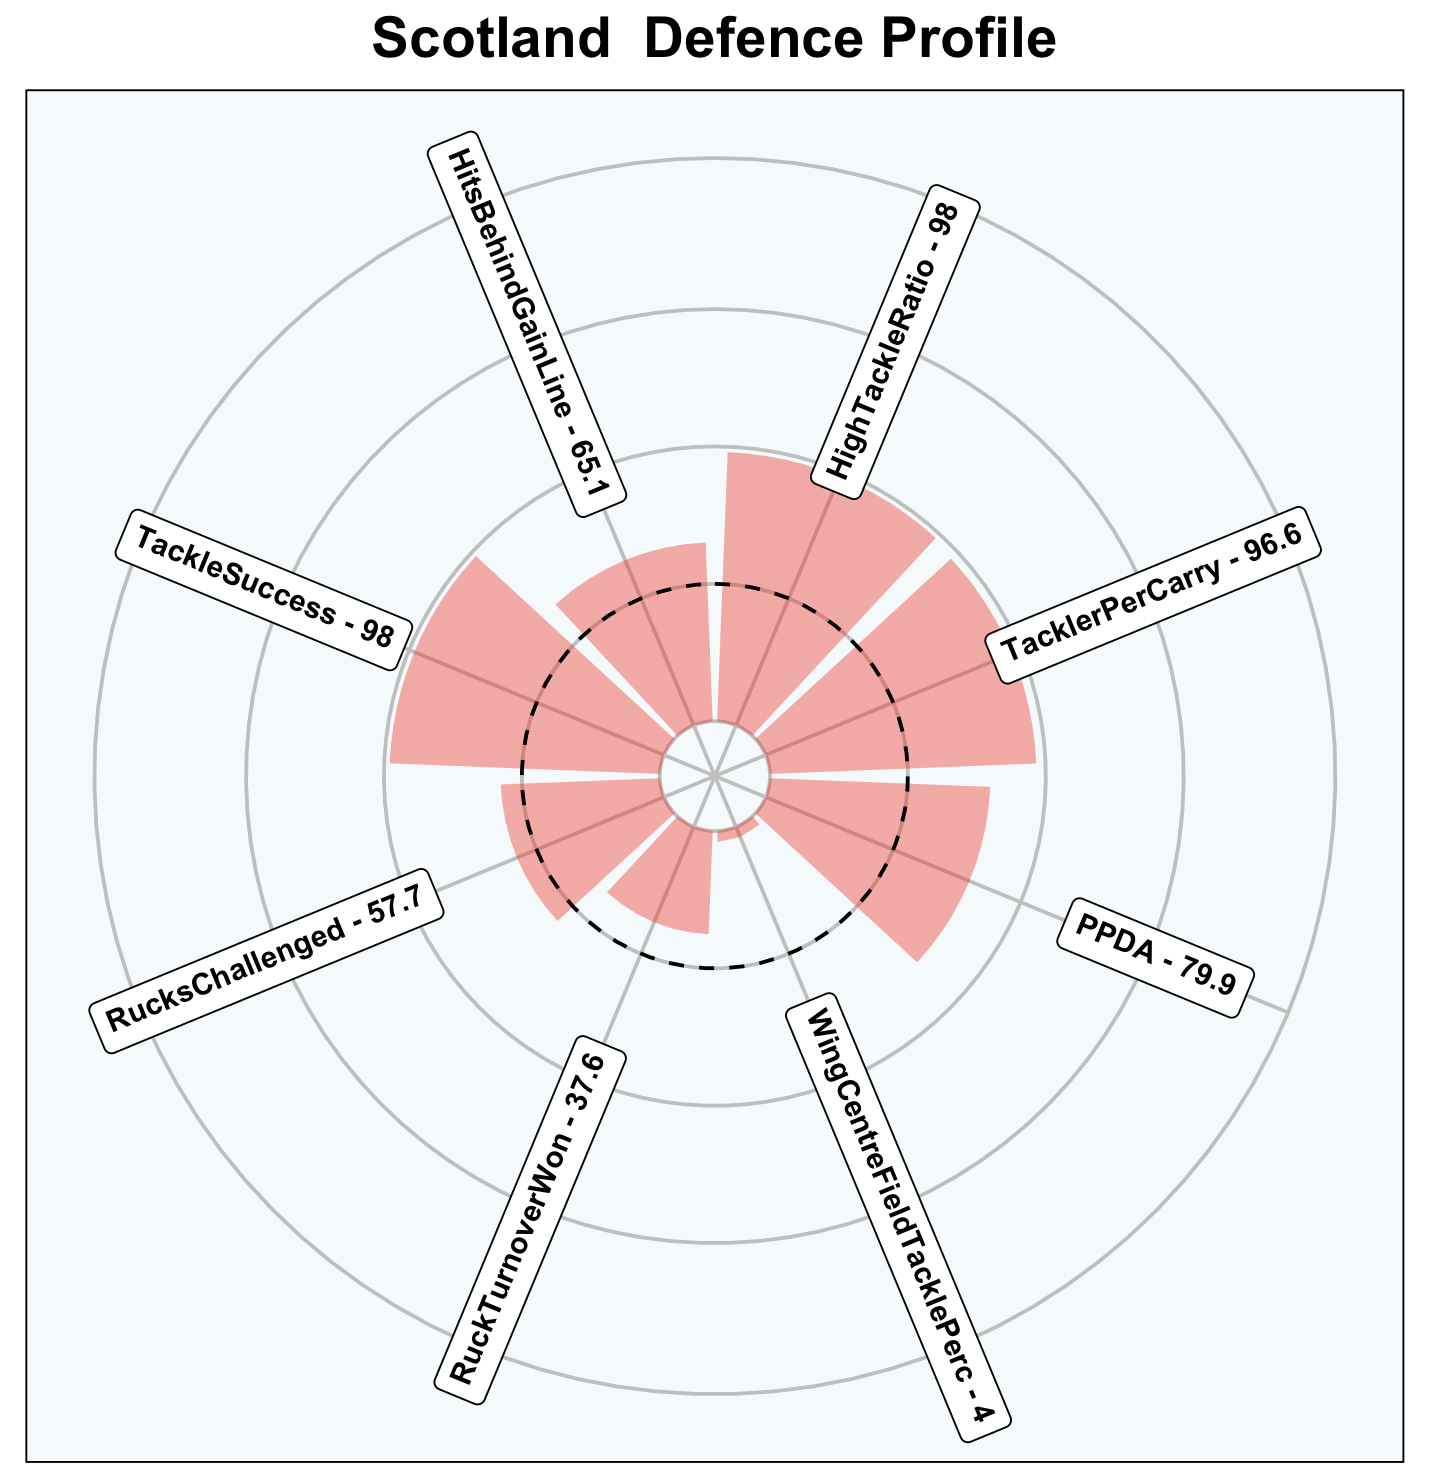
The defence radar gives a good indication of how Scotland defends, with some very clear focus points. Firstly they prefer to tackle higher, and also load the contact area with multiple players. This is shown by having both being in the top 5% for both tacklers committed per carry and high tackle ratio.
As shown in their game versus Australia, Scotland use the double tackle to target the ball and stop momentum of opposition carriers. By wrapping up the ball in the tackle the Scottish players looked to slow the ball down for following phases. The result is the Scots facing the 4th slowest attacking rucks (filtered to between halfway and defensive 5m) on average.
What the GIF above shows alongside their double tackle system is their desire to get off the line, with the Scots sitting just outside the top 20% for Passes per defensive action across professional rugby. This shows Steve Tandy’s intent to try to apply pressure with the Scotland defence, however the method used by Scotland is also interesting.
In rugby two trains of thought have developed within defence around how to apply pressure, Blitz v Drift. Sides can be grouped by whether they drift: absorbing pressure and allowing the attack to work towards the touchline. Or whether they Blitz: pincering from the outside and using an aggressive press to force the attack back towards the ruck.
The clip below shows Scotland’s drift defence in full effect. Australia are allowed to make multiple passes and Scotland just drift across with the ball before making the tackle in the wide area having lost a couple of metres but remained connected.
As described in this Rugby World Piece ( The evolution of Lions defence coach Steve Tandy – Rugby World ), Tandy has set about building a great Zonal defence away from the need for individual reads the Scotland team is asked to tackle. This defensive system helps minimise errors, Scotland have the best tackle success rate across professional rugby (of teams with 10 games played) at 91.2%. The system’s preference for connection over aggression is one of the reasons they have developed such a difficult defence to break down over recent years.
The screenshot below shows how Scotland go about building their zonal defence, the first cornerstone is the width of the defensive line. The winger is sat firmly in the 15m while the rest of the defence is packed tighter, this will allow them to remain compact and connected as England play the ball.
The second key aspect for the Scottish defence is enabled by this width. The Scotland 13 is able to set up outside the opposition forward pod which will allow him to assist in the double tackle if England hit a short runner. His width also allows him to swim around the block if England play wider and assist with the tackle in the wide channel.
As you can see in the clip below Scotland are able to drift as a compact unit and then apply pressure in the breakdown out wide. Note how key 13, Huw Jones, is in this defensive phase swimming past the forward runners to cover the missed tackle and challenge at the ruck. An illegal clear out from England then gives Scotland a penalty.
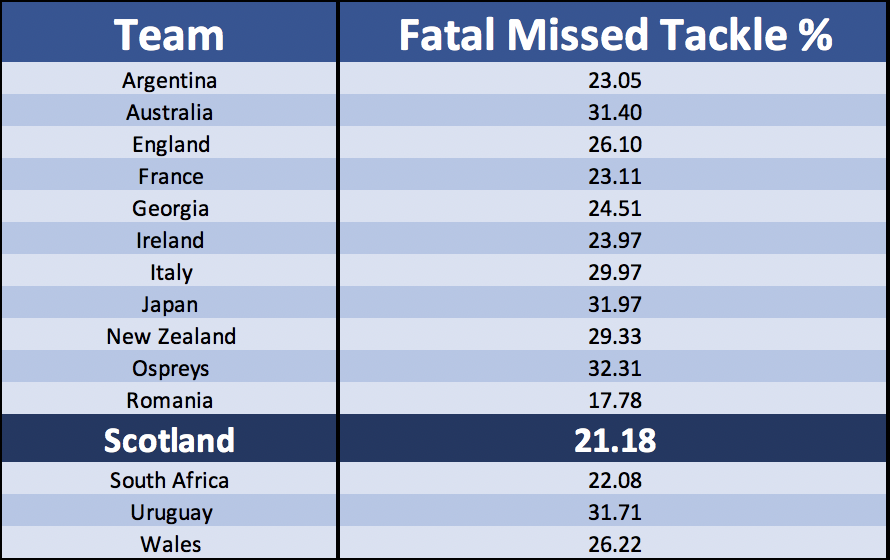
The compactness of the Scotland defence has another benefit as shown in the clip above, missed tackles are rarely significant threats. Scotland (19 Games) have the lowest percentage of missed tackles leading to tries or breaks of anyone bar Romania (6 Games) in International rugby. This fail safe nature in the Scottish defence is by design and allows them to make mistakes without leading to huge opportunities for their opponents.
Townsend’s Attacking Weapons
Scotland have built a great defensive system but they have also matched it with a strong attacking system which allows them to stress teams with ball in hand. They have two weapons in particular we will look at today, in general phase play their use of 3-2 forward pods which help them spread the play. When launching their attacks Gregor Townsend is a big fan of the rewind attack allowing Scotland to punish defences who get their folds wrong.
Escaping From The Edge: The Three Two Set Up
Scotland’s phase play attack is predominantly driven by their Fly Half. To do this they often use a 3-2 (or 3-3) forward pod shape off an edge. This setup gives an option for the 10 to hit forwards up directly off 9 or they can pull it back and challenge using a second wider forward pod. Take a look at this example against England. The initial 3 player forward pod screens Finn Russell who then passes to Pierre Schoeman.
On this occasion the carry isn’t great and Scotland lose a little ground but the width means that England’s fold is under stress. A messy ruck results in the ball spilling out and Ben White takes full advantage to snipe and score.
This phase against Australia shows their intent to spread it wide. A forward pod of three runs hard with Gilchrist pulling the ball back. Kinghorn takes the ball and stops his feet to fire a tunnel pass between the second forward pod and allow Scotland to find the edge.
This shape benefits from its flexibility especially within the second pod of two forwards. The Fly Half for example is able to hit three different players (2 forwards and the back in behind) but is also able to change his run and open up different angles for each of these forward runners. This versatility and adaptability in the attack is a real bonus for Scotland and allows them to show different pictures even if they start from similar positions.
Springing a Surprise – Scotland’s Rewind Attack
Under Gregor Townsend Scotland have become a team who love a rewind attack, frequently hitting into midfield before coming back against the grain to try and expose sides who overfold.
Take for example this try from their game against Italy in the first of the World Cup warm ups. A short pass from Ali Price to Stafford MacDowell who gets over the gain line. Italy’s back row gets off the scrum quickly and fold expecting Scotland to play the same way. Ali Price however has other ideas and snipes against the grain to link with Graham to score.
This score wasn’t an example of an isolated play but instead a theme within the Scottish attack. Against Australia we see Scotland running a 21 Play – 21 meaning two phases in one direction before coming against the grain – this time starting off a lineout.
This first carry from Tuipulotu is strong and gets Scotland on the front foot having broken the gain line. Worth noting how good Hamish Watson’s delivery is from the maul, with the openside flanker fixing the tail gunner before giving the pass meaning that Tuipulotu takes the ball on the gain line.
The second phase is around the corner, note the width on the Scottish forward pod dragging play to the outside post. This drags the Australian defence across the field as well as opening both sides of the field for the next phase.
Coming off that outside post ruck, Scotland hit back against the grain with Ali Price firing a pass to Sione Tuipolutu who has formed a 3 man pod. The outside option of Matt Fagerson helps attract the fifth Australian defenders. The defender biting in allows Kinghorn to time the ball before freeing Full Back Ollie Smith who scores a great try.
Scotland’s rewind could be a great weapon at the World Cup as they look to expose overzealous defences. Mixing up their attack and surprising the opposition will be key if they are to spring an upset. This kick off the back of a 21 play against Ireland shows how they can also be used to manipulate the back field and apply pressure with the boot.
Scotland Pool B King Makers?
Scotland have been dealt a hard hand with Ireland and South Africa in their pool. However its not impossible to see them springing a surprise. Scotland have become a team who are always a threat on any given day and while they may lack consistency all it takes is one shock win and they could find themselves in the World Cup knockout stages. If they are to spring an upset then Steve Tandy’s zonal defence system will be key, minimising the damage from mistakes while proving more than capable of absorbing pressure. Coupled with an attack with the capability to hit both sides of the breakdown and with one of the world’s inform centre partnerships Scotland will be an exciting watch regardless of the result this autumn.
Ireland are well positioned for a push for World Glory, currently ranked 1st in the world and with a solid return to the field against Italy this weekend. Their current ranking is driven by an attack averaging 30 points per game, an attack based on an intricate framework looking to move the ball and stretch defences. This approach is supported by an incredibly strong kicking game which allows them to either pin opposition or regain possession in the opposition’s half. They have the tools to make a run for World Cup glory, even if they are on the difficult side of the draw.
Andy Farrell’s Tool Box – The Irish Attack
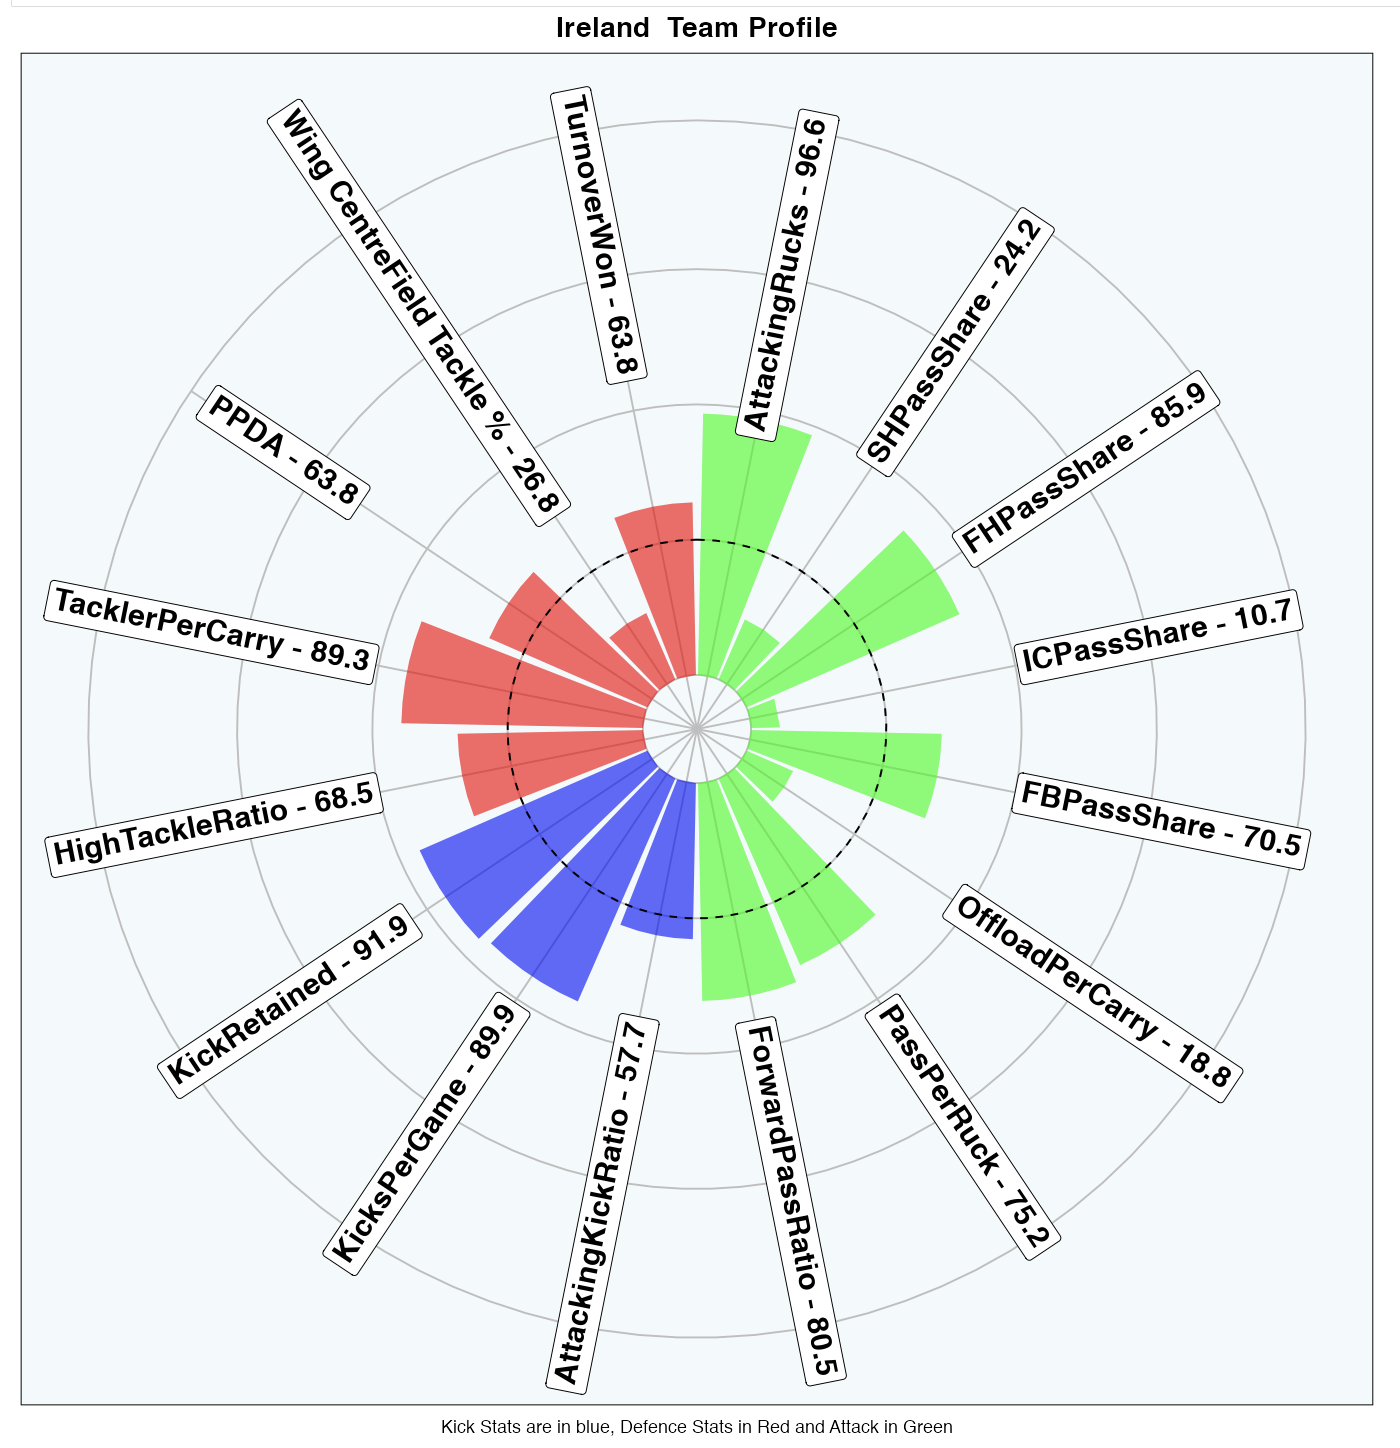
Let’s start with the attack that Andy Farrell hopes can propel his side to World Cup glory. The data behind the attack gives a clear indication of Ireland’s approach, with the team in green averaging more rucks than 90% of professional teams as they look to keep the ball.
As you can see in the radar Ireland also play a huge amount off 10 and ask their forwards to shift the ball. Take this second phase against England as they look to apply the stretch. Launching from a lineout Ireland have spread the ball to a midfield ruck and then play around the corner with this well designed play.
Jamison Gibson Park passes the ball to Dan Sheehan who angles back towards the ruck and then flips the ball back towards the looping Gibson Park. This means that Ireland are attacking against a narrowed England defence. Hansen is not able to offload cleanly but it shows how the connections between forwards and backs help Ireland manipulate the defence.
These two phases against Wales are great examples of this. First this shoulder ball from Sexton avoiding a shooting Welsh defender and followed by Sheehan carrying well and beating the first tackler, this generates Ireland quick ball.
The subsequent phase uses a strong carry from Andrew Porter to generate more quick ball. Following this Ireland played the same way and Sexton attacked the line. The shape used this time sees two forwards on Sexton’s shoulder and he drifts over runner 1 before firing a tunnel ball behind to James Lowe.
Filling The Field: Ireland’s Use of the Blindside Attack
One of the most fascinating weapons utilised by the Irish is their blindside attack. We can see how Ireland exposed the short side in two of their tries from last year – first Hugo Keenan’s effort versus the All Blacks and then Dan Sheehan’s against England to secure the Grand Slam.
Hugo Keenan’s effort begins from a wide lineout launch with Ireland using great intricacy and handling to find the edge of the New Zealand defence. The maul release used by Ireland uses a stack helping to hide their intent with Bundee Aki positioned so he can either carry, tip or flip the ball behind to Sexton.
The hard lines help pin the New Zealand defence and allow them to reach the full width. It also means the far 15m channel contains the entire back three with Hansen and Keenan securing the ruck from Lowe’s carry.
The return play is typically Irish with a hard and pod of three forwards sitting tight to Sexton with a second pod positioned outside Bundee Aki. Aki instead steps back inside and carries. The carry beats the first tackle attempt, keeping momentum in the Irish attack.
The speed and momentum in the Irish attack has created an overload in the 15m channel. New Zealand have their 1/3/4/7/8 and 9 all within arms reach of the ruck. This restricts their width completely and means Ireland have a 3 on 2 chance down the 15m channel.
It is important to note how crucial Gibson Park’s delivery here is. The 9 fires a pass quickly to Mack Hansen before New Zealand have a chance to reorganise. Mack Hansen then has time to catch and attract Ioane before making a skip pass to James Lowe. The skip pass beats the New Zealand winger and James Lowe breaks the line. Hugo Keenan does well to flood through in support and score Ireland’s second.
The second example of this rewind capability comes from their Grand Slam game versus England. Dan Sheenan’s 67th minute try showed how Ireland will repeatedly look to the short side and are also more than happy to use the 5m try to stretch sides.
The maul release this time is a little more difficult and Ireland take a phase to settle with a pod crashing into the England defence. The breakdown work is good especially from inside clear Ryan Baird (4). This means the ball is presented quickly and allows Gibson Park to fire a skip pass straight to Mack Hansen. Hansen fixes David Ribbans and frees Sheehan down the tramlines, getting Ireland onto the front foot.
The next phase sees Ryan Baird back to his feet and carrying hard. Again work from the ruck clearers is good and keeps the breakdown nuisance free. England paver fold which means when Ireland’s carriers reload they have an overlap on the blindside. Gibson Park then finds Hansen who has plenty of time with England on the back foot. The winger takes three steps starting square before delivering the pass to Conan. Good hands from Conan then allows Dan Sheehan to slide into the corner.
Ireland’s blindside attack enables them to threaten across the entire width of the pitch. Enabled by the work rate of their players, in both these examples players were involved seconds before, then returned to their feet and were ready to attack before the defence who weren’t able to react.
Ireland’s Approach to Control: The Kicking Game
However a world title charge isn’t built on just one weapon and Ireland will look to present a wide array of threats. Farrell’s charges also bring a strong kicking game making more kicks than 89% of teams in the professional game while also retaining more kicks than 90% of teams.
This is a nice example from the Six Nations game against Scotland. Ireland have Mack Hansen arcing behind the ruck to come onto the blindside on the chase and compete for the ball. Box Kicks into the 22 aren’t a frequent weapon but show the range of options this Ireland side bring to the table.
One other kicking weapon the Irish used to regain the ball was 50/22s. No other international side has kicked as many (7), 50/22s as Ireland. Andrew Conways two against England in 2022 were a great example of how Ireland used the new rules to punish an opponent’s loose kicking.
Ireland typically make these kicks early in the phase count, 5 of their 7 happened on the first phase of attack while the other 2 happened on the third phase. By kicking to the tramline on transition the Irish bring the 50/22 into play. The transition nature of the 50/22 is also shown by the positions who have made the 50/22 with 3 being made by forwards.
Now obviously there is a great deal of luck in their 50/22 return but their willingness to kick on transition can help Ireland gain the upper hand. For example following the Peter O’Mahony 50/22 they lost the lineout but won a penalty inside the New Zealand 22 and were able to increase their lead beyond 2 converted tries.
A First Semi Final?
No-one in the Ireland camp will want to be getting ahead of themselves just yet. While in a difficult pool with Scotland and South Africa, Ireland should progress. Yet awaiting them will be either an All Black side who have been going from strength to strength or a French side playing at home. The path to making history won’t be easy for Ireland but a first semi final will be the target. Driving them towards this goal is an attack driven by great interplay and cohesion across the XV, and a strong work rate which enables their blindside attack. While their kicking game is driven by an ability to regain possession while not overlooking the territory battle helping them pin their opposition. The Irish will be a difficult side to beat for any side with a range of tools and experience which could propel them to a first semi final.
New Zealand will enter the 2023 World Cup in an unfamiliar position. At every edition of the World Cup since 2007 the Kiwis have been world number 1. This time however they will be underdogs in France. They haven’t reached the heights of previous years but still possess a world leading attack as well as being superb on both sides of the driving maul. So today we dig deep into how New Zealand will look to shock the World.
Attacking the All Black Way
When we are examining a team’s attack we can use their pass data to see each team’s playmakers. Looking at the New Zealand attack radar below we can see how their use of the Full back stands out against the rest of professional rugby. The main advantage of this second playmaker system for the Kiwis is their ability to split the field and threaten both sides of the breakdown.
A strong blindside attack has proved a key for New Zealand over recent years, take this clip from their game v Japan. A hit up from Caleb Clarke on kick return splits the field and gives New Zealand a large blindside to work with. The play is sluggish and results in a turnover but shows the intent to reload quickly and have a two sided attack.
It was no different against the Pumas last weekend. The clip below shows how work rate underpinned their blindside attack with a cluster of blackshirts reloading to stretch to the Argentina defence. The pass from Smith is crisp for Beauden Barrett who then fires a flat pass direct to Narawa. Narawa beats the first tackler putting New Zealand on the front foot.
Their short side attack was also key for the 3rd try last weekend. Jordie Barret, Caleb Clarke and Beauden Barrett all reload to the short side and hold their width. Some quick hands and they are away with the three players then all flooding through post-break meaning that Jordie Barrett can run it over the white wash.
Their blindside attack enabled the All Blacks to change their point of attack. This ability to strike across the field was also underpinned by a strong cross kick game. The All Blacks make 1.11 cross kicks per game, the most in Tier 1 rugby.
Take for example this from their game versus Scotland last Autumn. The All Blacks are rampaging having made a break down the left wing. Scotland give away a penalty at the ruck trying to stop their momentum but this doesn’t stop a lovely score.
The set up for the kick is slightly disjointed with the Kiwis hitting a forward pod first before Jordie Barret finally gets the ball in his hands. Barret turns immediately to find Telea and pointing his hips towards the target kicks a low kick into the expanse of the Scotland backfield for their second try.
Or take this example against England off a scrum launch in the first 10 minutes. The Kiwis have clearly identified that England use a narrow defensive press on the first phase. To expose this Caleb Clarke has kept his width hugging the touchline. This allows the winger to attack the catch zone from out to in and take the ball two handed before setting off on a mazy run which takes play into the England 22.
But the cross field kick wasn’t solely an attacking weapon with the All Blacks also using it as a more aggressive exit option. This example versus Japan shows how they looked to play to their strengths and create aerial competitions on their exit.
Mastering the Driving Maul
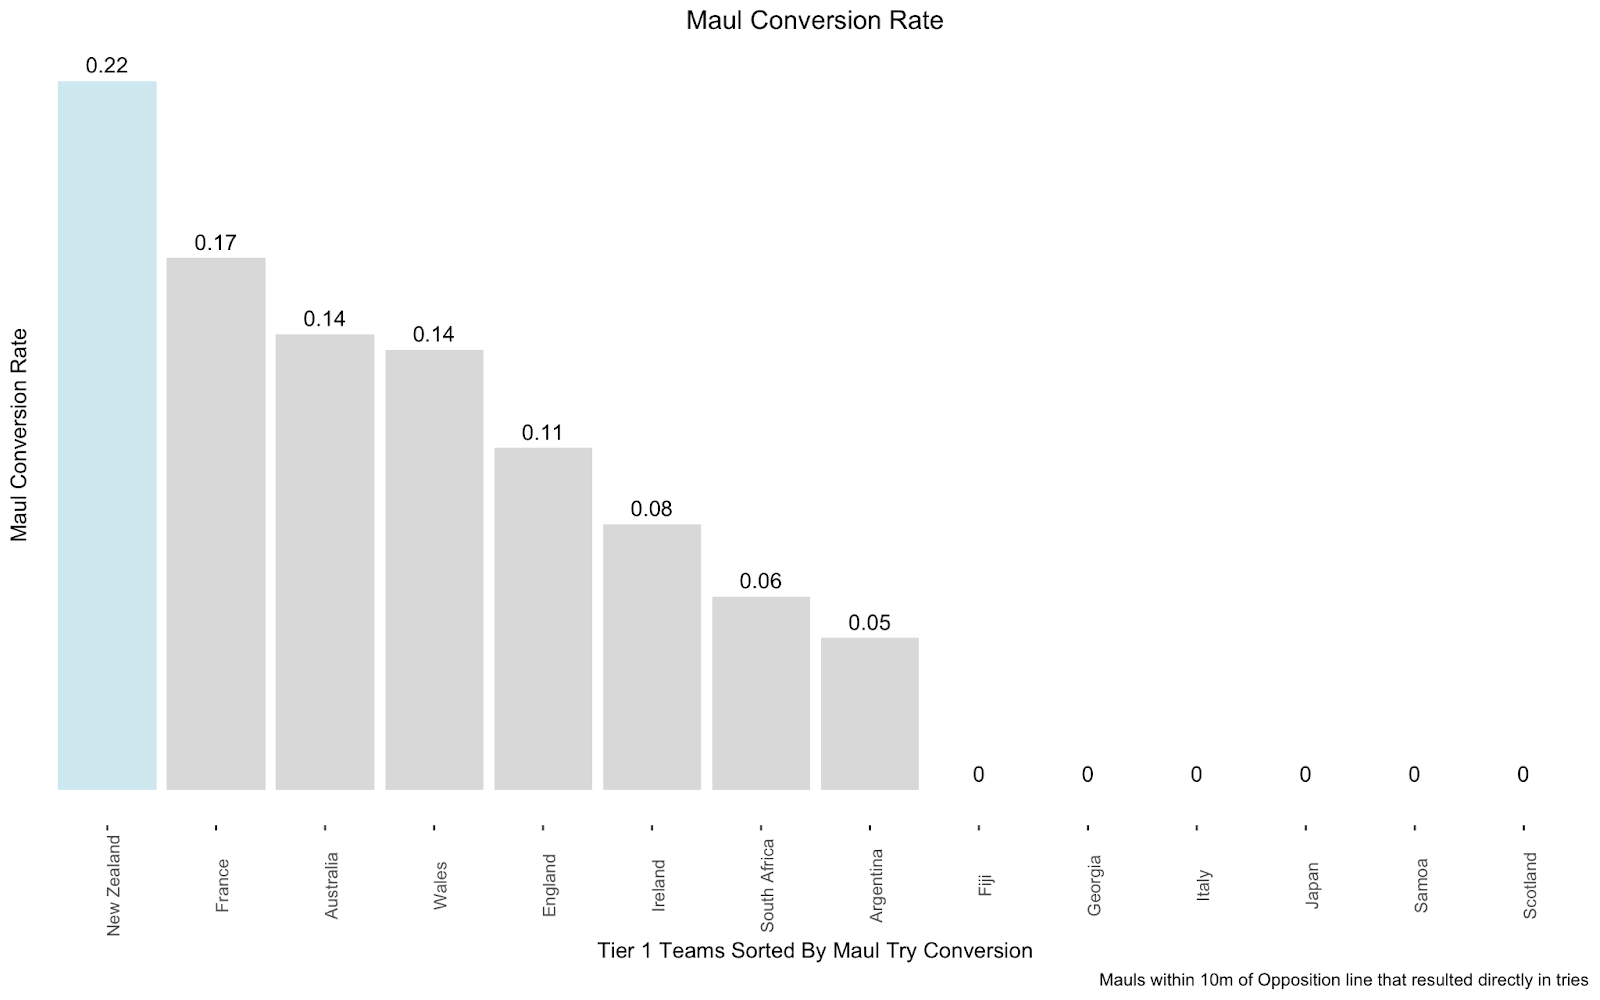
A lot of the strengths we have covered so far look at the All Blacks back line but a lot of their strength revolves around their forward pack and especially their driving maul. No other side within Tier 1 rugby is better at scoring tries directly from mauls within 10m of the Opposition line.
So how did the All Blacks build this devastating weapon?
A big part of this dominance was achieved by double stacking. The idea is to slide a lifter behind the jumper protecting the ball from the defence. Stacking also boosts the stability of the maul before supporting the jumper before the team begins their drive. The tactic exploits a grey area in rugby, where if there is access to the jumper as he lands then it is legal otherwise sides can be penalised for obstruction.
This example from their game against Wales shows New Zealand’s intent with their double stack. Ardie Savea sliding behind Papalii from the back lifter . The number 8 looking to get his shoulder through the gap and dominate the space in behind jumper. Also note the twist in the All Black lift and how he looks to drop Dalton Papalii behind him. This space is known as in the pocket and is another way that New Zealand look to give their jumper space and time to set.
We see the same pattern with this try against England. Scott Barret is the stacker on this occasion with the All Black 6 stepping behind Brodie Retallick to allow the pivot. The pivot in a maul is an important weapon as it allows sides to avoid the opposition’s strength. England’s maul defence is a bit disjointed with players hitting at different angles, but New Zealand are able to navigate through with Scott Barrett turning the maul while the remaining All Blacks drive infield.
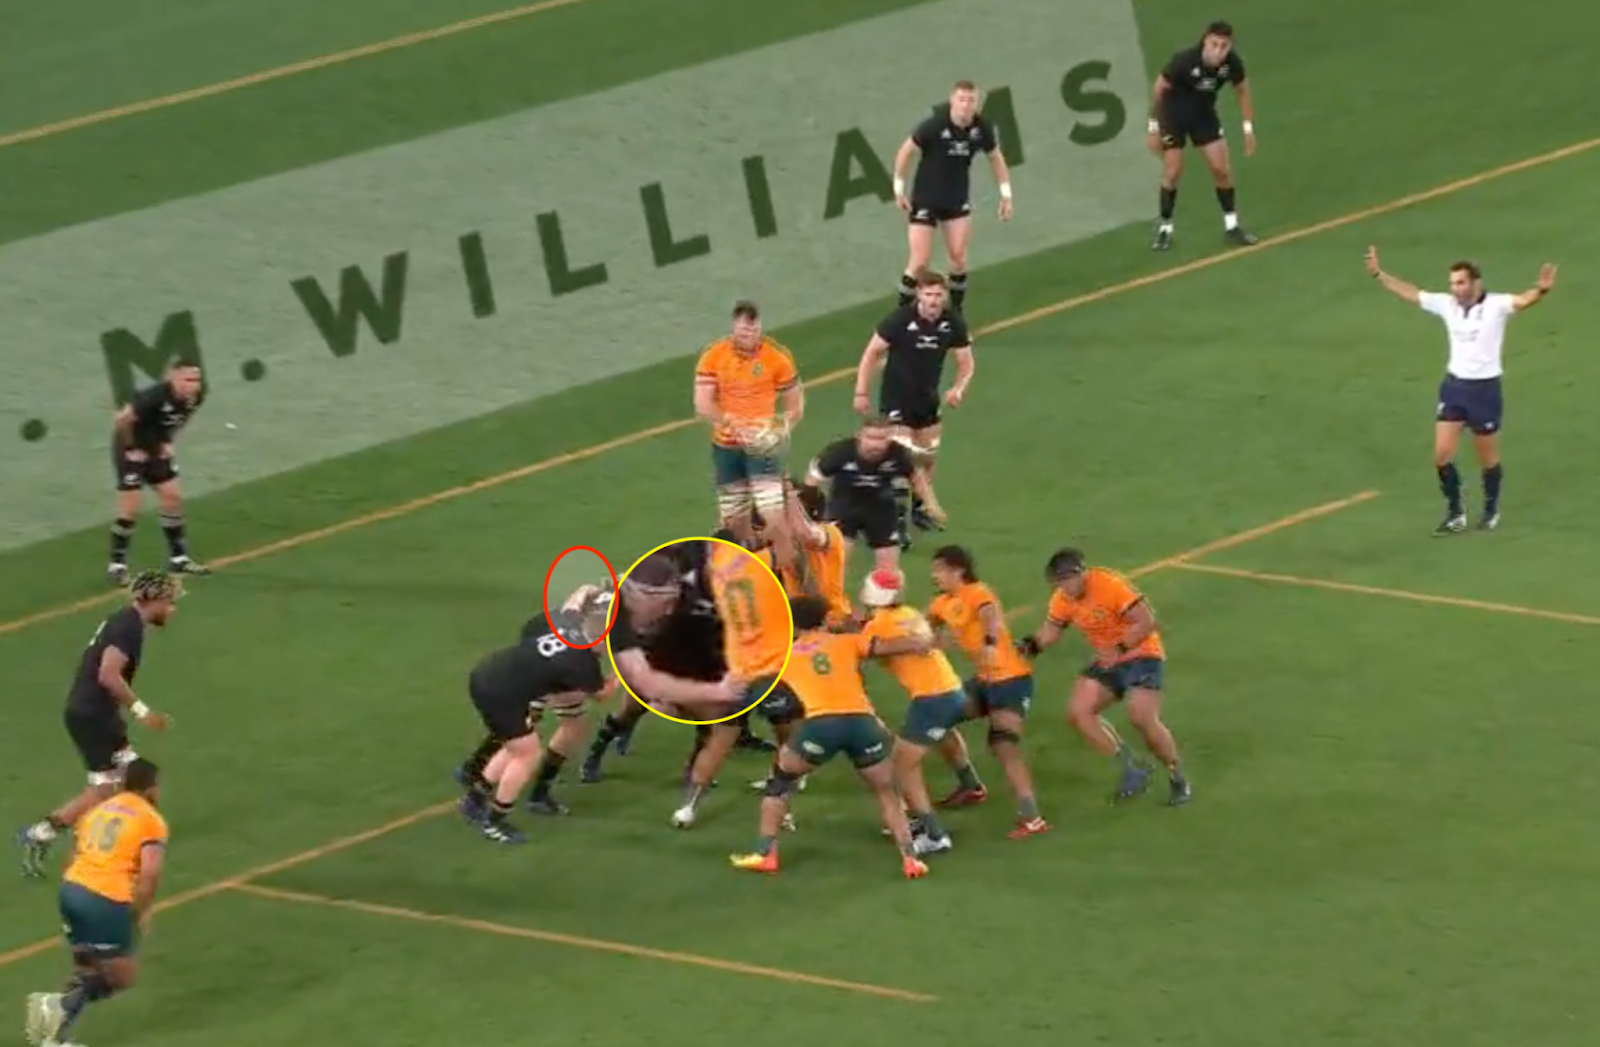
Arguably however it was their maul defence which was more impressive with the All Blacks conceding just 2 tries directly from a maul in the last two years, including the one this past weekend. We can see two of the foundations behind this strength in this maul against Australia.
First, the New Zealand team look to bind up with each other (red circle) as if they were in a scrum, this connection helps preserve their strength and means that they are able to direct the power in the same direction.
Second, they also make early contact with the Australian lifters. This is shown in the zoomed yellow circle, with Brodie Retallick grabbing the front lifter. This binding helps the second row preserve space between himself and the Australian pod allowing him to catapult into the maul.
We can see the effectiveness of this catapult by looking at Australia 17’s body position. Initially both players try to race to fill the space and get as low as possible. Brodie Retallick wins the race and he is able to drive under Taniela Tupou. This all help prevent the Australian’s getting any momentum and they are forced to play away having made no ground.
We can see similar tactics against Wales. Again New Zealand bind early between the New Zealand players before the contact. We also see the early binding on the back lifter, and New Zealand are able to win the initial engagement. Wales do try and spin into the openside but New Zealand are able to pin them in. The actions of 6 Shannon Frizzel are important here with a long bind and strong angle preventing Wales access to the midfield or any go forward.
All Blacks Mission To Shock The World
New Zealand are not near the heights of the 2015 dynasty but despite this it would be folly to write them off from World Cup glory. Their performance against the Springboks on Saturday was a real statement of intent. Since 2019 the All Blacks have the third best win rate, driven by an attack which has scored 32.8 points per game, 3 points better than France who sit second in Tier 1 games. Defensively they sit second best to Ireland’s 16.6 points per game conceding a miserly 19.8 points per game against Tier 1 opponents. All this points to a side who should strike fear into any team they face at RWC 2023.
The Rugby Championship began with a disappointing defeat for the Wallabies as they lost 43-12 against the Springboks. While the defeat will leave a sour taste we began to see the changes that Eddie Jones is looking to make this Australian side his own. Today we examine how Jones’ use of wingers varies from Rennie before looking at where the Australians will need to improve to get their Rugby Championship back on track.
Dave Rennie’s Inverted Wingers
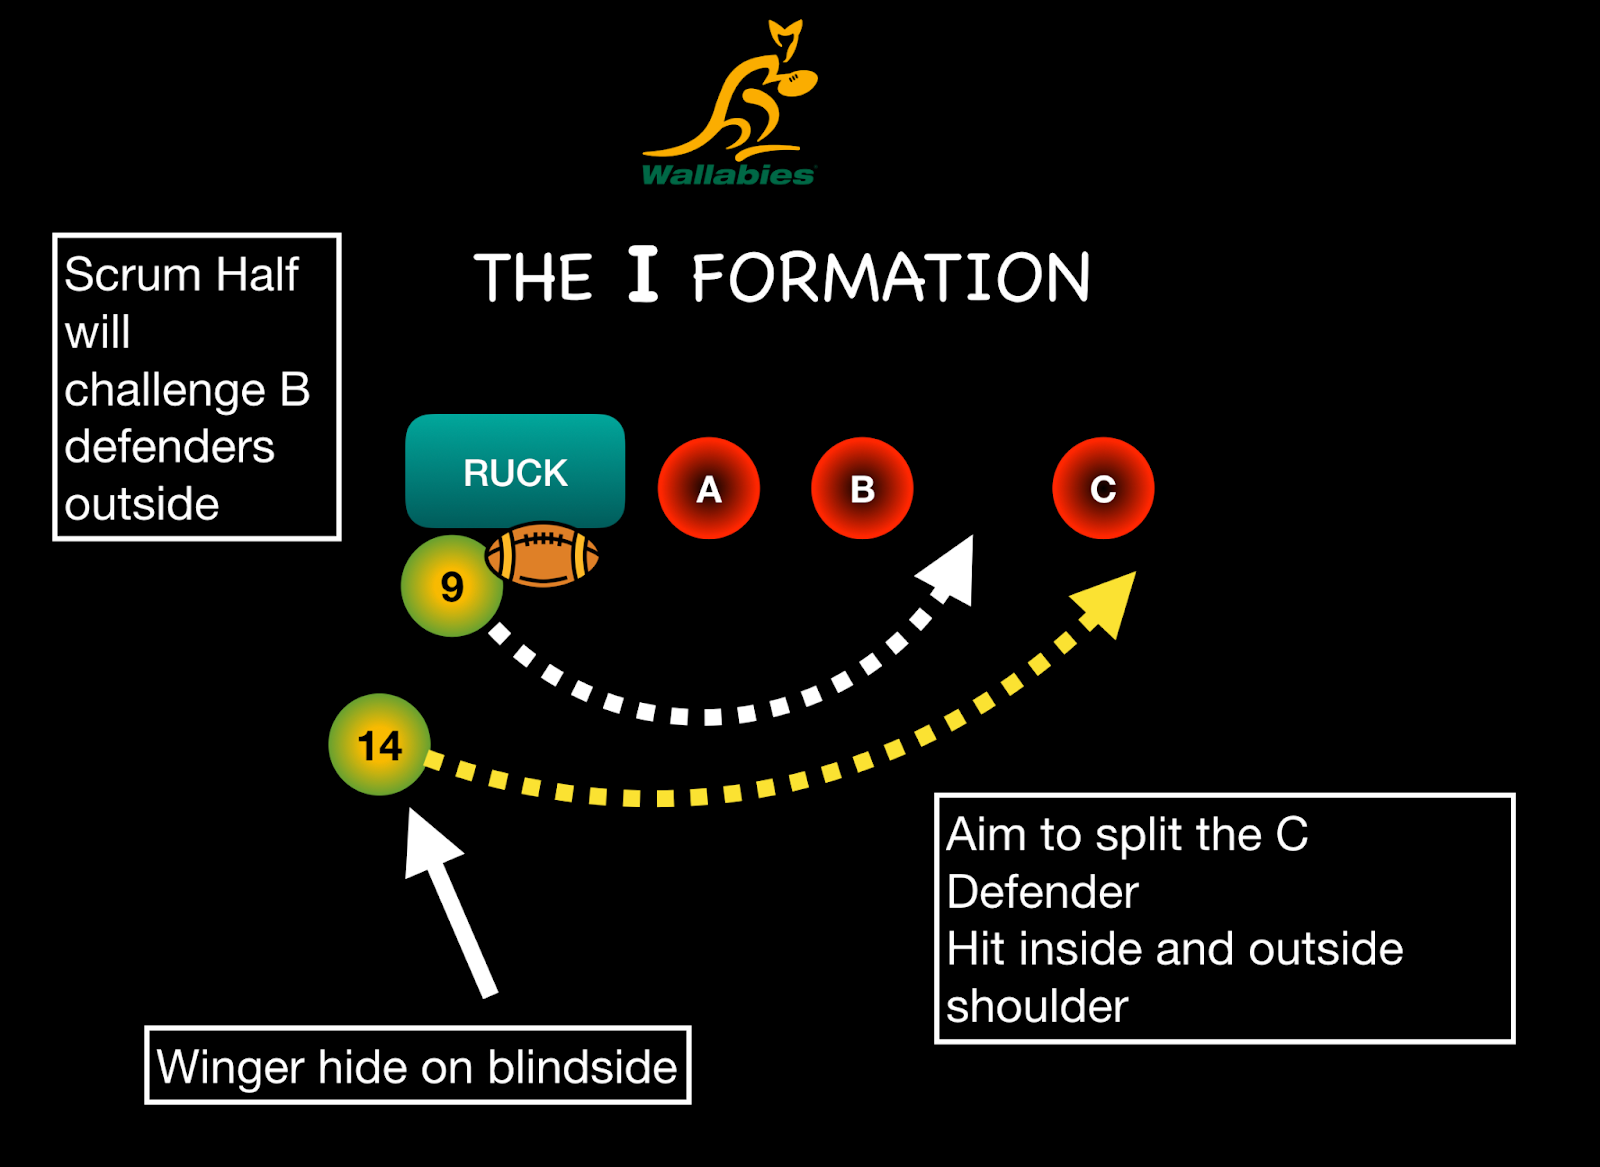
Under Dave Rennie the Wallabies frequently used inverted wingers. This means Australia’s wingers were often used as carriers in midfield. Over the last two years the Wallabies wingers made 46% of their carries between the 15 metre lines. Teams typically defend with tight forwards closer to the breakdown and the Wallabies looked to create speed mismatches by using their wingers in an “I formation” behind their scrum half.
The clip below from Australia’s victory over Wales in the autumn shows this well. Mark Nawaqanitawase positions himself behind scrum half Jake Gordon to hide from the fringe defenders. Gordon then snipes and Nawaqanitawase fades to his outside before taking a pop pass and challenging the line. The speed and agility of the winger sees him beat 3 defenders before riding the tackle and offloading. The ball goes to ground at the end of the play but it’s a good example of how Australia tried to create mismatches with their wingers.
This example from their game versus Ireland is less pre-planned but shows a willingness to attack back towards the fringes of the ruck. A bouncing ball means the Irish defence rush up and Tom Wright beats the first tackler to get to the gain line. An offload to Foley puts the Wallabies on the front foot.
Dave Rennie’s attack also utilised wingers in the pick and go game. Marika Koroibete was a great exponent of this, helping keep defences honest with his pure physicality. Take for example this clip against Argentina with Koroibete making a pick and go before then clearing out a ruck to keep possession for Australia.
This is a trait we may see continued under Eddie Jones, who can forget the games he played with the media around Jack Nowell and the England number 7 shirt. Jones will look to have at least one of his wingers operate as a workhorse. The numbers show the similarity between how Eddie Jones’s England and Australia under Rennie used their wingers. In 2022 England’s wingers made 45% of their carries in the midfield, in the same season Australia made 44% between the tram lines. Opposition fringe defences will certainly have to remain connected to shut down the Wallabies attack.
Australia’s Tight Attack
The fringe attack didn’t just stop at their use of wingers, Australia also represented one of the most 9 driven attacks in professional rugby. Their 9 contributes more passes to the backline than 90% of other sides.
The play around the fringes became a really key theme of the Rugby World last year, and Australia were able to expose this space frequently. One of the drivers of this was how good Nic White was in motion.
Take this play against France. Nic White scans as he’s approaching the breakdown and is able to explode from the base following good presentation from the carrier. This also allows him to draw an offside penalty while opening a space for the Australian 8 to dent the French line.
This score (though it was ruled out) against Ireland is another good example of their fringe attack. The move has similar design to the one above versus France. Both come from Australia switching direction to attack against the grain. Against Ireland a wide pass from White to James slipper has stressed the Irish fold. This results in Andrew Porter being left defending far too much space. White spots this and darts to the left. Hooper has set himself in the “I Formation” we discussed earlier while Mark Nawaqanitawase is an option to Nic White’s left. This means Ireland are defending a 3 on 2. White’s wide arc puts him directly in the gap between Porter and McCloskey and neither is able to stop the scrum half getting over the line.
Under Eddie Jones we are likely to see a shift from this 9 driven attack. The scrum half made 63% of England’s play maker passes compared to Australia’s 74% in 2022. The development of the Australian attack will be key for any smash and grab attempt at RWC 2027.
Merging the Two
Australia began their transformation against the Springboks with their scrum half making 64% of their playmaking passes almost identical to Eddie’s England. It did come off a turnover ball, but the first try from Marike Korobette showed their desire to spread the ball. Two quick passes taking play from one touchline to the other, and beating the South African press to score in the corner.
In phase play we saw the Wallabies use multi-layered plays to try and create mismatches outwide. These involve two or more options with a hard runner trying to fix the inside defence and a pull back option offering the width.
This phase shows the space they were trying to attack Saturday. Quade Cooper engages defence before snapping the ball behind for Marike Korobette but rather than carrying the winger floats one to right winger Vunivalu. They do find the edge and are able to play around the South African press on this occasion. But it was a picture that was few and far between for Australia on Saturday..
The South African Strangle: Why the Wallabies Struggled
Australia were unable to impose themselves on Saturday and will need to tweak their game plan this weekend, maybe consider using their winger closer to the fringes as we saw under Rennie. This is because they lacked a physical punch and South Africa were able to dominate the gainline. The pivot away from their tight fringe attack to the wide game plan Eddie Jones is going to be a difficult transition but merging both weapons could well help them move forward.
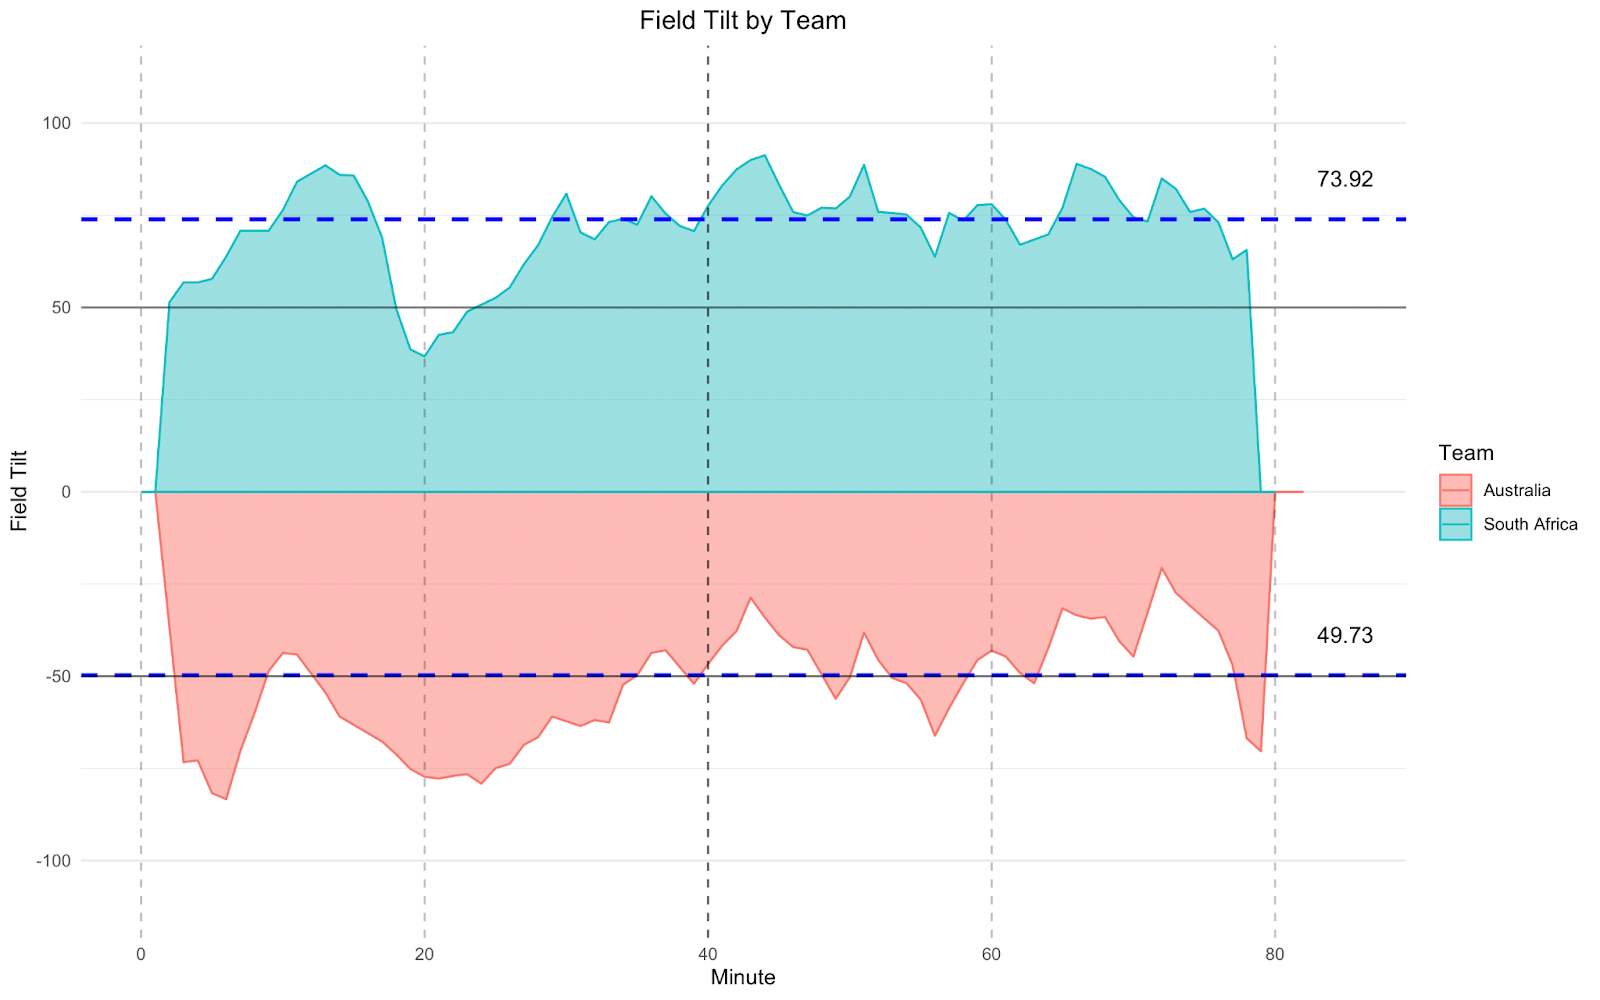
However their biggest problem was not the merging of two styles of play but that they couldn’t impose themselves on the game across the full 80 minutes. The graph below shows the field tilt, or territorial dominance of each side with South Africa in blue and Australia in red. The blue dashed line shows the average field tilt for both teams.
South Africa were able to strangle the Australians and prevent them gaining a foothold. Australia had an average field tilt of 49.73, meaning the average position of rucks was within their own half. While the South Africans field tilt was 73 so they attacked for the majority of the game from just outside the Australian 22. And apart from one small period they were anchored in the Australian half.
Eddie Jones will have a lot to tweak this week before the Argentina game but it will have to start with establishing a firm foothold and applying territorial pressure. Argentina will have no rollovers in this regard with a strong kicking game. However it will be an important challenge in Eddie’s first game in front of his home fans.
Assessing Australia
Last weekend proved a rude awakening for Australia, there’s not much sugar coating for a 43 to 12 defeat. Part of the reason behind this is the new expansive manner of playing that Australia are transitioning to after the inverted wing and tight play of the Dave Rennie regime. Having this style of play in the back pocket will be good for Eddie moving forward though he’ll certainly be looking to stretch teams as Australia did for their first try this weekend. This will rely on more physicality in their carrying game with South Africa’s starting tight five making 44 metres from their carries over 2.5x more than their Australian counterparts. Patience is key and it is important to remember we are still at the bedding in stage for Eddie Jones but he will certainly be demanding improvement from his Wallabies as he looks for a first victory against Argentina.
The Rugby Championship returns this weekend and with a World Cup around the corner it forms a crucial stage of preparations. The current World Champion Springboks are playing host to the Wallabies as they begin their international year. Let’s look at how they have played and what we can expect come Saturday.
Playmaking Full Back Key To Wide Attack
Few players captured the imagination of the rugby public at RWC 2019 like Cheslin Kolbe and Makazole Mapimpi. The two Springbok wingers offered work rate, calm under the high ball and an ability to beat players with ease in the wide channels. And it’s in these wide channels that we start. The heat map below shows every carry made by a South African winger, removing kick returns, since 2021, and it paints a clear picture. Jacques Nienaber’s wingers stay in the wide channels rarely venturing inside the 15m.
Within international rugby most sides have their wingers average more than 40% of carries happen between the 15m lines, as teams look to create speed mismatches. The Springboks however differed significantly from this with 80% of their carries happening in the wide channel (between the 15m line and touchline) as they look to use their pace to create breaks out wide.The graph below really emphasises the difference, with no other international side carrying more than 67% of their ball in the wide channel.
So why do the Springboks use their wingers like this? Certainly some of it is driven by their personnel, of the top five wingers for breaks per carry in the wide channel two, Cheslin Kolbe and Kurt Lee-Ardense, play for South Africa while Makazole Mapimpi sits 6th. All helping South Africans create the third most breaks per carry in the wide channel, and second most metres per carry out wide.
But the South African wingers only form part of their back three, with perhaps the crucial Springbok wearing the 15 jersey. For South Africa, those wearing the Full Back operate as a key second play maker. One of the best ways to see this is by looking at their pass contribution, the amount of passes they make divided by the total passes of the back line.
The graph below shows how much of a role the 15 plays in the Springbok attack. The South African 15 makes over 30% of the backline passes.
Willie Le Roux is a great asset in this regard, adding extra width to the South African attack and helping them find the space outwide. Willie Le Roux has created 18 line breaks from his passing since 2021 a total only beaten by Finn Russell. If we adjust to a per game total, Le Roux slides into fourth place out of a total of 376 players, not a bad return.
Having looked at the data, what does this look like on the pitch? The carry below from Makazole Mapimpi is a great example. Playing from edge to edge, South Africa use Willie Le Roux as a second playmaker. The Full Back does a fantastic job to attract Will Jordan before releasing Mapimpi. This allows the winger to make big gains down the edge.
The play does result in a breakdown steal for the Kiwis with Ioane doing really well to cover across but is still a great example of how South Africa looked to stretch their opponents.
This score from Australia is a great example of how South Africa were able to expose narrow defences.
South Africa made a great break on the previous phase and spread the ball against a disjointed defence with Mapimipi receiving the ball just inside the Australia 22 from Le Roux and scoring well in the corner. However it’s the role of Le Roux here that is all important who shows great subtlety to outflank the Wallaby defence.
In the graphic below we see how the edge of the Australian defensive line is incredibly narrow. The winger, has also pressed ahead of the main line and is incredibly focussed on the ball. This allows Willie Le Roux to fade outside and flank the defender. This creates a South African 2v1 in the 15m channel and even though Marika Korebete nearly makes it across, Mapimpi finishes the chance well. But the try all comes from the subtlety of Le Roux’s outside arc.
So what have we learnt about the Springbok Back Three? Firstly they leave their wingers incredibly wide and prefer to use them to stretch sides and occupy the 15m channel, while their Full Back operates as a second playmaker. It’s certainly a system which suits the Springboks – and the pace they have outwide as well as maximising Willie Le Roux’s talents with the ball and his distribution. If the Springboks are to deliver a second world cup on the bounce they will need the connection of their back three to fire on all cylinders.
Risk and Reward: The Springbok Defence
The most vaunted aspect of this Springbok side however is their defence. It was the primary weapon as they strangled and suffocated opposition en route to the world cup title 4 years ago. So what is the profile of the Jacques Nienaber system?
There are two very clear focusses for the Springboks – they are heavily reliant on their outside press and then when they make the tackle look to disrupt the breakdown. This outside press is something I explored in a deep dive into the Crusaders and the mechanics are similar for the Springboks. This outside press is shown by how often their wingers and centres to get high even going beyond the ball to try and force the opposition inside.
This clip from their game versus the All Blacks is a great example of how they want to defend. From a midfield ruck the Springboks on the outside look to get high, and narrow on their press. Mapimpi, the winger tracks down the 15m line and accelerates as the pass goes to Reiko Ioane forcing the step back inside.
This outside press is high risk, high reward and does leave them vulnerable. This clip from their trip to Argentina shows how the Springboks mitigate this risk. The defence relies on the inside defenders to slide under the aggressive outside press. Doing this means even if the opposition beat the press and can get the ball outwide the Springboks are able to minimise their losses.
The second element of their defence is the focus on the breakdown. A big influence on this was their prioritising of the second action. Take this clip from their match versus the Kiwis last year. The Springboks make the tackle on first phase on the gain line. But rather than settle for that Damien De Allende and Kwagga Smith immediately disrupt the breakdown. The counter drive is superb and the Springboks secure possession.
Summing up the Springboks
With the Rugby Championship starting this weekend the Springboks will look to hit the ground running. Crucial for that will be getting their attack to the next level and consistently firing. The Springboks have only scored the most points in the Rugby Championship once in the last 4 years and they went on to win the World Cup in Japan later that year. Crucial to their attacking success will be Willie Le Roux and the link up play he offers. If Australia can’t contain him this Saturday they could be in for a long day. On the other side of the ball expect South Africa to bring their high risk high reward defence. The trust and work rate in their system is something to be marvelled at and could propel them to a second World Cup in a row later this year.
The Crusaders are the standard setter in Southern Hemisphere rugby having underlined this status with a 7th Super Rugby title in a row. Today we dive into the building blocks behind their triumph. First we look at how they use forwards in their attack before focussing on their ability to change the point of attack. Afterwards we turn our focus to their kicking game, before examining their defence which conceded 36 tries across the competition – the fewest in Super Rugby Pacific.
Stretch And Speed: Crusaders Attacking Mindset
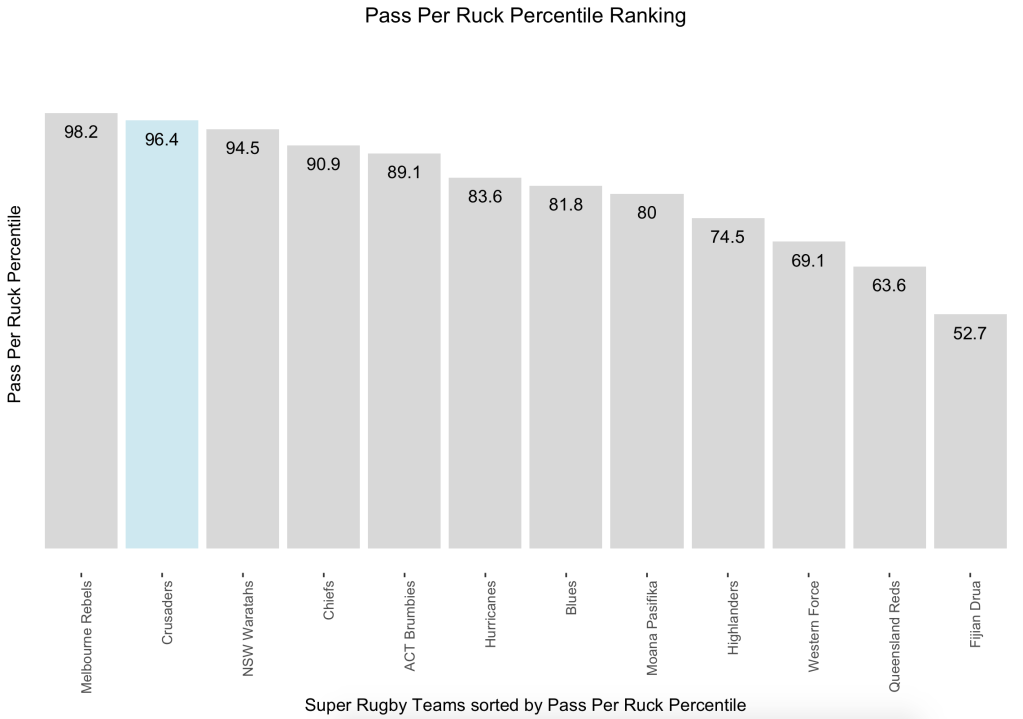
The Crusaders had the fourth best attack in Super Rugby before the playoffs recording 32.6 points per game. The basis of this attack was their ability to stretch teams the Crusaders made more passes per ruck than 95% of top level professional teams.
One of the driving forces behind this wide attack was the ability of their forwards with ball in hand. What is noticeable is that most Super Rugby sides have their forwards pass more per carry than average. Given this it’s no surprise the Crusaders sit in the top 20% globally.
Dynamic Forward Attack
The use of forwards helped to maintain the flow of their attacks, for example in the build up to their 8th minute try versus the Waratahs.
Having played outwide the Crusaders look to spread their attack. The first pass goes to Richie Mo’Unga who then hits Sam Whitelock in the middle of a forward pod. The set up isn’t perfect but Whitelock is able to attract the Waratahs press before pulling the ball behind allowing Fergus Burke time to make the wide pass.
From the touch line the Crusaders then strike into the midfield. Having crossed the gainline ont the previous phase Sam Whitelock is able to move onto the ball against a Waratahs defence on the backfoot. The second rower’s tip pass allows a half break and keeps the Crusaders moving forward.
The scoring phase, a little later in the attack, shows how strong the Crusaders are when they have momentum. They strike off the left edge, with scrum half Mitchell Drummond hitting Cullen Grace. A great line from Fergus Burke means he appears unsighted.
Burke then passes to Sam Whitelock, allowing the lock showing his class. The 143 cap All Black breaks the first tackle before offloading to blindside Lio-Willie. The number 6 accelerates through and one final offload sees the Crusaders open their account.
The use of offloading particularly among the forwards really helped the Crusaders pick teams apart. It allowed them to keep the pace in the attack and alongside tip passes also meant they could find soft shoulders enabling them to build momentum by winning the gain line battle.
Swing To Win: Maximising the Second Play Maker
Another key factor behind this try is the Crusader’s use of secondary playmakers. Both their Full Back and Inside centres sit above average on their passing contribution. The use of a second playmaker was also key in enabling their swing attacks.
This swing attack was particularly effective against the Blues during the Semi Final.
The 11th minute try comes directly from the work rate of Will Jordan. Initially the full back positions himself on the blindside but noticing the change of direction Jordan loops around to be behind Richie Mo’Unga. The impact of this late appearance is clear as the Blues Winger shoots out of the line to tackle the wrong man allowing Jordan to break through.
Using the overhead angle we can see how the Crusaders change the point of attack which shocks the Blues defence. Mo’unga hits up a forward pod just outside the right hand post. The fly half then positions himself behind the ruck before switching to attack against the grain. Will Jordan notices this change and runs a very flat arc, hiding behind the forward pod, to get become an option outside Mo’unga.
Later in the game we see how Mo’Unga takes advantage of a mismatch against a prop to break through. Again the Fly Half starts directly behind the ruck, before moving to launch the attack The swing is well timed with Drummond hitting Mo’Unga early to keep the element of surprise. This allows the 10 to receive the ball in motion and isolate the prop before stepping back on the inside and creating the line break.
So as we round this section to an end, what can you steal from the Crusaders attack to make your attack more effective. Firstly their ability with the ball in hand. Having 15 players comfortable with the ball allows them to stay fluid in attack. Second, their use of the swing attack and especially the starting position of the Fly Half allows the Crusaders to change the point of attack with ease. This coupled with excellent individual play and skill allowed the Crusaders to be one of the leading attacks in Super Rugby.
Kick To Victory
The Crusaders also had an incredibly strong kicking which helped lay the foundations for their attack. The main driver of this kicking game was control, a trait they showed to great effect against Fijian Drua in the Quarter Finals.
We can use a metric called Field Tilt to show a team’s control. In the quarter final game we can see that the Crusaders Field tilt dropped below 50 just once, while their opponent had just 5 small periods which scraped across the halfway line. A truly dominant display.
So let’s look at how the Crusaders used this kicking game to apply pressure and strangle sides out of the game. One of the main driving forces was simply the quantity of kicks that the Crusaders made with more kicks per game than any other Super Rugby side. While kicking is not a silver bullet the Crusaders add another piece of evidence that it is often the foundation of a title winning side.
This kick versus the Drua though is a good indicator of one way they looked to apply pressure. Starting from a centre field scrum the Crusaders spread the ball and then kicked down the tramlines. The Drua are unable to gather the ball and the Crusaders start an attack less than 10 metres out from the try line.
Kicking down the tramlines was an important part of the Crusaders building pressure on the opposition. This example from their game versus the Brumbies doesn’t result in a turnover but shows a willingness to kick once they enter the 15m.
They also used kicks to move down the field during transition. This from the 1st minute from the Semi Finals demolition of the Blues is a great example. The Crusaders kicking down the tramlines and win a 50/22.
The strength of the Crusaders kicking game is that it applied pressure and often created a chance to win turnovers. This is backed up in the Oval data with the Crusaders retaining the most kicks of any side in Super Rugby.
Controlled Aggression: Crusaders Defence
The saying “Defence wins championships” has become a common phrase in sports, and the Crusaders demonstrated how defence can lead teams to glory, even in the high-scoring world of Super Rugby. Under the guidance of Scott Robertson, the Crusaders proved their defensive prowess by allowing a meagre 36 tries, the lowest in the entire competition. Their outstanding defence was built upon a foundation of aggression, with their wingers and breakdown threats playing crucial roles in stifling the opposition’s attacks.
The radar shows this aggression. The Crusaders challenged more rucks than over 94% of teams, while recording more turnovers than any side in Rugby’s top professional leagues. Their wingers also made more centrefield tackles than 90% of teams, an aggressive trait that helped the Crusaders rank in the top 20% for tackles behind the gain line.
One of the main traits in the Crusaders defence is how high their wingers get. A trait that is also synonymous with the Springboks and their run to world cup glory. By allowing their wingers to get higher defensively the Crusaders looked to impose themselves on the opposition. But what does this aggression look like on the field?
The Crusaders are defending here following a kick chase and set up narrowly. The winger (red circle) sits outside of the 15m ready to angle in on the Waratahs playmaker (yellow circle). By targeting the playmaker the winger aims to shut down the attack and prevent them utilising their numerical advantage.
This aggression is rewarded with the winger making the tackle behind the gainline allowing his teammates to attack the breakdown and win the penalty.
We can see the mechanics of the defence better by looking at a play from the Final v The Chiefs. The Chiefs, shown in Orange, are set up with pod options before and after 10. The second pod will see the Number 11 loop out the back.
To defend this the Crusaders again use their winger aggressively. Starting well inside of the 15m line, Fainga’anuku looks to shut down the attack early. The Crusader’s 11 decision to fly early places the emphasis on the 6 and 2 to cover the space left behind. These are the catch up defenders and try to prevent any huge gains if the Chiefs are able to play around the pressure.
In the video of the play we can see this in action. Fainga’anuku flies out the line to apply pressure but is beaten by the ball. This allows us to see the work rate of the catch up defenders who minimise the ground gained by the Chiefs.
The catch up defenders are a crucial element of this defensive set up allowing the Crusaders to tilt the risk reward balance in their favour. Using Oval’s data we can see how well the Crusaders minimised risk by calculating Tries Conceded Per Line Break. No other professional side stopped breaks as well as the Crusaders, with a rate of just 0.48 tries per line break conceded.
The other key part of the Crusaders defensive system was their ability to turn over the ball.
Super Rugby had plenty of sides all looking to target the ruck. The Melbourne Rebels ranked last but still challenged more rucks than 65% of top level professional teams. The Crusaders were a clear part of this trend challenging the fourth most rucks in Super Rugby.
While the targeting of the ruck is clearly a part of Super Rugby’s DNA, the Crusaders were particularly effective. Scott Robertson’s chargers recorded more turnovers per game than any other side in top tier club rugby.
Defensively the Crusaders looked to choke their opponents out of the game. Whether it was with their wingers restricting access to the wide channels or at the breakdown. The Crusaders brought a great desire to their defence as well, restricting their opponents conversion rate. All this created an incredible defence with the Crusaders conceding the fewest tries in Super Rugby.
A Dominant Dynasty: Summary
The Crusaders’ title-winning journey was forged through a formidable wide attack, enhanced by the exceptional skill level of their forwards. Sam Whitelock’s masterful touches in their try against the Waratahs epitomised the momentum-generating prowess that fuelled their success. Their ability to swing and shift the focus of their attack added another dimension to their already potent offensive arsenal. Their dual playmaker set up helping exploit the gaps in opposing defences. Alongside this they brought a strong kicking game and suffocating defence which applied relentless pressure to their opponents. In the Quarter Final against Fijian Drua, they applied a strangle hold which paved the way to success. While across the season aggressive wingers and ruck pressure system stifled their opponents.
Scott Robertson and the rest of the Crusaders coaching staff have created a legacy in Christchurch that very few professional sports teams can match. The title this year represents a great sign off for one of rugby’s most dominant set-ups.
In the final written piece of this deep dive into Leicester Tigers, we look at the strength of their kicking game.
One of the key parts of any rugby side is their approach to the kicking game. As the modern game has developed controlling territory and “playing in the right areas of the pitch” has become even more important. Today we will take a journey examining Leicester’s own approach, before looking at why kicking is important, and then moving onto Leicester’s specific kicking tactics.
Kick To Win Rugby
The reasons for a high kick game have not always been best explained, with some finding it easier to call it boring and move on. But today we will look deeper. Using my database of 138 pro games covering leagues from the MLR to the Premiership to the International game, we can look at the kicking traits of winning sides.
A summary of kicking data from games including both Leicester Tigers and games which didn’t involve Leicester. Teams clearly kick to win.
Winners (in the non-Leicester Games) averaged 24.29 kicks per game, compared to the losers who recorded just over 21. By kicking more teams can turn the screw and move themselves up the pitch trying to get to areas where they can be most effective with their attacking weapons. This effect was even more marked in Leicester’s game with the Tigers averaging 36 kicks in the games they won but this fell to just 27.5 in the two games they lost.
This hopefully establishes why teams including Leicester have a high kick approach. However, team’s need also need to be able to kick well and on their way to the title the Tiger’s exhibited kicking skill in droves.
Kick To Pressure
We can divide their approach into two different types of kicking game. Firstly kicking to apply pressure, and secondly, attacking kicks.
Let’s start with how Tiger’s kicked to apply pressure.
A strong kick chase from the Leicester winger Guy Porter against Northampton Saints in their Premiership Semi Final.
This clip from the semi final against Northampton shows a great example of Tigers kick chase was able to exert significant pressure. The passage started with Tigers stealing a Saints lineout in their own half. Richard Wigglesworth kicks looking to gain territory but off the turnover there is no chance to organise their chase line. This means Tigers rely on their work rate to apply pressure and kill any chance of a counter attack.
Harry Potter makes a huge perfectly timed hit driving back the catcher. After a dominant tackle the remaining chasers get straight to work attacking the breakdown. Driving past rather than for the ball. This counter ruck secures an impressive steal, although Chessum is unable to gather the ball cleanly afterwards.
The following clip from the final against Saracens shows an even better example of their breakdown work post kick.
Leicester pile the pressure on to Sean Maitland and win the turnover
Here Richard Wigglesworth kicks from the back of a maul, aiming for distance rather than a competition in the air. He manages to kick over the head of Maitland buying extra time for the kick chase.
The wide angle shows how Leicester arranged their kick chase. The length of the kick hits a perfect zone particularly powerful as it forces Sean Maitland to adjust.
The kick distance also enables Tiger’s to organise their chase.
In the still above, we can see a huge gap between those in the 5m channel and Tommy Reffell at the tip of the spear. From this position Tommy Reffell only overtakes one Saracen’s player instead giving the rest of the chase time to catch up.
Ollie Chessum makes a good tackle on Maitland who is isolated. He falls just in front of Julian Montoya who pilfers the ball well
Maitland initially shows some good feet to get around Chris Ashton but only runs into a swarm of Leicester Tigers shirts. Ollie Chessum and a recovering Ashton combine to make a double shot, chopping down Maitland right in front of the Puma-cum-Tiger Julian Montoya. The Argentine pouncing immediately to snaffle the ball and make the turnover.
There is a bit of luck in this turnover for Leicester with Saracen’s hard work at the maul spinning it in such a way that both Chessum and Montoya get a head start on their chase. But it is also another clear example of the pressure that Leicester exerted with their kick chase.
Kicks To Attack
In the past two blogs I have examined ways of how sides may tame the Tigers. However in this piece, we will look at something coaches may want to add to their play book as pre season winds down and the real rugby returns.
During the season Tiger’s developed a range of attacking kicks to apply pressure to opposition defences. Let’s begin with their kicking on the first phase.
One of Leicester’s powerful tools is there ability to compete in the air as shown on the way to one of their tries v Clermont
In this example Leicester Tigers play off the top of a four man lineout. Wigglesworth receives the ball early. The players in the lineout form an NFL-esque screen buying time for Wigglesworth to fire a pass to the Fly Half.
George Ford receives the ball and has time before the defensive line is able to apply pressure. This allows him to place a superb cross field bomb. The kick is aimed towards the right wing at JJ Hanrahn.
Freddie Steward has quickly become a household name in rugby and this is a superb take from the Leicester Full Back. The support and finish by Porter is also supreme
Steward dominates the air, leaping early and turning his back to JJ Hanrahan. This allows him to cut off the Clermont player’s access to the ball. tFollowing the superb take by Steward Leicester flood through in support. Another benefit of their superb work rate that’s been a feature throughout this series.
Harry Potter shows great awareness to support Steward. Holding his feet, ready for the offload from his Full Back. Steward does really well to release the ball, and Potter can take advantage. He then shows his finishing instinct, swerving the final defender to score.
Another example of Leicester using cross field kicks to attack the space
This try away at Connacht is another great example of their attacking kick repertoire. Freddie Burns takes the ball from Wigglesworth. This gives the Leicester Fly Half time against the flat three press of Connacht. Murimurivalu has held his width, leaving himself acres of space in the 15m channel. It’s a superbly well taken try and is another example of Leicester’s kicking game on the first phase.
George Ford puts a delicate kick over the Exeter Chiefs defence.
In this first phase kick by Tigers away at Sandy park we see a distinct change in strategy. Whilst in the first two clips we have seen the East Midlands side kick wider on this occasion they aim at the posts.
When defending in their own 22, some teams prefer to use a flat line and will typically have just a single player sweeping in behind. This means that the space around the posts can often be unguarded. And while spectacular Henry Slade defence prevents a score, it is an indication of a trend within Leicester’s kicking game.
Another kick into the middle zone behind the front line defence. Leicester’s kcik chase pressure wins the turnover.
On this occasion against Clermont, Leicester kicked following a couple of lateral phases. The kick from Jack Van Poortvliet is aimed into the centre field region dropping short of Clermont’s backfield coverage. This causes the sort of havoc that Leicester will have planned.
Clermont’s defence with a 13-2 has left the space and the kick finds the grass. Morgan Parra chases across to try and gather but can’t make the grab. This leaves a bouncing ball within the Clermont backfield. Leicester are then able to regather and attack inside the Clermont 22.
Another kick from the Scrum half again angle into the space behind the defensive line leading to a great Leicester try.
For the final example we return to the Leicester Tigers game at Sandy Park. George Ford has only just stumbled back into line having taken some medical treatment so Ben Youngs asserts control.
Youngs angles his kick towards the posts and splits the Exeter back field yet again. The kick is perfectly directed It bouncing away from Josh Hodge who was working the same way as the attack and has distanced himself from team mate Olly Woodburn. This distance forces Olly Woodburn to race across the backfield and play catch up.
This means all momentum is with Freddie Steward as he chases after the ball. Steward shows awareness to slow down his feet allowing Woodburn to run past. This means he is the first to react and regather the ball. It’s a strong finish from Steward and shows the benefits of attacking kicks being aimed at the posts.
Summary
The kicking game of the Tigers is simply a masterpiece, playing a key role in returning the Premiership trophy to Welford Road.
First they developed a kicking game based around pressuring their opponents and turning their defence into an attacking weapon. This was built primarily around a strong kick chase, and breakdown pressure. This suited their playing squad perfectly, especially with jackal specialists Julian Montoya and Tommy Reffell.
Secondly, they built a strong repertoire of attacking kicks. Whether it was first phase, or during phase play the Tigers added another level of threat with their attacking kicks. This is a weapon that teams at all levels can look to add to their repertoire ahead of the next season.
It was a joy to watch a team embrace the kicking game and be so precise in how they used it as a weapon. I for one am certainly looking forward to watching how Tigers develop this skill set further in the coming season.
Welcome to the second part of this series breaking down Leicester Tigers. Today we take a look at the formidable Leicester Tigers defence.
The defence built by the superb Kevin Sinfield were the only side to restrict their opponents to below 20 points per game. A superb achievement given some of the attacking talent in the Gallagher Premiership.
Over the following piece we examine how Sinfield used chop tackling to get the best out of his jackal threats, before moving onto their scramble defence which ranks as one of their most impressive traits. Then we will look at how teams may well look to break them down next season. Before all that though it’s time to stop off at the Chop and Jackal.
The Chop and Jackal
The main cornerstone of the Leicester defence was their chop tackle approach. While many teams in the past have looked to apply huge line speed in order to kill attacks, Tigers prioritised targeting the ball on the floor.
The table above summarises how many tackles each team made, the carries they faced. This allows us to see how many players were committed to the tackle. Thanks to Sam Larner for the data.
But what are the nuts and bolts of this strategy? Firstly the Tigers try to avoid over committing players to the tackle. This graphic shows how many players each side committed to each tackle, with Leicester ranking 3rd lowest.
This approach has two main effects: First it allows Leicester to pack their defence, by limiting the players on the floor after each contact, secondly it also allows them to jackal more effectively.
A table summarising the amount of steals each player in the Premiership won last season. Players filtered to the top 5 and must have played at least 1000 minutes. Thanks again to Sam Larner for the data.
Tigers ended the season with 2 of the top 25 players for Steals Per 80 of those players who had over 100 minutes on the pitch. A great sign of their effectiveness over the ball.
An example of Leicester’s single tackle against Leinster
This defensive set against Leinster is very indicative of their approach. We join the attack after Leinster have put the Tigers on the ropes with a few momentum building phases. Despite being on the back foot Tigers manage to cut down the Leinster carrier in the 15m channel.
Leicester show defensive pressure and continue with their single tackle approach.
The tackle on Ronan Kelleher by the Leicester left wing is a simple low tackle, and while Genge gives a helpful pat on the way down Tigers keep 14 men on their feet for the following phase. This gives them a chance to apply the heat as Leinster attack from the touchline.
The next tackle, made by Callum Green, is a perfect tackle from a Leicester perspective. Green manages to wrap up Lowe, and control how he falls without the need for an assisting tackler. Montoya is then able to threaten the ball and while he doesn’t win a turnover Leicester are now on top.
Leicester work round the corner to continue battling with the Leinster attack. Again they used low chop tacklers and tried to get someone over to slow the ball.
Leinster continue to the same way but the Tigers have done well with their fold. This allows them to go and meet the Leinster attack as the ball is passed from the breakdown. Leinster play through Sexton but a low chop by Guy Porter brings the hard runner to ground. Again this means Tigers have committed just one tackler.
Jasper Wiese gets involved only to guide Doris to his feet before jackalling. This slows down the ball for Leinster, while also giving Guy Porter time to regain his feet. This allows Leinster to push one player wider on the next phase, and that allows them to create more pressure with their defence.
Moroni does well to harry Jamison Gibson park into a mistake here. Leicester then target the ruck and win the ball.
Again Leinster play the same way trying to gain an edge before bouncing back but Tigers are up to the task. A low chop tackle by Moroni on Hugo Keenan is a great piece of defence. Reacting quickly to Keenan attacking his outside shoulder before rebounding to the edge of the line. Chris Ashton also does well here, cutting off the pass to Conan before assisting Moroni and disrupting the Leinster ruck.
On the following phase Moroni harasses Jamison Gibson-Park, preventing him from throwing a pass and forcing him into a welcoming committee of 3 Tigers defenders. Moroni is again the sole tackler, launching into the scrum half’s ankles, while the rest of the fringe defenders cushion the blow and latch onto the ball
This passage is a great example of the Tiger’s single tackler policy. Prioritising getting the attack to ground before then disrupting and hunting on the floor. However it is not the only string to their bow, in the next section we examine arguably their greatest strength.
Scramble: Tiger’s Rubber Band Defence
A graph showing how many points each side conceded per linebreak against the total linebreaks they conceded. (Min. 2 Games/Club Teams)
The graph above shows this trait perfectly. Leicester conceded slightly more line breaks than other club teams i’ve covered. But crucially they restricted their opponents conversion to significantly below average.
This comes down to a trait I’ve called the rubber band defence. Leicester being very capable of absorbing huge pressure without snapping. This is driven by Tiger’s prioritising the ball carrier’s channel, a strategy which is enhanced by their ability over the ball.
An example of Leicester’s rubber band defence against Clermont
This clip from their match away at Clermont is a perfect example. Clermont sliced through thanks to a superb step from Alivereti Raka. Raka then passes to Fritz Lee, who get tackled just inside the Leicester 22 by Jack van Poortvliet who has shown an incredible work rate.
Following the tackle Leicester swarm the breakdown, Tommy Reffell especially , who locks on to the ball. This buys time for the rest of the defence, who are prepared to defend again before Parra has arrived at the base of the ruck. The Tiger’s flanker however goes one better and remains unmoved by the Clermont cleaners to win the penalty.
Another example of Leicester’s rubber band defence against Leinster.
In their game against Leinster we see similar desire and work rate. Leinster make a break through Hugo Keenan down the left hand side. The Tigers respond by working hard to cover all of Keenan’s main passing options. Ford makes the tackle but Leinster play away quickly with Ronan Kelleher picking a great line to keep the East Midlands side moving backwards. However despite being on the back foot Tigers still manage to steal the ball.
The main workings of Leicester Tigers defence was flooding the breakdown immediately after the line break. Here they outnumber Leinster 5 to 2.
This counter punch is enabled by Tigers swarming the tight channels with 6 players forming the defensive line. Leinster on the other hand have just two ready to secure the ball, and play it away. Gibson-Park does get over to form some sort of shield, but the actions of Tommy Reffell make his contributions futile.
The turnover from Reffell is a thing of beauty. The openside first covers nearly 80 metres to make the cover tackle on Kelleher. He then immediately gets back on his feet, and counter rucks against Gibson-Park. This is a huge defensive effort and shows the quality of the Openside.
Tommy Reffell counter rucks well before making a great tackle on James Lowe and winning the turnover.
The counter ruck itself is maybe not all that effective. But allows Reffell to close the distance on James Lowe as he picks up the ball. This positioning is perfect for Reffel who barely needs a step to lock his arms onto James Lowe and effect a turnover. A great way to cap off such sterling defensive work.
This defensive work epitomised Tigers. The defensive desire and work rate making every opportunity difficult to convert for their opponents.
Breaking Through
As we’ve clearly shown throughout this piece, the Tigers have a supreme defence. However, no defence is unbeatable. Rugby is a game played on a pitch which is 70m wide, which gives plenty of room to stretch and manipulate opposition defences.
Playing to width can help beat the Leicester Tigers defence
In the clip above we see a small chink in the Tigers armour. Having played a phase into midfield Chiefs are presented with an opportunity to just skirt around the Tigers defences. The opportunity arises as Exeter have won the race to fold. Tigers, through Freddie Burns, do well to contain the threat.
This weakness is a necessary evil caused by how their wingers defend. The Leicester Tigers wingers are responsible for holding the width and neutralising any wide attacks. To do this the Leicester Tigers wingers position themselves in between the two edge attackers, leaving space inside them for catch up defenders to fill should the Opposition spread the ball.
Leicester Tigers employed an interesting system with their winger on defence. The wingers looked to split the two edge attackers in order to manage the Leicester defensive width.
This picture is taken from the phase after Harlequins have regathered a box kick. We can see Nadolo beginning to set the width. Harlequins are yet to fold round so he has support close on his inside, but on the second phase (shown below) we see how this system really comes into it’s own.
Leicester are evenly numbered on defence. Nemani Nadolo (numbered 4) splits the widest Harlequins attackers.
Tigers are evenly matched with the opposing Harlequins attack but Nemani Nadolo is still splitting the edge attackers. The idea seemingly to prioritise connection, and allow the catch up defenders (those numbered 2 and 3) to push across and assist if Harlequins attack in the 15m channel.
This system typically works well, helping to push attackers inside as they know Tigers will rarely leave multiple men unguarded on the outside. However, if teams can beat the fold then opportunities arise. This tactic works because it isolates the Leicester wingers in the 15m channels.
Clermont have been going lateral but Alivereti Raka makes a strong carry in the wide channel. This gives them momentum to start their attack.
The clip above is from the phase before Clermont’s first try. Alivereti Raka makes a powerful burst in the outside channel. Getting beyond the gainline and kick starting, a previously lateral, Clermont attack. Now we can see how Clermont go about attacking Leicester in the far 15m channel.
Clermont play wide off the edge. Sebastian Vahaamahina pulls it back late to Camile Lopez who is able to expose a dog leg in the Tigers defence. The diagram above explains why the dog leg appears. Ellis Genge not expecting the pass from Vahaamahina to give the pass plays a key role.
Playing off the edge, Clermont strike at the Leicester midfield. Tigers try to counter this with strong line speed, but Lopez has held his depth and is able to release a forward into the heart of the Tiger’s defence. The width of Clermont’s attack is helped by the quality of Morgan Parra’s pass. The pass from the base cutting out five Leicester players, with an additional two Tigers on the floor.
Tigers do make the tackle on Fourcade but are now under stress as they try to fold and keep pace with the Clermont attack. But the French side are able to generate quick ruck ball, clearing Tommy Reffell with ease while their attack fans across the rest of the pitch.
Clermont win the race to fold. This gives them an opportunity to attack Leicester’s weakness out wide.
The speed of ball creates a five on five, with 60% of the pitch for Clermont to attack. As expected above the Leicester Tigers winger (5) splits the difference on the 15m sitting as close as he dares to the inside defenders. But the speed of the ball beats Leicester’s fold and means that after just two passes, the five on five becomes a three on one with quick passing isolating the Leicester Tigers winger.
Clermont shift the ball well and manage to outflank the Leicester defence. A mix up between the Winger and Full Back allows Clermont to break through in the wide channel.
Clermont have unpicked one of Leicester’s weak points, folding faster and managing to isolate the Leicester Tigers winger. It’s a scenario teams can look to recreate next season, through use of a quick folding attack while hugging the width and executing their passes. If teams can manage this then we can expect them to create opportunities outwide.
Summary
Tigers have built a nearly immaculate defence under Kevin Sinfield’s watchful eye It is a defence fundamentally built around single man tackles shown by the Tigers committing the 3rd lowest amount of players per tackle. This system also benefited their large array of jackal threats who wreaked havoc and turned the ball over for fun this season.
The Tigers defence did give up opportunities with sides able to find joy in the 15m channels. But even though Tigers gave up these chances, they were still able to recover, and kill the attack even if they look beaten. Targeting the pressure point to turnover ball or buy time while they regained their structure. The exploits of the Leicester rubber band defence were a key factor in their title winning exploits.
The Tigers defence is sure to play a key role in any league title challenge next season. With this in mind the steps that Kevin Sinfield takes to future proof his charges will be fascinating.
Our story begins with a side languishing second from bottom. At the end of 2019/20 season Leicester were a side who had won just 6 games, and scored under 400 points. To resurrect themselves, in the space of two seasons is an admirable feat. But what exactly is behind the Tigers’ return to glory?
In this piece we will look at the attacking foundations behind their surge to the top. Leicester’s attack was built on three core ideas: winning the physical battle, shape on shape wide attacks, and kicking game which requires its own individual focus.
Physical Tigers
Leicester Tigers have played their own unique brand of rugby this season. Basing their style around dominating the gainline and winning the physical battle. This begins with their set piece attack.
A GIF showing Nemani Nadolo being used direct on first phase. A primary attacking weapon for the Tigers.
Leicester loved releasing big carriers directly into midfield. The Tigers threw just 1 or 2 passes over 85% of the time on Lineout first phase attack. And with weapons like Nemani Nadolo it helped provide a solid platform, allowing Leicester to fold quickly around the corner.
They maintained their physical approach during phase play too. The main way they did this was their choice of play maker.
A graph covering the Play Maker balance of teams across the club game. (2 games in database minimum)
What we can see on the above graphic is that Leicester love playing off the Scrum Half. They averaged the third highest % of play off 9 of the sides within my data base. They also played the second lowest percentage of their phases off the Fly Half. This helped reduce the impact of high pressure defences with Leicester aiming to bang the blitz.
Leicester play around the corner using direct carriers off the Scrum Half. This was a key part of the Tiger’s identity last season.
As can be seen in the GIF above, Leicester have a very simple pattern wrapping round the corner. There is certainly nothing revolutionary about the shape of the forward pods used by Leicester.
However there is an interesting tweak. Leicester have turned the directness up to 11. Where most teams look to move the ball within their pods, Leicester’s forwards prioritise clearing the rucks. This helps generate the quick ball modern teams use for their attacks.
Pod balance across the same club sides as earlier. All based on the forward pods used by teams.
The data backs this up. While Leicester don’t carry the most, the South African sides take this privilege, the lack of tips inside or outside is quite clear. Leicester shifted the ball within their forward pods, the second least of all club teams I have covered for a minimum of two games.
Tigers Baring Their Teeth
While Leicester’s are more than happy to break the barn door down, they also played some scintillating rugby. Scoring more than 700 points requires more than one method of attack. The main way Tigers varied their attack was through their use of Pull Back passes in order to play shape on shape rugby.
Example of how Leicester attacked the Corner in opposition defences. Primary tool was shape on shape attack as they looked to spread the ball.
Here we can see an example of Leicester’s wide attack. Typically Leicester have utilised a 3-1 or a 3-2 set up. This describes the alignment of their forwards, with a pod of 3, (dark blue line) and then a second pod outside a ball player. That Leicester are happy to play with a single player in the second pod is a sign of their intentions to spread it wider rather than crash it up. Instead the single man pod is designed to target the corner defender (circled in red).This helps divert their attention inside, leaving space out wide for Leicester to attack.
GIF showing how Leicester used shape on shape attack to out flank the Clermont defence.
This attack eventually peters out, but it does provide a clear example of Leicester’s shape on shape attack.
This shape on shape attack becomes even more effective when married with the brutal approach we discussed earlier. In their game against Connacht we get a clear picture of Leicester’s attacking DNA.
The Melting Pot
Leicester attack from turnover ball against Connacht in their European game earlier in the season. A great example of Tigers shape on shape attack.
Leicester begin their attack from a turnover just inside their own half, first using a small pick and go from Wells to get them on the front foot. Jasper Wiese then steps into Scrum Half and floats a pass straight to the number 13 Matt Scott. The centre is standing deep behind the pod of 3 we discussed earlier giving himself time to pick his pass.
Scott chooses to throw a long pass to Bryce Heggarty who has time to drift on the pass. This creates a disconnect in the Connacht defence. A small pass from the Heggarty to the charging Dan Kelly then beats the Connacht defence and Leicester scythe through.
Leicester flood through in support carrying their momentum into the Connacht 22.
Tigers maintain their width as they flow through following Kelly’s break. This passage provides a great example for teams to follow with multiple options for each ball carrier after the initial break. This support play enables Leicester to reach the Connacht 5 metre line.
Strong carry directly off the scrum half keeps Leicester moving forward. Great way to set a platform in the Connacht 22 from which they can continue to build pressure.
Following this break, Leicester releases a flat pod of forwards into the Connacht defence. This forces Connacht to fold and adjust their defensive alignment. The width on the pass from Wigglesworth really helps add to the pressure on the Connacht defence by cutting 4 players on the blindside.
Leicester spread the ball wide to challenge the defence.
Leicester are really on the front foot by this stage. George Ford then utilises his forwards in a 2-2 set up to screen the backline, giving Leicester time to attack Connacht’s widest defenders. They can’t quite make a break but some great footwork by Steward keeps the pressure on.
Following a further carry around the corner by the Leicester backs, the Tigers have reached the touchline.
Leicester look to attack off the touchline with a direct carry.
To bounce back off the touchline they carry with a forward pod a phase. Connacht do well to hold up Wiese in the tackle slowing down the Leicester attack.
Leicester wrap around the corner following their traditional blend of physicality
Recovering from a slow ruck this close to the line can be difficult as the opposition defence can apply extremely high pressure. To counter this Leicester revert to type as they work hard around the corner. The first carry is as direct as they come. With a near immediate latch. The second carry by Ellis Genge is superb. The Prop uses great footwork pre contact footwork to get a softer shoulder. Rather than angling back towards the previous ruck, the Bristol bound loose head curves out with his carry, allowing him to attract Connacht’s 4th, 5th and 6th defenders to the tackle. This reduces Connacht’s width significantly on the next phase.
Leicester beat the Connacht fold, some great passing allows them to crash over in the corner via Kini Murimurivalu
The final phase may look simple, but how often have you seen your side spurn an overlap and get bundled into touch. Ford carries to the line, and fires a great pass directly to Steward. Steward then attacks the winger, managing to turn his shoulders inwards. Some solid handling by Steward then sees Murimurivalu down the touch line to score past despite the desperate challenge of Aki.
The marrying of Tiger’s tight and wide attacking in this passage is highly impressive. However Tigers attack is not infallible. In the next section, we will take a look at a small chink in the Tigers armour teams may look to exploit next season.
Beating The Tigers
Every side in rugby has an achilles heel and Leicester no different. For the Tigers this weakness is driven by their pass selection to their Forward pods. As discussed earlier, Leicester rarely shift the ball within their pods, instead prioritising the ruck clear. This is fine, except on occasion Tigers found themselves too flat meaning their inside man was the only option for the pass from the ruck.
Leicester typically used a 3 man pod off the scrum half. However the inside man could get over promoted leading to a weakness in the Leicester Tiger’s attack
In the GIF above we can see this trait of hitting the inside option. On this occasion inside option Julian Montoya has cut off access to the rest of the forward options by getting too flat. This means the Argentine only has clearing options on his outside. This is where the problem stems from. By having the cleaners stuck on one side, a good tackler can manipulate the carrier to present jackal opportunities.
Here Leicester again have an over promoted inside man. Api Ratinyuwara makes a solid hit and forces the carrier to fall inwards.
This clip from the Semi Final fixture with Northampton Saints is a great example of the problems Tigers face when they hit the inside man. Wiese makes a decent effort in carry, trying to run towards the supporting Montoya. However a strong chop from Matavesi and a solid hit from Api Ratinyuwara on the outside forces Wiese to fall inside. This means Wiese falls in a compromised position just in front of Juarno Augustus. The Northampton Number 8 immediately locks onto the ball and makes the steal.
This is a little detail in the larger scheme of Leicester Tigers attack but does show a small chink in their armour. Whether we see Leicester change their shape slightly and prioritise hitting the middle player next season will be interesting. This could also allow additional variation in their attack as they look to reach new heights next year.
Summary
Tigers built a fearsome attack scoring over 700 points scored last season. Fundamentally it was built on gainline dominance and a strong forward carrying game. They based their attack primarily off their Scrum Halves. However, teams shouldn’t underestimate their ability to strike outwide. Tigers successfully certainly brought a cutting edge to match their brutal tight game. But they aren’t invincible, with their tendency to hit the inside man on their carrying pods presenting an opportunity for opposing jackallers. But Leicester will certainly bring a strong attack next year as they launch their assault to be back to back Champions.
Thanks For Reading. You can subscribe to get future parts of the series straight to your inbox below.
Italy provided the shock of the Six Nations beating the Welsh in Cardiff. The Azzurri won their first game in seven years off the back of a new-found pragmatic attack, and their suffocating defence.
The Pragmatic Approach
Italy adopted a more pragmatic approach in the 2022 Six Nations. They were previously a side happy to fling it about anywhere on the field. Everyone loves running rugby but the best sides kick to make sure they play beautiful rugby in the right areas of the field.
A breakdown of kicking across the Six Nations in 2021 and 2022. Italy jumped from 80 kicks in 2021, to 159 kicks in 2022
As shown in the graph above, Italy jumped from just 80 kicks in the 2021 Six Nations to 159 kicks in 2022. This more pragmatic approach allowed them to move up the field, escaping the pressure in their own half and applying it to Wales.
1:31 – Italy kick from a centre field scrum. It places huge pressure on the Welsh backfield.
Take this kick from the second minute by Paolo Garbisi. The centre field scrum has caused problems for the Welsh backfield leaving McNicholl trying to cover half the pitch. This leaves plenty of space for Garbisi to aim for, and with the new 50:22 rules in play, he angles his kick towards the touchline.
Garbisi keeps the kick low, reducing the time McNicholl has to cover the ground. The bounce is lucky, but it allows Ioane to hunt the Welsh Full Back. McNicholl does well to prevent the to reel it in. But Wales are pinned deep in their 22 and have to escape. The passage ends with a Welsh kick to touch, an early shot fired by the Italians.
However it is the kick that followed the Lineout attack that impresses me the most. Italy start with a pretty standard, off the top midfield crash from the lineout. They then play around the corner reaching the 15m line. Nothing spectacular, and they have lost all their momentum by the second tackle.
2:33 – Calum Braley shows great game control with a delicate chip over the Welsh defence
This is where teams can lack nous, and try to overplay. Italy plays one more phase and get caught behind the gain line by the Welsh defence. This well and truly kills the Italian attack. Braley takes one glance and chips a lovely box kick into the Welsh backfield again finding grass.
While the outcome may not be as dramatic as the first, it is the kick that symbolises a new Italian approach. A side with a more pragmatic, and efficient approach.
Shows a team’s attack completion versus their progression in the Six Nations since 2021. Completion = Attack which doesn’t end with a turnover or error. Progression = An attacks ability to move up the field
The effects of this pragmatism are shown in the data. The only 3 games in which Italy secured above average Attack Completion and Progression were in 2022. Attack completion is a measure of how many attacks a team doesn’t give up a turnover, while progression shows their ability to move up the pitch.
The progression part is key here. Italy boosted by their newfound kicking game began to really move up the field and place other teams under territorial pressure.
Italy combined this desire to move the pitch with a sensible approach to penalty decisions. Unlike the Welsh who chased tries, Italy instead kept the scoreboard ticking over. Of the five penalties they kicked over, four of them were outside the 22.
This low-risk approach is admirable, you can only imagine how tempting it must have been to chase tries as they started to believe.
55:18 – Capuozzo and Monty Ioane combine for a linebreak in build up to final penalty.
Don’t take this as an attack on teams that prioritise flair, and expansive attacking. The Italians certainly treated us to some fantastic off the cuff attack. Such as the effort above which led to their final 3 point score, the only one in the Welsh 22.
Mixing their pragmatism with this incredible flair and attacking the talent allowed them to tear Wales apart in key moments. While the penalties keep them in touch long enough for these key moments to be more than footnotes.
Attacking the Edge
However, they were not just reliant on magic moments. The Azzurri had success deploying shape on shape attacks when reaching the wide channel. This game however wasn’t a flash in the pan for their edge attack, with the same shapes on show against Scotland.
Italy v Scotland – Italy use an edge shape with a hard runner and out the back option to attack the Scottish edge defence
The Italians use a double-layered attack to attack the Scottish in this second-minute attack. I call the move ‘The Storm’, as it includes players that bring the thunder, carrying hard, and those that offer the lightning, to get outside the defence.
The Italians use this to attack the channel between Scotland’s 13 and 14l. By having a thunder option the Italians are hoping they can cause one player to bite in and get either a two against one or a physical mismatch to attack back from the touchline on the front foot.
Italy v Scotland – Italy too deep so edge shape is well shut down by Darcy Graham and Chris Harris who remain patient.
The problem here for the Italians is, they begin their shape too deep giving Harris and Graham plenty of time to read the shape and make their decisions. The Scotland pair hold their feet before Italy reveal their plan. This nullifies Italy’s attack and Luke Pearce calls it back for an earlier Scottish offence.
But what relevance does this have to the game in Cardiff? Italy were able to target the Welsh defence effectively, using this shape to make half breaks stress the Welsh defence in trouble.
11 – Italy use a late transforming pod to surprise the Welsh attack. They force a penalty for an off the ball tackle and open their account.
In the GIF above we see a small variation on the Storm shape. Italy start with a 3 man pod before transforming late. The Welsh defence is actually well prepared for the 3 man crash, but the late transformation cause significant problems.
Watch the actions of the two Welsh defenders outside the players who make the tackle. They both accelerate hard as the Italy shape transforms worried about getting outflanked. This leaves Brex running hard at two front-rowers with Garbisi on his outside.
Brex breaks through the first contact. The late transformation is a powerful tool and puts Italy on the front foot. Wales tackle Garbisi off the ball. This is a sign of the stress Italy placed on the Welsh defence and leads to the first points of the game.
Suffocating Italian Defence
However it wasn’t just superb attack that led to Italian victory. Italy also bringing a suffocating defence. The Italian defence definitely benefitted from Welsh mistakes, but the system itself also forced turnovers.
The main component of this suffocating defence was their two-man tackle system. Across the game, Italy made 175 tackles forcing 109 Welsh rucks. The Azzurri committed an average of 1.6 players per ruck. The highest of any side on Super Saturday
26:30/36:50 – Italy used double tackles to great effect shutting down the Welsh attack and winning turnovers.
As these two GIFs show, the Italians had a great effect with their double tackle system. Forcing the Welsh attack backwards and creating slow ball or turnovers.
However, their defensive strategy wasn’t just focused on killing the ball with two man hits. They also used single man chop tackles, particularly close to their line. The only player they didn’t chop near their own line was Alun Wyn-Jones. A sign of how Italy varied their defence based on the Welsh threats. This chop tackle strategy did appear outside the 22, especially when Danillo Fischetti was on the prowl.
14:17 – A low chop tackle by Ignacio Brex allows Danillo Fischetti to lock down on the ball and force a turnover.
The prop was a threat at the breakdown throughout the tournament recording 5 steals. He was particularly dangerous against Wales. The GIF above is a great example. Brex makes a wonderful low chop tackle on Seb Davies. Brex locking the legs and controlling the fall of the Welsh 6.
Brex delivers him right to Fischetti’s feet. The Italian loose-head immediately locks onto the ball, and the Welsh can’t move him. The resulting penalty moved the Azzurri 6 points in front. A great start on their way to their famous victory.
There are many tales from this particular game. The final try by Carpuzzo will live long in the memory. It was a victory built on a pragmatic approach to the game, mixed with a dose of Italian flair. Italy defended suffocated the Welsh attack. However, their development with the ball and their pragmatic approach stands out to me. Setting the platform for a famous victory.
Throughout the Lions tour we have seen Gatland developing the structures he believes will beat the Springboks. While most of the games were not of the highest calibre, they have provided a useful laboratory for the Lions. By looking at Adam Beard’s try against the Stormers, we can begin to see the fruits of their labours and also some of the teething issues the Lions have had on both sides of the ball.
The sequence starts from a Stormers lineout just inside their half. This first phase gives a good indication of their breakdown policy. First the Lions rely on the tail gunner, Luke Cowan Dickie. The Exeter Chiefs hooker makes an effective low chop allowing Tadgh Beirne to compete. Beirne on this occasion is not able to grab a turnover, but there is significant disruption to the Stormers ball, and allows the Lions to comfortably set their defence.
The Stormers set for a box kick, which gives us an opportunity to look at one of the Lions biggest weaknesses. Their protection of the catch zone. Throughout their time in South Africa, the Lions have been vulnerable to letting the opposition compete and disrupt the ball. This could play a huge part in the series, especially given South Africa favour a kick based game. But what causes this issue?
The main issue for the Lions is the gap between the two Tadghs. Beirne and Furlong need to try and fill the 15m channel, and prevent the Stormers Left winger from having a free run into the catch zone. However Furlong gets slightly ahead of Beirne which leaves a route open to the catch zone for Edwill van Der Merwe. However, the blame does not lie solely with the Irish forwards. Ali Price began falling back earlier than the rest of the team, which means one less body is available to fill the 15m. More importantly though, Price runs an incredibly similar line to Furlong meaning that he is a less effective blocker.
The catch zone may be disrupted but Beirne is able to grab the ball, and passes to Hogg. The Lions immediately look to play the ball wide, with the backs having tracked back to fill the field. Marcus Smith and Elliot Daly fix their defenders, spreading the ball to Duhan Van Der Merwe.
Having reached the edge of the field, the Lions set up their 3-2 pattern. The 3-2 pattern describes the alignment of the forwards across the field. The first pod of 3 acts to fix the initial Stormers defenders, with another pod of forwards further across in the midfield. Placed behind both pods of forwards, is a playmaker. Robbie Henshaw operates behind the first pod, and Daly behind the second. Price passes to Jack Conan who then delivers a pull back pass to an arcing Henshaw.
Henshaw has to run a little flat to take the ball from Conan, which fixes Ernst Van Rhyn (Stormers 4) and prevents him drifting onto the centre field pod. Henshaw manages to free Tadgh Beirne despite the pressure who hits a half gap. Beirne lifts the ball to Jack Conan allowing the Lions to keep the pressure on the Stormers.
Following the carry from Conan the Lions attack kicks into hyperdrive, with Tadgh Furlong making a magnificent break down the centre of the field. The bust by Furlong prevents the Stormers from settling, and means they all concentrate around the ruck. A rapid follow up by Beirne keeps the pressure on before the offload keeps the attack flowing.
Adam Beard then takes a pass from second row partner Jonny Hill, before attacking the space inside the high blitzing Stormers winger. Adam Beard then exhibits some great skill to float the ball to Adam who charges forward. This wide to wide play leaves the Stormers disconnected and struggling to recover.
With the Lions now in the 22, and the Stormers in disarray, they make the final simple play to score. Scrum Half Ali Price breaks away from the base of the ruck forcing the fringe Stormer defender to jam in. Adam Beard then runs a superb out to in line, and canters through the Stormers defence.
There are lots of impressive mechanisms behind this team try, from the Luke Cowan Dickie and Tadgh Beirne breakdown work, to a wonderful use of a 3-2 edge pattern. The try does show some weaknesses that the Lions will want to patch up before the test series begins, primarily around their escort running and protecting the catch zone. Overall, though it is an incredibly well worked try which shows a small part of the Lions attacking repertoire. The test series will see parts of their game tightened up, but the skills are certainly there for the Lions to take their chances when they come.
Under Wayne Pivac the Welsh lineout has been quite the roller coaster ride. In the 2020 Six Nations Wales had perhaps the worst lineout. Using Simon Gleave’s Lineout Effectiveness Metrics they sat bottom, however by the end of the 2021 competition they had risen to the top. This piece won’t focus on how they fixed the problems, but instead look at how Wales used the lineout as a launch platform. Wales have managed to create a great attacking weapon, not only one which enables them to score but also one which enables them to exit dangerous areas.
The Welsh lineout strategy is dependent on the zone of attack. To begin with we will examine how Wales exited their own 22, and before then moving onto how Wales delivered scintillating strike plays further up the pitch.
Welsh Exit Lineouts
Wales have called a 4 man lineout on their 5 meter line. The idea behind this is to use speed to beat the Irish jumpers. To help with their speed and accuracy don’t bother with any complicated movements instead walking straight into the jump. The simple nature of the lineout is easy to see from the end on angle.
Wales begin with a small walk in, before Tipuric followed by Beard rush forward. The Irish mirror the Welsh Lineout, this means they are reactive rather than predictive. This slight delay gives Tipuric the time and space he needs to make the catch. The throw from Ken Owens hits the apex of Tipuric’s jump. This gives the jumper additional space allowing Tipuric to free his hands and give the ball off the top.
The above screenshot gives a clear image of the Welsh attack shape off 9. As the ball comes off the top, Wales place themselves under high pressure to execute and make sure they can execute the simple move. Faletau (Red Circle) is the lead runner in the formation, with Alun Wyn-Jones, and Tomas Francis as the ruck clearers. This forward pod is set wide from the Scrum Half and allows Wales to reach the 15m immediately. The Welsh forwards are targeting the Irish hinge defender, hoping to make easy yardage while he is isolated.
Switching back to the TV angle, we can see why Wales aim for that 15m line. Faletau, as the lead runner, is able to skip around the hinge defender and make a dominant carry. Once the Number 8 is brought to ground, Wales can enter their kicking shape. The Welsh breakdown is stacked with players giving good protection for scrum half Tomos Willaims. However, they also position chasers on the blindside. Ken Owens and Wyn Jones will act as the containment with Louis Rees Zammit wider to target the ball.
The targeting of the 15m line is a clear trait of the Welsh exit strategy. In the clip above Wales use a near identical pattern to clear their lines. There are some changes, with it being a 5 man lineout as opposed to the 4 man used against Ireland but there are still consistent themes. Wales again used a no nonsense approach, throwing to the front with little movement. There is another small innovation with Navidi at scrum half (more on this later). Faletau then carries, attacking the hinge of the lineout, and targeting the 15m line. This width again allows Wyn Jones, and Ken Owens to be used as containment on the upcoming kick chase.
The two lineouts broken down above give a good insight into the Welsh exit policy. The system uses speed to beat the defence, both in the lineout and when attacking the hinge. Wales have become incredibly good at the nuts and bolts, and this helps join their defensive lineouts with their exit kicking game.
As Wales get further from their try line, they do change tactics though there are still some similarities. The main change is their preference for mauling, especially in their Own 50m. Across the 2021 Six Nations, Wales had 15 lineouts in their Own 50m. Wales used a maul 10 times (66%), and played off the top just 5 times. This is a clear change from their Own 22 where they had 3 mauls and off the top plays alike.
Here Wales partially set a maul in order to draw Scottish eyes to the front of the lineout. They then run a shape consisting of 2 hard runners, one of which is the industrious Faletau, in the midfield. This is designed to give a centrefield platform for the kick. The speed of the play is crucial to its success, with Wales again beating the hinge, and easily winning the gainline battle.
Another interesting aspect are the actions of Tomas Francis. Initially the tighthead prop joins the maul, working round to cover Wainwright. The Exeter player then joins the midfield to help secure the ball. The work rate of Francis has been clear throughout all these moves with the tighthead prop acting as the second arriving forward in all three. While it may not be glamorous, it is important. The Exeter prop helping to give Wales a solid platform to exit and complete their attack.
The Welsh 31 Play
The Welsh lineout attack uses similar structures when it gets into the opposition half. One of the biggest carry overs is the use of a 2 man crashball team. Whether this is composed of backrowers, or centres, Wayne Pivac’s side really enjoy a solid carrying option.
Here is a great example of Wales using a 2 man crashball, this time playing wider off Fly Half Dan Biggar. Launching from the tail of the lineout gives Wales a lot of space, and decreases the distance to Dan Biggar. The speed of the ball allows the Welsh ball carriers to make the gainline and carry through the French tackles. The crashball therefore serves a useful purpose, giving a strong platform to attack from, and allowing Wales to create quick ball. However, the more crucial part of the crash ball is that it allows the Welsh to launch one of their most effective patterns. The 31 Play.
A 31 play is simply a pattern where 3 phases are played in one direction before a fourth phase is played against the grain. Wales use the first 3 phases to contract the defence, opening up space for an expansive return play.
Wales play their second phase the same way as the first, attacking directly from the Scrum half. They use a simple shape to try and disrupt the French defence, with a pod containing Navidi and Alun Wyn Jones wrapping behind the hardline of Jon Davies. Navidi makes an impactful carry, getting beyond the gainline. This carry gives Wales quick ball and allows Tipuric and Faletau to work wider ready for the next phase.
Wales then play the same way for the third phase attacking to the far 15m line. Tipuric and Faletau have gotten really wide from the previous phase. The width allows Faletau and Tipuric to work together, removing the french breakdown threat. The carry also reaches the crucial launch point of the 15m line, which opens the field for a Welsh strike pattern.
This backline play may seem quite complicated with lots of moving parts, but as we break it down, the play becomes easy to understand. Firstly, we can identify the target of the Welsh play, Gael Fickou. Fickou is defending quite wide from his inside defenders, and acts as the “Corner” of the French defence. If Wales can isolate Fickou, there will be opportunities.
To attack the “Corner”, Wales use a 3 layered attack. The distribution, the blocking and the striking layers. The distribution layer comprises the forwards in the red line, and Dan Biggar (White Arrow). Biggar is sitting in the pocket of that first pod, meaning he is able to spread the ball whilst protected by that layer of forwards. Wales then use the blocking layer (Orange Circles) and strike layer (Black Arrows) to target Fickou. The orange layer aims to prevent Fickou connecting with the inside defenders, and to open a space for the strike layer. The strike layer can then isolate Fickou, either spreading the ball wider, or using Liam Williams (Top Spotlight) on the inside. Now, it’s time to see how Wales stitches it all together.
The ball is played behind the orange line, and Liam Williams almost escapes on the inside line. Fickou has done really well to stop Wales getting wider before disrupting the pass inside. However, the strength of the Welsh carry has caused some problems. With Wales going wider, the French backfield has to rearrange itself with Thomas pushing up to the main line. The width has also caused a mild scramble in the French ranks who sweep round the corner to try and match Wales.
Wales flashback again, this time using Adam Beard at first receiver to spread the ball. Tipuric receives the ball with enough space to slide a kick through. The panic Wales have induced with the speed of their attack leads to a lot of space in the French backfilled, and Tipuric attacks it. Adams and Tomos Williams then combine to score. The score may have a fair bit of luck with the bouncing ball but is a great example of the Welsh 31 play and how it laid the foundations for the Welsh to score.
Forwards At Scrum Half
One major innovation from Wales under Pivac has been the use of Forwards at the Scrum Half position. Teams have certainly done this in the past, with many using the “plus one” lineout to either form a maul, or as an extra lifter. Wales have taken a different approach with the forward at scrum half acting as a distributor, a great example of the no numbers on back approach. Under Pivac we have seen various backrowers appearing at Scrum Half giving Wales an additional option with which they can threaten the opposition.
Wales start from a 5 man lineout just outside the Ireland 22. Navidi stands in the position typically occupied by the Scrum Half ready to link with the front jumping pod. Wales then played off the top with Tipuric giving the ball quickly to Navidi. The blindside flanker can then free Taluape Faletau, who runs directly into Josh Van Der Flier. This gives Wales a powerful carrier directly into the Ireland line. Josh Navidi then follows the ball and is free to play scrum half on the next phase.
As a result of Navidi working to play scrum Half, it gives the opportunity for Gareth Davies to play from first receiver. Davies then carries on the blindside, with Wales creating a 3 on 2. Ireland do well to defend this with Davies running lateral, so Wales rely on the silky feet of the Sheriff to get to the gainline. While the Welsh attack fizzles out, it does show the intent and new approach under Pivac.
Wales again start from a lineout just outside the England 22. Navidi begins in the lineout, but pivots to take the ball from the jumping pod. This gives an impression to the English side that Wales will bring a maul, instead they play the ball wider. Wales play with great pace off the lineout. The carry may be ineffective but the attack wins Wales a penalty as England go offside. The attack exhibits just how Wales are innovating under Pivac.
This innovation is a great way of examining one of Wayne Pivac’s crucial principles. The No Numbers on Back attack. By using a high skill forward at Scrum Half, Wales are able to push their attack wider and spread the ball with ease. The use of a Back Rower in this way keeps the defence on their toes as they can’t solely expect a maul from a plus one lineout. Playing off the top is incredibly rare when using a plus one lineout. Of the 276 plus one lineouts over the 2020 rugby championship and 2021 Six Nations, only 27 have been played off the top. Wales are responsible for 6 of these.
Overall, Wales have built a really fearsome lineout attack. There have been great strike moves including those which have resulted in tries. But more importantly they have developed a way of playing off lineout which is truly innovative while built around key principles. The 31 play, for example, which Wales have begun to use is a powerful phase play pattern. It allows Wales to immediately get into their overall attacking shape, while attacking specific weak points in the defensive line. The use of 4 man lineouts on their own line, shows a willingness to take a risk. The four man lineout, offers quick and easy exit patterns, and really help Wales focus on playing in the right areas. Finally Wales have innovated through the use of a forward at Scrum Half. A simple innovation which links perfectly with the no numbers on back rugby they are trying to develop.
Under Wayne Pivac, Wales had a rocky start defensively, conceding over 90 points across for the first time since 2015 in the 2020 Six Nations. The defence wasn’t any better when Wales played in the autumn, when they conceded the 3rd most points of any team. There were still some problems with the defence under Gethin Jenkins with them conceding over 100 points. But there were some general improvements and tweaks as Jenkins got his feet under the table.
Wales General Defence Structure
Wales had a clear defensive system under Gethin Jenkins, with the Welsh defending using a typical 13+2. This means that they have 13 players in the front line, and 2 deeper players covering the backfield. This allows them to use line speed more often, as they often match numbers, while it also covers the kicking spaces well with the back 2 players typically quick to cover the ground.
In the example above, we can see the Welsh 13+2 system at work. France have just won the ball near half way, and begin entering their own phase play patterns. Notice how the Welsh backfield players track the ball. Dan Biggar and Liam Williams stay evenly spaced and try to cover the zone between the 15m lines. The only real time the Welsh backfield do push beyond the 15m is when the ball enters the tramlines. This makes them better at covering centrefield kicks, but has caused problems especially with tactical kicking going into the 15m.
Wales Changing to a 14+1
Whilst Wales generally defended with the 13+2 as above, when they were defending in their own 22 they switched to a 14+1. This allowed them to increase their line speed, and be more aggressive.
This example begins with Wales defending using that typical 13+2 with Ireland attacking in the Welsh 50m area. The backfield is being covered by Leigh Halfpenny and Dan Biggar. The system is the same as described above, however they are adaptable as the Irish attack develops.
This adaptability is incredibly important as Wales transitions to the 14+1 with ease. It begins with a small Irish break down the 5m channel. This leads to Halfpenny partially entering the ruck. As a result Dan Biggar, at the bottom of the screen, pulls across ready to cover the 15m channel.
Wales reform their defensive line incredibly well. Halfpenny (White Arrow) immediately joins the backfield having disengaged from the breakdown. With the Full Back entering the backfield, Biggar (Black Arrow) begins pushing hard to join the front line. This allows Wales to transition smoothly to their 14+1 defence system.
Dan Biggar pushing hard into the defensive line opens the 15m channel kick space. This shows one of the issues with the 14+1, as it can leave a lot of grass uncovered. However, on this occasion the 14+1 is a necessary evil, as Biggar’s actions prevent an Irish overlap. This passage of play shows Wales defending comfortably. Easily transitioning from their typical 13+2, to their 14+1 defensive structure, and covering the Irish threats well.
Defensive Frailties of the 14+1
Every defensive system has its flaws, and the 14+1 is no different. The major trade off in defence is covering the kick space versus having a strong front line. Wales typically uses a 13+2, and then changes to a 14+1 when the ball enters their 22. However, this 14+1 puts a lot of pressure on the Full Back to cover the space and manage the backfield well. On occasion Wales have struggled with this, occasionally allowing dangerous situations to develop, as a result of kick space opening.
Darcy Graham catches a kick just inside his own half, and carries to just beyond the 15m line. Here, the Scottish winger is met by Tauluape Faletau who makes a dominant tackle. This gives Scotland a midfield ruck splitting the welsh defence. As a result Scotland has an opportunity to attack.
Scotland play to the blindside, attacking the soft edge created by the Welsh trying to regain their shape. The weak edge allows Scotland to make good ground, putting the Welsh defence under stress. The team in blue then plays a phase into the midfield to tighten the Welsh defence.
Scotland plays a phase off. Scrum Half Ali Price aims to tighten the Welsh defence. They are also able to trap some players into the ruck. This leads to the wider Welsh defence being exposed on the next phase as 3 players are missing from the main line.
On the following phase, Scotland makes a line break through the centre of the Welsh defence. The linebreak puts Wales under enormous pressure. Wayne Pivac’s side then transitions into their 14+1 defence, as the Scottish attack reaches the 22.
Scotland plays a phase tight off 9 following the line break, meaning the Welsh defence becomes incredibly tight. This phase has shifted the balance of the Welsh defensive line toward the right. This is best shown by 5 Welsh players marking the blindisde, a space filled by just one Scot.
On the openside, Darcy Graham is hidden within the forward pod allowing his run to take Wales by surprise. The snipe from Ali Price draws attention, and gives space for him to kick. Halfpenny is unable to cover the backfield, and Graham beats him to the kick. However, you’ll notice that Halfpenny is offset, sitting near the 15m line, before Price snipes. This is evidence of the pressure applied by Scotland. The pressure applied is even more evident from the end on angle.
The End On angle shows just how far over the Welsh defence has shifted. Halfpenny sits just shy of the 15m line and Davies, the scrum half, has just joined the blindside defensive line. This creates a massive uncovered space in the centre of the field. The panic induced by Scotland has led to Wales overmanning the blindside whilst leaving this crucial zone uncovered. As a result, Price has a large area to aim for, and his kick is perfectly placed for Graham to canter under the posts.
Wales Passive Defence
There are clearly some trade-offs in the Welsh defensive structure. However, Rugby goes beyond just numbers and backfield coverage. There are many facets which make a defence, most crucial of all is how they approach the contact area.
Wales Double Tackling
It’s clear that any side wants to pride themselves on their work in the contact area, and Wales are no different. The first weapon that Wales have is an incredible breakdown game, but they are also able to slow teams down and steal the ball before they even hit the ground. They are able to do this through the use of a strong double tackle game.
This is a perfect example from the Welsh victory over England this year. England end up going lateral in their phase play, and Wales are coping well. This means that when the ball is spread by England they don’t have enough support to protect the ball. George North manages to target the ball as Callum Sheedy drives the tackle towards the welsh centre. The strength of the rip then allows Wales to relieve pressure.
In this passage of play against Scotland, Wales deliberately uses double tackles to slow down the ball before it culminates in a turnover for James Botham. We join on phase 6, and Scotland has been steadily making ground and applying pressure. As the ball is thrown wide, Tompkins, defending on the wing, tries to jam in before recovering and working with Owen Watkin to make the double tackle. Duhan van der Merwe tries to cut inside Tompkins, meaning he can gain quick yards, but it also means that Owen Watkin can attack the ball relatively easily which slows it down for the next phase.
Scotland attack using Fin Russell behind a forward pod. A strong press from Adam Beard prevents Scotland from going wider, instead forcing Scotland to use the short carrying option. Wales again used a double tackle to make a strong tackle with Elliot Dee and James Botham combining. Botham is the primary tackler, staying locked on to the ball as he wrestles the carrier to the floor. This allows Elliot Dee to target the ball as it hits the floor, and while he may not fully release the tackle before hitting the ball, it serves a purpose by slowing down the Scottish ball and allowing the Welsh defence to get ready to absorb another phase.
This tactic of absorption has become a key characteristic of the Welsh defence. The line speed is slow and methodical and gradually turns the screw on the Scottish attack. In this phase Scotland again played wide, trying to flank the Welsh defence. Sheedy and Zammit push higher on the Welsh wing to meet Hogg, and yet again force the Scottish attack inside. Tipuric supports Faletau in the tackle, but is able to easily release when he realises it’s a lost cause.
The effect of Tipuric being able to rejoin the defensive line allows Wales to go and meet the Scottish attackers. Again Wales uses a double tackle, with James Botham and Wyn Jones combining. Botham, clad in a red scrum cap, wrestles the ball free again targeting the tackle from the side. This angle of entry into the tackle means that Botham disrupts the Scottish latchers, and leaves Kebble slightly isolated. However, the main advantage of Botham’s angle of entry is that he can target Kebble’s arm and rip the ball away from the Scotsman’s body instead of against it. This makes it significantly easier and gives the Welshman the opportunity to lever it away.
This entire passage is a great breakdown of the Welsh defence and it’s policies, especially around the contact area. One clear change under Pivac has been a shift from a blitz defence to one based around absorption. This major diversion leads to Wales often giving up soft edges; however, this is designed to support one of their strengths, which is their ability over the ball.
Passive Defence and Breakdown Policy
In this clip we see Liam Williams come up with this great steal directly from use of the weak edge. England stretches Wales with Elliot Daly running a great line to get outside of North. However, Josh Adams is happy to drift, giving up ground, happy that there will be cover inside. George North leads the inside defence, making a strong tackle on Daly. The English Full Back makes significant ground by targeting the soft edge. However, this ground gain comes at a cost. Daly becomes isolated from his support, giving a window of opportunity for Liam Williams to target the ball.
Liam Williams comes in to attack the ruck, noticing the opportunity as he covers in the backfield. The Welsh Full Back’s technique is clean as he attacks the ball first and manages to get a clear lift. The pick up from Liam WIlliams is a moment of pure skill. The steal may be a moment of skill, but has benefitted from a defensive structure designed to give a soft edge.
Again England target the soft edge trying to use their overlap to beat the Welsh defence. England have spread the ball, with Jonny May receiving it outside his opposite number. May tries to attack outside George North but his options are quickly cut off. Louis Rees-Zammit makes a great decision, jamming in, and preventing the offload. George North works well from the inside as a supporting tackler helping to bring May to the floor. Following the tackle, George North stays on his feet and manages to win the space over May. The English Winger rolls to try and buy some time, but this is noticed by Gauzere who awards George North with a turnover.
In these two examples, Wales use their defensive structure to create opportunities. Defending with a soft edge, Wales allow teams to run away from their support, thereby giving their outside backs time to target the ball. This is a defensive strategy built around a Welsh strength.
Under Pivac, Wales have developed a solid defence. It may not have the same reputation as it did under Sean Edwards; however, the ability of Wales to absorb opposition attacks should be admired. It’s also important to remember that Pivac has a different focus when defending. Under Pivac, Wales have become hugely focussed on winning turnovers, whether it being rips in the tackle, or over the ball in the wide channels. Overall, there is plenty of room for development but it is certainly a formidable area of their game.
Wales under Wayne Pivac have developed into an innovative and forward thinking side. They have melded various strategies and tactics into a high skill, attack minded gameplan. The development however has not just been on the attack, with innovation also present in their kicking strategy, whether it being double footed scrum halves, 2 man chase teams, or kicking in the 15m channel. All these different strategies have created a great weapon in the Welsh game.
Welsh Exit Kicking
When breaking down their kicking game we can focus on two different areas, their defensive and attacking strategies. First, we will start with their defensive kicking strategy. Primarily Wales are an exit first team, with a strong focus on keeping the ball on the park. The best example of this is the welsh approach v England in the Six Nations. The strategy limited England to just five lineouts, four from penalties and one from a kick from Adams which bounced into touch. The strategy was much more in-depth than just kicking in or out. They varied their kicking strategies by opponent.
The above GIF shows a cornerstone of the Welsh kicking game, the 2 man kick chase. Each team will have their own variations on the kick chase, however there are two common attributes, a containment team and a headhunter. The containment runner, shown in the blue spotlight is responsible for protecting the edge of the welsh kick chase and connecting with the openside chase line. The headhunter, typically the winger, is responsible for firing after the ball and either hitting the catcher or challenging for the ball.
The chase here from Williams is a great example of the role of the head hunter. The Welsh Winger makes a strong tackle getting underneath Daly, allowing him to drive through English Full Back. The effective tackle allows Wales to attack the breakdown. Liam Williams makes a second effort driving at the breakdown. The effort disrupts the ball, and allows Tipuric to apply lots of pressure on the second phase winning the collision.
Wales did have a few struggles in their kicking game in the recent Six Nations, with some scrappy box kicks caused by high pressure, including the Maro Itoje charge down in Cardiff. While it wasn’t a major problem, it does allow us to examine how Wales protect their scrum halves when kicking and another example of a high skill approach being taken.
Let’s begin by examining the first Welsh box kick against England in this Six Nations. Wales are running a 3 man protection team. This gives Gareth Davies plenty of space to make the clearance. The 3 caterpillars give plenty of space and protection for Gareth Davies. It’s important to notice Itoje’s positioning, who sits in the guard position giving him a short distance to the Scrum Halves foot.
This scheme is not particularly innovative, with it being a common strategy used to protect the Scrum Half. However, it does exactly what is needed with plenty of protection for the Scrum Half. Crucially it also gives time for the team to set up for the kick. Notice the 2 man chase team on the blindside.
On this occasion Wales received the ball from an England restart in their own 22. Wales then take the ball ground just inside the 22. However, whereas in the previous example they use a 3 man protection group, Wales instead use just Justin Tipuric as a single extension. This leaves the ball significantly closer to Itoje standing yet again in the guard position. The launch from Itoje is explosive, and he gets onto one foot extending as high as he can. The extra height allows him to get a hand to the ball. Wales do manage to recover from this moment, but it goes to show how important the 3 man protection scheme is for the Welsh Scrum Half.
However, the Welsh Scrum Halves have developed another useful tool. A second foot.
The Two Footed Approach
Wales here again use a 3 man protection scheme, with Adam Beard and Alun Wyn Jones combining at the front to lengthen the caterpillar. Because the two second rows aren’t on their feet Davies is under some pressure from Gray but takes a step back to beat the Second Row. Gareth Davies uses his preferred right foot, driving the ball, finding good height which allows Louis Rees Zammit to headhunt Matt Fagerson. But later in the same game we see him switch to his left foot.
This time, Wales are exiting from a lineout maul. The lineout drive has tied up all of the Welsh forwards, close to the 5m line. This means Gareth Davies has to kick from barely one body length of protection. Worse still for the Welsh Scrum Half, Rory Sutherland and Scott Cummings are bound into the maul and are able to apply pressure on his favoured right side. The pressure forces Davies to switch foot. While the kick from Davies comes from a weaker foot, he still manages to drive it a decent distance. The ability to kick from his left foot gives Davies a quick way to escape pressure and is just another example of a high skill approach being taken by Wales.
Individual Kick Chase Skills
The Welsh Scrum Halves of course are not the only highly skilled players. One of the most important roles in the Welsh kicking game is the Head Hunter, typically performed by a winger. To be a headhunter, the Wingers need a variety of skills. Most importantly, they should be able to challenge the ball in the air. Using just one example we can break down how Louis Rees Zammit acted as the headhunter to help Wales reclaim the kick.
Wales have a really well organised chase line with 3 players outside Dan Biggar. Louis Rees Zammit is positioned second in from the touchline, ready to target the ball. This setup is very similar to their 2 man chase teams on box kicks. Wales have a headhunter chasing the ball, and targeting the catch zone. While a second layer offers protection from a counter attack.
Louis Rees Zammit as the head hunter is targeting the catch zone. The catch zone is simply the area where the ball is going to land, if a team can dominate this space then they are most likely to win the ball. The Louis Rees Zammit first beats the French escort runners who tried to obstruct his run into the catch zone and then positions with his back to Dulin. This positioning means that if Rees Zammit can slap the ball it is more likely to travel backwards. His positioning also makes it difficult for Dulin to make a clean catch.
The Welsh Winger is able to slap the ball back for Wales, into Navidi’s grateful clutches. This clip is just one example of how Wayne Pivac has optimised the Welsh kicking strategy for his stable of thoroughbreds. The Welsh regaining the ball, allows them to gain ground with less effort and less physical exertion leaving them fresher later in games. Once Wales do catch the ball, it also opens up the field for attack, and they are often able to exploit the space.
Welsh Kicking In The Wide Channels
Wales, as discussed in a previous blog, have played an attacking game based around width and attacking fringes of the defence. One of the key elements of this has been their use of a roaming back 3. This strategy has also been combined with the Welsh kicking game.
This example comes from the Welsh game against the French in Cardiff. Wales have played 2 phases since Halfpenny took the ball from a kick on the right hand side. With the game entering the final quarter, Wales spread the ball, beating the French defence. The first two phases contracted the French defence and enable Wales to play wide. An early pass from Biggar allows Adams to attack the outside shoulder of Virimi Vakatawa and free Tompkins in the outside channel. The Welsh pressure outwide forces Bouthier to come up from Full Back to stop Wales running. This opens up a channel in behind for Wales to kick into. The power of this kick is then shown as Tomos Williams is first to get to the ball, after running a great “cheat” line, and toes it on. The bouncing ball causes France some problems, and Ntmack is forced to come and shepherd the ball off the field.
This wasn’t just a once off tactic from Wales, with it becoming a powerful strategy in this year’s Six Nations. The power of this tactic comes from being able to expose the modern day defence. Most modern day defences prioritise line speed, and applying pressure in the immediate. This often leaves significant space in the backfield, usually covered by just one or two players. The lack of cover in the backfield is most prominent in the wide channels. As a result it leaves some luscious green space for good kickers to find.
Using the End On Angle from the Welsh trip to Murrayfield we can see how they expose this space. Wales start from a midfield scrum, splitting their backs across the field. The Scottish Scrum Half defends from the boot of the scrum, meaning there is no pressure on the Welsh Scrum Half. Wales spread the ball, forcing Scotland into an early drift. Biggar gives an early pass to Tompkins who gets to the outside of his opposite defender. The scottish winger, Duhan van der Merwe who had been holding his depth had to press forward and join the defensive line. This opens the space in behind into which Tompkins can kick.
This Welsh kicking strategy is designed to apply pressure once a defence is beginning to creak. In both examples above Wales have passed the ball early to the 15m channel. The ball carrier then closes on the defence, with space outwide forcing the defender to sit off. The aggression in the carry and threat of the overlap forces the backfield to readjust and leaves space uncovered for the kick. This tactic is particularly strong as it is built on cores of Pivac’s philosophy. Under Pivac, the Welsh have developed a ball flinging, edge finding attack. The kick in the 15m is simply another tool ready for them to use. The tactic also benefits from players with good awareness, a willingness to take risks, and high skill levels particularly under pressure.Wales have these characteristics in abundance, and it all came together for one of their more controversial scores.
We join the play during a Welsh attack just inside the English half. After Wales have worked their way up to the edge of the England 22, playing from wide to wide. England have transitioned into a 14+1 defence, with just Daly defending the back field. Daly is positioned well, following the ball and sliding with the Welsh attack, however at each ruck he has to make a choice, whether to cover the blindside or the openside.
Daly is positioned to the openside for this Welsh breakdown, however he has to pay some attention to the Welsh blindside attack. The England Full Back has been working across the back field during the Welsh attack getting just beyond the left hand post. Ken Owens (Black Arrow) has begun shifting to the blindside, and this combined with the ruck helps drag Daly slightly to the left of the posts. This leads to a shift in Daly’s bodyweight, with the England Full Back working back across to the left before having to pivot again to track the Welsh openside attack.
Wales play to width on the openside, looking to stretch the English defence. The phase begins with a wide pass from scrum half, Kieran Hardy, skipping out Tomas Francis to George North. North has to wait a little for the pass, his initial depth gives him time to avoid the initial pressure from England and still pass the ball early for Adams. Adams has worked from his Wing, attacking on a curved line to get outside his opposite defender. This causes a drift in the English defence who end up on their heels. With England in a 14+1 defence there is plenty of space for the kick from Adams.
The kick is perfectly directed which allows Rees Zammit to win the foot race. The kickforces Daly to accelerate so he can cover the ground before trying to slow down and take the ball. Daly misses the ball, choosing to target Zammit. Instead the ball bounces fortuitously for the Welsh winger, hitting his leg and bouncing through for Williams to gather. Some will argue that the try is lucky. However it does act as a great example of a side making their own luck. The kick in the 15m channel has been a persistent tactic for the Welsh, and this try takes advantage of the havoc a bouncing ball can cause.
Kicking in the 15m was also profitable in the final Six Nations game against France. Again Wales are playing against a 14+1 defence, with only Dulin covering the French backfield. This passage also offers another insight into the Pivac philosophy, showing how even in the kicking game, there truly are no numbers on backs.
Wales again attack from a midfield ruck, and have split their attack accordingly. However, unlike the last clip, rather than all the back 3 roaming in the wide channels, Tipuric and Faletau have combined with Adams in the 15m channel. The simple objective of the play is to target the space behind the French line. France blitz hard in defence, especially Virimi Vakatawa who tries to target Tipuric, after a slightly high pass from Adam Beard. However Tipuric, transitions well from his catch to his kick. The kick is slightly wider, and Josh Adams has to use his own footballing skills. This try is incredibly similar to the Liam Williams score v England, with Wales again exposing a 14+1 backfield. This is clearly a powerful tactic introduced by Wayne Pivac, with the bouncing ball causing massive problems for the covering defenders. That the skill can be executed by the forwards, like Tipuric here or Faletau in the autumn, and the backs alike shows a clear example of the “no numbers on back” in the Welsh kicking game.
The advantages of this strategy are clear, especially with the highly skilled individuals. The fact this policy involves high skilled players, regardless of position is no mistake. Wayne Pivac has aimed to create a highly skilled team, which has threats across the field.
Overall, the Welsh kicking game both when exiting and attacking is predicated on individual skills, built around a solid structure and system. When Wales box kick they have a 2 man chase team, helping to protect against the touchline break and allow the headhunter to target man and ball. This strategy also benefits from Scrum Halves being able to kick off both feet. The Welsh use of attacking kicks is also built from individual skills within a structure and system. The clearest example though of individual skills, is the Welsh kick and regain strategy. Again it’s built into a structure with a clear head hunter, and containment team, but the high skill nature of taking a highball acts as a really great attacking weapon. The kicking in the 15m is a direct result of their general attack strategies, and their overloading of back three players. The tactic benefits from a back three all comfortable when kicking, and a team capable of distributing with pace. The forwards in the Welsh team are becoming threats even in the kicking game, an indication of the no numbers approach. In every aspect of their kicking game, Wales use both individual skill and solid structure to exploit defences. The blend that Wales have developed should help them prosper with kicking such an important part of the modern game.
Under Wayne Pivac, Wales have developed one of the strongest attacks in the Northern Hemisphere. In the 2021 Six Nations Wales scored the most points on their way to the title. One of the main drivers of this success has been the innovations by Pivac and Stephen Jones especially around the “no numbers on back” approach they have been using. This no numbers on back approach means all the players became capable of performing various roles, such as playing first receiver regardless of position. However, this is not the only innovation that has been a key victory, with various tweaks and improvements to their general style proving successful under Pivac.
The No Numbers On Back Policy
It is with the “no numbers” approach that we will start, given how crucial it has been to the welsh attack. The approach is beautiful in its simplicity as Wales are gearing their game towards speed of ball, and having players capable of filling the majority of positions across the field. One of the key elements of this attack is the highly skilled Justin Tipuric, who provides great handling skills, and can act as a second distributor to help spread the Welsh attack, like he does here against the French.
The example above is from the second phase of a scrum attack. Wales have loaded their Centres and Wing Josh Adams on the blindside, which limits their ability to play wide on the second phase. This is a great indicator of Wales’s willingness to play with no numbers on their back. This is because it leaves just 10 and 15 as playmakers and distributors in the wider channels, using Tipuric to fill the role.
Tipuric’s role also means that Wales can maintain their pace when they attack the openside, rather than the ball getting caught up within the forwards. Tipuric has held his depth, meaning that Biggar has an easy pass, before passing to Liam Williams who has time and space when he gets to the ball for an easy pass to Louis Rees Zammit. The result of this extra time and space, is that Wales are able to go from 15m to 15m in just three passes, and force France to defend laterally. The kick decision is also incredibly easy, given the 14+1 France are favouring. Dulin has been pulled side to side, and Wales find space behind the French line.
However this welsh attack policy has a more far reaching impact when we examine it within a phase play attack. This comes to light when we examine the Hardy try v Italy in the Autumn nations cup. Built from sustained phase play, the Hardy try shows how Wales’ use of loaded backs, and highly skilled forwards where beginning – even in a rather dour campaign – to come together to create brilliance.
We join the try mid phase play after Wales have stolen the lineout ball of the Itallians. From this midfield ruck, Wales run a variation on a blocker play which forms a part of their attack playbook. With Jon Davies receiving the ball off the Scrum Half, Sheedy can work round the back to offer an option. However, on this occasion Jon Davies straightens, dragging Canna into a ruck.
Wales now worked their backs all to one side of the field, looking to attack Italians with a more physical play. North is driven on by Louis Rees Zammit while Elliot Dee comes in to finish securing the ball.
Having won the ball out wide, Wales have set into their typical attacking shape with a single three man pod and two further two man pods out wide. However, it’s not the numbers in the pods that are particularly important here. Instead our focus should be on Sheedy’s role as he inserts himself into the pod, operating flat to the line. This is an incredibly common edge shape for Wales, and something we will return to. This shape allows Wales to split the Italian defence, striking right at the centre. It also allows a quick ball with two cleaners following up on the carry at the weak shoulder.
The screenshot above shows how Wales have set their shape, in order to target the space they have created in the Italian line. The first thing to notice is how deep Tipuric is attacking. This gives him plenty of time to adjust his angle depending on Canna’s (the Italian defender outside the space) decision and body shape. This position is integral to what unfolds.
Looking in more detail at the play, we can see how impactful Tipuric’s positioning has become. As Faletau receives the ball almost flat to the Fly Half, he can fix the two inside defenders. However the Italian defender Canna on the outside of the black circle loses connection slightly giving Tipuric the space to target. The highly skilled Faletau can then pop the ball to Tipuric to run through the line and make a break.
Watching in full speed we can see how quickly Tipuric adjusts his line, blasting through the Italian defence. But we can also see how influential Pivac’s doctrine of no numbers on backs is. While Sheedy is at Fly Half, it is actually Faletau in the main decision making role, with three clear options. Faletau is able to either carry, pull it round the back to Jon Davies, or to tip it on as he does. This multi-decision play is an example of not only the system but Pivac’s trust in it.
The Welsh Attack Shape From The Edge
Now let’s look in more detail at one of the more common attacking patterns used by Pivac, a Fly Half insert pod. This shape is particularly prominent when they play from the edge. The shape is a wonderful example of the power of structure and how it can exploit the defence.
The still from above is just a general example from Wales’s first attack under Pivac. It shows what would become an important shape for Pivac’s game plan. Characterised by the Fly Half standing in the centre of the pod, this edge shape can really help Wales influence the defence. The inside runner can provide a good hold on the inside defenders, whilst the outside runners can either act as blockers for a pull back play or hit the ball hard.
By using it off the edge, Wales are able to set their attacking 1-3-2-2 framework early, and it gives plenty of time for the playmaker to attack the defence and size up the right options. The options are the true magic of the play, with the insert shape giving four clear options depending on the preference of the decision maker. Firstly, they can decide to pass to the hard runners who attack their outside shoulder. Secondly, the Fly Half has the option to play wider by using the pull back option, aiming to attack the corner of the defence. Third, they could decide to pop the ball on the inside, in order to relieve pressure from a blitzing defence. If all other options are exhausted, the Fly Half can carry from the shape.
On this occasion Dan Biggar lifts the ball to the hard runner on his shoulder, Wyn Jones. By using the tighter option it gives Wales a fast clearing option as Jake Ball can cut across and pin the Italian tacklers into the ruck. This simple edge attack move may only be a small cog in the game plan but allows for some wonderful variations which help Wales break teams down.
There are multiple ways in which Wales set about breaking sides down, based on this shape, and their general attacking framework. The handling between the different elements of the pods helped them open the defence, like we saw in the Hardy try earlier. This edge play allows for some wonderful variation based on the Pivac doctrine of “no numbers on back” rugby. For example, the use of a roaming back three which Wales have become adept at using to break teams down.
In the same attack against Italy, Wales have now set a 2 man pod outside the Fly Half, as part of their general attack structure. However, instead of both runners being forwards, one of the roles is performed by Winger, Josh Adams (Blue Spotlight). This gives Wales additional pace within the midfield. On this phase, Wales use their other Winger, Johnny McNicholl (Red Spotlight) who wraps off his wing, operating as the pull back. The use of roaming Wingers, is a clear example of the no numbers on back policy.
Later on in the same attack, Wales do pull the trigger releasing from a pod. While the setup is slightly different with Adams on the inside, it is again based on their common phase play shape. The two hard runners (white rings) outside the playmaker, draw the Italian pressure. This leaves a small hole just outside the ‘B’ defender who is hung out to dry. Adams (Red Spotlight) attacks on the inside. The strength of the carry, especially against a weak inside shoulder, allows Adams to get his hands free and offload to the Scrum Half on the inside. The offloading attack is a clear example of Wales focussing on developing a high skill attack.
This interplay didn’t just deliver line breaks, it also directly delivered tries, such as this beauty from Tomos Williams.
Wales rather than using the edge shape we have been discussing, are now flowing through to the end of their structure playing off the one forward out wide. The quick ball from the previous ruck is important as Justin Tipuric stayed on his feet long enough for Dillon Lewis and Hadliegh Parkes to clear out. The quick ball allows Tomos Williams to beat four folding irish defenders with a pass and gives Alun Wyn Jones, a one on one carry against a scrambling Bundee Aki with Murrary swimming off early. This allows the welsh Lock to stretch through the tackle and control his landing. With his hands free Alun Wyn Jones can pass inside to Dan Biggar who has run through the Irish line. Biggar can then combine with Tomos Williams to provide an offload for a truly flair filled score exhibiting the Welsh gameplan.
The Welsh Attack Structure
The Welsh attack is built from a doctrine of no numbers on back but it is still structured, using not only the attacking shape shown above but with a typical attacking structure. Some may bemoan the use of structure and formations in modern day rugby, however Wales have melded this with their no numbers to produce some fantastic opportunities and scores. The structure Wales have employed have been variations on the 1-3-2-2 shape, pioneered by Japan at Rugby World Cup 2019. One of the main innovations that Pivac has overseen is a use of a roaming back three, with them often loading on to one side of the field. The overall structure of the Welsh attack is easy to see in this passage against England.
The Welsh attack begins from a lineout maul drive just inside the English half. Using two pods of three, Wales take their attack to the 15m line. These phases allow Wales to get their forwards on feet, and they begin to set their attacking structure.
After the first two phases, Alun Wyn Jones (White) has worked around from the maul on the touchline to form a midfield pod with the two Welsh Centres (Blue). Jones positions on the inside of the pod, acting as the primary cleaner and giving the welsh quick ball. The strong carry by Halaholo forces a double tackle, and traps Curry and Farrell on the wrong side of the breakdown.
The outside backs have now loaded up in the outside channel, with Rees-Zammit (14) inside of Williams (15) and Adams (11) on the edge. Sheedy gives a well timed pass which forces the English Full Back to come up and cover the wide channel. The threat of the outside backs causes England to commit out wide and they are left tight on the next phase.
Wales use their typical edge attack shape with Callum Sheedy inserting in front of the pod of three forwards. Wales have also formed a second pod slightly wider holding the English defence. Sheedy’s break comes as a result of exploiting holes created by this structure. The animation of Navidi inside puts Cowan Dickie on his heels just for a second. The Hooker is not helped as he is defending alone with his inside exposed by Itoje’s slower line speed.
From using the end on angle, we can also see that the break stems from England’s defence being completely worked out of shape. Callum Sheedy (Red Ring), stands opposite Cowan Dickie who is completely exposed on either side. Wales have filled their positions well, flowing within a structure. From here, Wales strike hard and fast at the gaps they have created. The break has been caused not only due to individual brilliance but also a attacking framework and structure.
The welsh use of structure does not just lead to holes and line breaks however with it also delivering one of the tries of the tournament. A mixture of individual brilliance, and superb tactical play to expose holes created by the structure gave us a masterpiece of a score from Louis Rees Zammit.
A carry from Taulupe faletau sets a midfield platform, and allows Wales to gain front foot ball. The dominant nature of the carry means that the Welsh forwards can enter the breakdown immediately without having to work round to get through the gate.
Off the next phase Wales search for width, Sheedy positions in behind Ken Owens to receive a pull back pass, with Tipuric dropping back allowing Wales to reach width. The phase may go sideways but it allows Wales to form into a 1-3-3-1 shape across the field with Alun Wyn Jones supported in the clearout by three backs.
Playing from the edge, Kieran Hardy finds Callum Sheedy as Wales look to attack the Scottish midfield. The Scottish line speed is good, and the double tackle strong, however Wales are able to fold round faster and it’s the speed of the fold which causes problems on the next phase.
Wales then use a variation on their typical attack shape, with two hard runners off Sheedy and the addition of a clear pull back option. The two hard runners force Scotland’s defence to shut them down. This turns Chris Harris (Blue Spotlight) inside. Sheedy gives the ball early to Adam Beard who shows great handling skills and lifts the ball cleanly to Halaholo who bursts round the corner of the Scotland defence. This attack is a clear indication of the Welsh gameplan, and them attacking off the Fly Half. Their general shape with an inside runner plus two outside runners give Wales lots of width with the added threat of a pull back option from both 10 and the hard runners outside. This added threat causes real problems for the Scotland defence as it exposes Chris Harris.
The welsh attack beats Harris, on the outside forcing him to defend with a soft drift and give up ground. As a result Wales can unleash their wide men, with Halaholo’s run linking him with Faletau, and Louis Rees-Zammit. Halaholo gives the Welsh speedster the ball with a perfect pass enabling Zammit to easily beat Duhan van der Merwe. The chip kick is an audacious piece of skill, and shows yet another example of the high skill, high reward play Wales have adopted under Pivac.
Summary
The Welsh attack has delivered some fantastic moments under Pivac, and was certainly the strongest attribute in their championship win scoring the most points. However, while the 32 points per game is impressive, what has also been fantastic is the manner in which Wales have scored these points. They have innovated and added layers to their attack with the use of roaming back three players especially important in the new Welsh style. Most interestingly, Pivac is developing a game plan which relies on high skills across positions with forwards playing increasingly important roles in spreading the ball. The Welsh attack is their own distinct brand, but also intriguingly shows what Rugby could become as a no numbers approach becomes more common.
The Toronto Arrows have been a revelation in Major League Rugby since joining the league last year (MLR’s second). In their inaugural year, the Arrows reached the semi-final stage.
The winter weather in the Toronto area meant that for the beginning of the 2020 season the Arrows played all their games away from home – before the Covid-enforced break. While the season was shortened, in the five games the Arrows played we learned a significant amount about Canada’s team and how to construct a gameplan to create a winning team.
Off the field, the Arrows have spoken strongly about wanting to become a pathway for Canadian talent, and the next generation can take heart from the system being created. This piece aims to look into the Toronto Arrows game-plan, and break down how they became serious title challengers.
The Arrows First Phase Magic
Every attack in rugby starts with a “platform”, whether this be lineout, kick, turnover or scrum – all are examples of platforms. The Arrows were good off most of their platforms. You don’t get to the top of the conference being mediocre. But while they were good off most of their platforms, they were extraordinary off the four man lineout. This platform enabled the Arrows to get a strong start to the majority of their attacks.
The launch from the four man lineout was a staple of the Arrows attack. The best way to examine the play is to pick an example which resulted in an outstanding score. While there were a couple of options, the best example was the score versus Rugby ATL.
The sole Canadian side had split their four men into two distinct sections, with a back pod of three and a single front man. The lineout’s back pod contains numbers 6,7,8 while number 5 marks at the front of the lineout. The lack of a Prop within the set-up is deliberate and increases the speed of the lineout. The Atlanta set up however, does include Props. The front marker is the Tighthead Prop, meaning he is matched up against the Arrows’ Lock. Meanwhile, the ATL Loosehead is positioned at the back of the lineout.
The split in the Arrows has created a target zone. This targets the inside of the Atlanta front marker, and aims to exploit the Prop’s lower mobility. The split is also more central to allow the Scrumhalf to take the ball on the move, rather than distributing from a standing position.
In the movement phase of the lineout, the Arrows have a dummy jump from the Number 8 aiming to unsettle the Atlanta pod. Atlanta appears to be expecting this with a specific defensive system. Rather than the number 4 moving out of the way, the Atlanta Lock instead pushes across to be a lifter. This gives the Arrows an advantage, however, as Paul Ciulini, 5, is able to move without turning. This earns them a split-second advantage. This gain within the movement phase has a large effect in the final competition for the ball.
The Rugby ATL number 4 turning puts the Atlanta lineout at a disadvantage when challenging the Arrows. While Ciulini is able to stay square throughout the lift and reach perfect form, the Atlanta lifter pivots and lifts away from his body. This limits the height of the ATL challenge, and ends up simply surrendering the ball and throwing the jumper across the lineout.
Due to the lack of significant challenge from the Atlanta pod, the ball comes away relatively cleanly. This allows Andrew Ferguson to attack onto the ball at a steady pace. This smooth delivery from the Scrum Half allows the strike team to fire into life.
The strike team is positioned in the center of the field, attacking off the Flyhalf. They are set up in a simple spear head shape, with the Centre in front of the two Props. This means the Arrows can split the field and have dominant carriers on either of the options they choose. In this case, the Arrows decide to have the Centre fade across the front of the pod. The bill is given to the prop who strikes on an out to in line against the Rugby ATL drift.
The lineout structure then plays a second crucial role in the make up of this midfield formation. With the Centre having faded across for the second phase, the number 4 Lock is used in the clear. He had been running the inside line, tracking on the Fly Half, and as such plays a role in contracting the ATL defence. The effect of the number 4 is on the inside defender of the press.
Splitting the Atlanta defence is the objective here for the Arrows. With the 12 fading across the pod, it means he can act as a distributor or strike runner on the next phase without having to win the race around the corner. The inside run of the number 4 Lock has pulled the inside defender higher, and he has to work further before wrapping. This is a two-phase strategy aiming to break the Atlanta defence systematically.
Before moving onto the second phase of the Atlanta score, it is worth reflecting on why this first phase move is so successful. The move is based on a common shape, so defenders will make preconceptions about the play. The formation was used to great effect, securing a try against the Seawolves the week before with a subtle change.
There is a subtle change within the lineout. You’ll notice on this occasion the number 5 Lock (circled in green) is positioned at the tail. He acts as the back lifter, but this positional change also enables the number 4 Lock to be shifted to the front of the lineout. This brings in a decoy threat to the center of the field. This changed with the number 4 Lock shifting into the lineout and the Winger (circled in red) becoming an option. This little distinction off the same shape is key for the Arrows in maintaining variability and introducing doubt to the opposition defence.
Shifting focus back to the Atlanta try, the Arrows are ready to enact the second stage of their attacking game plan. They have secured a quick ball, the inside option clearing the ruck alongside the second Prop.
The second phase again uses a strike formation, aiming to open a weak shoulder and allow a hidden runner to carve through the middle. There are a lot of moving parts to break down this try, and each one plays an important role.
The first role is carried out by the Inside Centre who runs a blocking line. A secondary role is played by the Outside Centre, who comes late onto the ball and moves toward the wide channels creating multiple decisions and therefore problems for the defence. The scoring role is played by the Left Winger. While the break is magical, and involves a lot of skill and talent, the positioning on the previous phase shows Leivas positioning himself perfectly.
Leivas attacks from a hidden position, starting the phase behind the screen runner. As opposed to a distributor who would want to be further across, the Winger tracks in behind the screen runner and ends up concealed within the secondary pod.
As shown on the pitch above (camera angles not great) we can see all 3 roles in perfect harmony. The Winger begins hidden behind the Inside Centre, who manages to create the split by escorting the Atlanta Openside away from the hole.
The outside threat, again with a small throwback to Dan Moor’s try v Seattle, convinces the Atlanta defence to push high. As shown above, the overlap convinces the back field coverage that the ball will be going wide, with the Fullback shifting his weight, ready to make a covering tackle. The double tackle aims to stop any spread of the ball, but the number 13 can free his arms and the inside is attacked.
The Arrows have a tendency to overload the wide channels in attack. This try v Atlanta and the score v Seattle are evidence of this. However, again there are small variations, as DOR Silverthorn aims to disguise the Arrow’s intentions. Against Seattle, the Left Winger targets the outside defender instead, with an inside trail runner from 10 holding the defence.
The Arrow strike plays are formidable. But what if they don’t work? The Arrows require a second option to play from, and this transition is another dangerous part of Toronto’s arsenal.
System Success: The Arrows 1-3-3-1
The main system used by the Arrows when they are unable to score is their 1-3-3-1 shape (broken down here: https://theanalysisguy.sport.blog/2020/02/19/building-blocks-deliver-arrows-victory/ ). The use of formations is something more akin to football, but in modern rugby the spread of players across the pitch is becoming more refined and specialised. The 1-3-3-1 shape is probably the most common shape across teams, as there is plenty of room for manoeuvre within the shape. By positioning two pods of three Forwards in the centrefield, teams have multiple options on attack. These also interact with the play making axis and offer different options depending on how the team wants to use them.
The Arrows are an expansive team well adapted to the 1-3-3-1 structure. Across three of their games I measured using Rugbycology (versus ATL, Houston, and Austin), they passed more than their opponents. There were significant differences in the pass per phase stat against Austin and Houston, with the Arrows bringing a really expansive attack to both matches. This expansive attack is enabled by the use of the 1-3-3-1 formation.
The formation is shown clearly in the game against Houston. Starting from a kick receipt the Arrows are able to get into formation early. As shown in the picture below, clear pods are being formed for the play back in the field. The wide ruck plays a crucial role in creating the formation.
The wide ruck is set up from a carry by the single forward on the right of the set up. The inside pod is circled in red. By positioning close to the 15m line they can get toward the outside of the Houston press and really establish a strong platform. It also enables the backs utilized in the wide ruck to be used in the following plays.
Outside the red-circled player’s crucial backline, alignment is beginning for the next phases. Joined by the yellow line, the second pod of 3 is beginning to assemble and align themselves to receive the ball from the Flyhalf. In a secondary role, Sam Malcom, shown in the blue hexagon, is rotating to become a second playmaker. This is a key shape for the Arrows with the stellar Fullback a crucial distributor out wide. The final part of the picture is Manuel Diana, the strong carrying back row who takes the wide position out wide giving the Arrows a whole-field threat.
This picture is also repeated against Austin. Again starting from a kick, the Arrows begin to gain their shape. The second phase after the kick was played to a carry from the left pod of 3 (blue square), this stretched Austin to the far side.
The play has led to a large defensive overload on the blindside with five Austin players marking two rather disinterested Arrows players. Instead, the Arrows play to the openside, using a pod of 3 to attract the initial press. The ball is then released to a deep lying playmaker, Fly half Tayler Adams, who spreads the ball further to expose the wide channels, allowing the Arrows to make significant ground.
Out wide, the Arrows make long gains reaching the Gilgronis 10m line. The carry is made by the archer himself, Dan Moor, with the wide forward involved in securing the breakdown. This enables quick and clean ball for the following play, involving the centre pod of 3.
The situation created by the Moor run is incredibly similar to the one at Sam Boyd stadium against the Sabercats. There is an electric feel to the Arrows attack, as it methodically follows the plan exploiting poor defence by the Austin side.
The play back inside to the pod of 3 after the break is also similar. This is because the Arrows are aiming to create what is known as a 80/20 split. The name is simply generated, looking at the width of the field as a percentage on both sides of the ruck. By getting to just outside the 15m line, it opens up a significant blindside – should the Arrows wish to hit back. Importantly, it opens the openside, allowing the Arrows to use their full-pitch threat.
The wide play allows the Arrows to use the pitch and bring in second distributor Malcolm, attacking outside just like he did against Houston. However, rather than spread the ball, he cuts inside, finding ground despite attacking a more organised Austin defence. This is because of the way the Arrows like to use a split pod when attacking on the 80/20. Rather than having a standard arrowhead, instead they position a short option – in this case cutting across the face of Adams, with a double running threat out wide.
This split pod means the Arrows’ focus is wider, with men out wide including a backrower attracting outside defenders. This opens the hole for Malcolm to attack through and make ground.
Having made ground, the Arrows switch direction, hitting the Left Winger who acts as a hybrid option, replacing the Hooker in the centre pod of 3. As a faster and more agile player, he offers a different threat, while Hooker Quattrin can target the breakdown and secure quick ball. From the quick ball, the Arrows enter a same way pattern using a combination of carrying 3 man pods with additional backs to offer a varied threat, aiming to reach a wide channel as they had against Houston.
By attacking the same way, the Arrows forwards can fulfil their roles easily. It also stretches the Houston defence, as it forces them to mark up and react to threats while continually travelling backwards. The deep lying 13 threat, coming on the inside of the pod above, also offers additional direction to the pods.
It is also incredibly efficient, as the Gilgronis keep players on their feet, so the Arrows don’t need to secure each ball in the ruck. The nature of travelling the same way also keeps the same defenders under pressure. In this case, the Austin Openside and Outside Centre deal with the brunt of the work.
Once the Arrows reach the 15m line, they again have split the pitch 80/20. However, this time they want to reset and work to the touchline, relying on their skill to fully utilise the Blindside. This creates a wonderful try for Dan Moor and shows how effective the Arrows’ sustained phase play can be.
But the same-way pattern has one final hand in the Moor try. Not only is it wonderful handling by Adams to free Moor, but with a great wide pass from the base there is significant deception from the Arrows.
In truth the Gilgronis should do better, Adams creates a 3 on 2 by sliding about a meter, but the threat of a pick and go means the Gilgronis have numbered up. The carry on the previous phase by Diana ties in two Gilgroni tacklers, with the Austin Prop (now at guard) also absorbing the blow. The Arrows have also beaten the Gilgronis in the race for width using the same-way pattern. As the ruck is set, the Gilgronis’ 13 is working through traffic. The high work-rate and continual focus on 13 has broken the Austin side, allowing the Arrows to score in the corner.
All of the examination above has been in isolation, focussing on either the strike-play or the phase-play of the Canadian side. But against the Seattle Seawolves we see how Toronto blended these two strengths to score a try. The attack starts from a four man lineout, again using the standard set up. Following the lineout, they transfer the ball, maintaining their shape and using a pod system, combined with backs acting as hybrid players. This stresses and eventually overwhelms the Seattle defence.
The simple four man lineout follows a similar pattern as above, with a dummy jumper leaving the line, and then ball off the top. Playing off 10, the standard structure is more disguised, though the basic formation is still present.
However, it is the slight change which makes it so effective. The lead running Centre acts alongside the inside forward to screen Dan Moor. With Moor hidden, the Seattle defender fixes onto the forward. Moor then accelerates late, beating the tip of the Seattle defence and breaking through.
For the next two phases, we again see the Arrows enter a same-way pattern. Using two pods of 3, the ball can be quickly carried to the wide channel. For the final ruck, notice that the Inside Centre has been used as a secure option, while at the start of the clip, 13 has been used as a clearing option.
Having reached the edge, the Arrows then continue attacking in the field. Being close to the line, the Arrows’ attack begins to morph, becoming a hybrid of both backs and forwards. It is admittedly an easier transition – the use of extra bodies increases the speed. The same-way attack also results in people becoming more automatic, another method for increasing speed.
The final two phases for the try deserves their own short breakdown: There are three major building blocks which generate the score. First, the quick ball of previous phases has disoriented the Seattle Seawolves defence. This is mainly shown through a lack of Seawolves defenders by the breakdown. Now whether this is inexperience or simply Toronto skill, the Seawolves have left a gaping hole, only filled by the Prop, Sears-Duru.
The second building block of the score is the isolation of a single player. Now, not only are the Seawolves on the back foot and in disarray, but this is all magnified and focussed upon one player. Sears-Duru (blue square), is faced with two options: either he will focus on where the ball is, or take the route of where it may go.
Sears-Duru makes a clear choice in focussing on the ball. His eyes become fixed on the ball, and he rests on the ruck, waiting to launch at the man at the base. This is where the secondary Seattle player becomes important. The player circled in red eventually sits just behind the try line, possibly waiting to see where he’s needed rather than being proactive. This means the space next to Sears-Duru is unprotected. With the Seattle Prop focussed on the ball, his blindspot creates an area the Arrows can exploit.
Summary
The combination and adaptability of these strengths allowed the Arrows to be a complete team. Despite the shortened season, there are clear signs of growth and strengths which the Arrows can continue to build upon. While I only covered two major parts of the Arrows attack, it’s clear why the team is so strong.
Strike moves are part and parcel of modern rugby, and the Arrows have ability in abundance. The tries outlined earlier all showed their ability from the four man lineout. By using the same set up, Toronto was able to maintain cohesion and also increase deception. They also manipulated defences when they changed their formations.
The ability of the Arrows to strike was not limited solely to the lineout. The try against Colorado is a perfect example of this. The multiple options on the play – using a blocker – is typical of rugby. The easy execution leads to what looks like a simple try.
The move has multiple options and typifies the Arrows. Crucially, the Arrows have hidden the target player from the intended hole (blue square). The strong run from 13 (circled light blue) is designed to act as a blocker and he interacts with the defensive line, hitting the outside shoulder of the defender.
The target runner is available at two opportunities. Either the ball can be passed early, opening the wide attack of the Arrows with Mieres playing a distributing role. This is illustrated by the dashed yellow line. This multiple option run is just a small innovation which made the Arrows hard to defend.
The run also has the benefit of drawing the cover defender out of the line. The left defender jumps out of line (purple line), aiming to intercept the deep-lying Mieres and tackle him. However, Mieres runs a slightly wider line, leaving the defender grasping air.
The choice of line is crucial – and another aspect of Arrows’ strike-running formations. This line running is clear with the blocking line run by 13, who manages to hit the outside of the defender and disrupt Colorado’s defence. This prevents any cover reaching Mieres so he can carve through the defence. The final defender makes a small misread, losing connection with inside defenders and pushing to cover the final threat of the Arrows’ formation.
This strike play has three clear building blocks. First, there is complexity built around simplicity. The result is easy execution and a distracted defence. Second, the line-choice and timing of distribution. Mieres’ fade outside the Colorado defender creates his own opportunity. The blocking line helps to widen the gap before the shape again relies on the simple structure to create what ends up being a simple opportunity. The final building block is continuity of the shape. As said above, the four man lineout strike move was used across all their games, and this scrum move is a variation on a theme. This means that the shape can be used across multiple games with players filling multiple roles, with no real drop-off being evident. In this age of analysis, it also paints a picture, which may cause defences to anticipate the wrong outcome.
Toronto’s attack, however, stretches well beyond 3 phases. They combined their strike-attacks with a clear phase play-attack. The use of a 1-3-3-1 attack enables the Arrows to stress the defence. The use of 3 man pods creates the ability to clear quickly, and also allows interplay. The use of the Centres as hybrid and supporting players within these 3 player pods maintains the speed in attack.
The 1-3-3-1 structure allows the use of the Toronto backs in a variety of roles. Sam Malcolm played a linking role outside. The ability of their Wingers to shift and roam around the field also changes the picture and keeps pressure on the defence. The Arrows transition from strike to phase attack was also well executed.
There is no better example than the attack from kick-return v Houston Sabercats. By finding width early, the Arrows allow their forwards to settle into formation. This removes work-rate with the backs able to clear out the ruck. This also meant that Diana on the far side could offer a more physical threat – outside the speed and distribution of Sam Malcolm. This combination of threats meant momentum could be kept throughout the attack.
Looking forward to next season, the Arrows are clearly in a good place.
They have been able to build structures which will form a foundation for future seasons. They also have the individual talent needed to be challengers, even with the departure of Sam Malcolm and Dan Moor. Whether Toronto would have won the MLR Shield this year is up for debate, but their strength would have given them an opportunity.
Thanks to Rhiannon Garth Jons and Karen Gasbarino for proof reading and hopefully making it more coherent. Thanks also to Sam Larner for some inspiration. Check out this small thread around the Arrows starter plays, https://twitter.com/SamLStandsUp/status/1233539241935802370?s=20
The Lions tour is in full swing, and against the Force, we saw an impressive display. It started in the first minute, with Sheehan offloading the ball before grasping a second touch to open the scoring. However, the attack wasn’t their most impressive aspect on Saturday; instead, it was their exertions without the ball which secured victory. It took until the Brumbies’ match versus Moana Pasifika in round 10 of Super Rugby for a defence to keep their opponents to seven or fewer points. The drills and leadership from Simon Easterby have made a big impact on the Lions’ defence, and while there were rough edges, what can we expect to become their calling cards moving forward?
Tackle Choice: One Low One Ball
A defensive system is comprised of many factors, one of which is the team’s approach to the tackle and contact area. For Easterby’s Lions, the approach is defined by a low chop, with a second man targeting the ball. On occasion, this led to an over commitment, but in general the defence was organised and in control.
Example tackle against the Force. Beirne (Yellow) goes low. Schoeman (Blue) goes high. Josh van der Flier (Red) hunts from the inside and will attack the ball.
Beirne (Yellow) is the primary tackler, reacting to the Force’s carrier stepping inside. The back rower goes low and gets the man to the floor. Pierre Schoeman (Blue) targets the ball in the tackle, he controls the fall and then can bounce across. Josh van der Flier (Red) tracks from the inside and is then able to attack the ball. He manages to disrupt the ball but doesn’t force a turnover.
In the following phase, Pollock (Yellow) went low, and Steve Cummings (Red) looked to attack the ball.
During the next phase, Pollock acted as the chopper, going low to make a quick tackle. Cummings (Red) was then able to try and attack the ball. Cummings did not make much of an impact, although the following two phases went laterally. However, these phases paint a clear picture of the Lions’ default approach, the use of a low chop and a second man attacking the ball.
To get these results, there was plenty of detail behind their system. One of their big aims, as a tackler, was to land chest on top. This gave the tackler a chance to get back into the game and disrupt. Notice in the clips above, particularly the second contact, how Cummings makes contact with the chest first. For Cummings, this provides a useful way to launch and disrupt the breakdown.
Pollock has disrupted the previous breakdown, reaching over the top of prone Western Force ruck cleaners and proving a general nuisance. This disruption buys enough time for Cummings to recover, allowing him to make an effective chop. Furlong then assisted in the tackle before he landed on top of the Force ball carrier. The negative nature of the tackle meant his second action wasn’t very effective, but again, it showed the motivation. Instead, we turn to Dan Sheehan, who made his double effort tell.
Sheehan made a dominant tackle, powering through the contact to catch the Force behind a gainline. Importantly, the Irishman landed on top and stayed there. He took half a second to set himself and allowed the first Western Force support player to go over the top. This allowed Sheehan to win the height battle. This counter ruck slowed the ball down and disrupted the Western Force’s timing. This leads to the turnover.
These double actions are forming an important foundation of the Lions’ defensive system, allowing them to aggressively disrupt and slow down the opponent’s ball. Expect Easterby to continue developing this weapon.
Finding Pressure Points
The breakdown was not the only area that the Lions have looked to build pressure on their opponents. Another method was prominent in both the Argentine and Western Force games. This is another pressure principle, built mainly on hard work. But Easterby hopes it can prove pivotal against the Wallabies.
Tadgh Beirne and Ben Earl make the efforts here, stopping Argentina from playing away from the lineout. This pressure game enables them to turn the tables, but it helps that it’s an add-on to their lineout strategy. At the beginning of this clip, we can see the Lions have no intent to lift. Therefore, to stop the Argentines having it too easy, they flood through and pressure the scrum half.
The TV angle doesn’t help here, but we can see the intent, especially from players at the tail of the lineout. They don’t quite force a change of the plan from the force, but the pass is poor, giving the defensive line to steal a couple of yards on the defence.
How future opponents decide to counteract this intent will be interesting to see. Hoskins does a good job here, blocking any pressure through the lineout. By blocking the lineout pressures, this exposes Dan Sheehan, who has been asked to focus on the 1st receiver.
This hyper focus on the 1st receiver leaves a hole on the inside, and with Furlong delayed in his departure and no pressure through the lineout, the Force can adapt. Nic White, rather than throwing the pass, scoots before delivering a shoulder ball to Dylan Pietsch. This line break will serve as a warning to Simon Easterby’s aggressive lineout pressure. Don’t expect these blips, though, to lead to a change of approach from the Lions. The extra time before the first test will allow the connections to be built, and the Lions shall hope to trap the Australian attack.
Lions On the Hunt
It’s noticeable that the Lions are not a blitz till broke team, instead Easterby’s defence encourages individuals to make decisions and be aggressive when they get the chance. This is a middle ground approach, and can help get the defence in ascendancy without the risk of blitz from the line.
Sheehan shoots here, and while he didn’t make a tackle, the pressure encouraged a front-door pass. As a result, the remaining Lions’ defence enveloped the attack. This is a small win that gave the tourists a chance to keep imposing.
This example from Garry Ringrose, earlier in the game, showed the system’s benefits. The Force front line passed early, giving Ringrose a chance to punish the off-target pass. While this is called back for a penalty, it showed the threat of the Lions. Against a Schmidt attack likely to be heavy on layers and interplay, this aggression could be an advantage.
In rugby, everything is a trade-off, and we can expect Australia to do their homework. In the example above, we can see the Force tried using their blindside winger to attack a seam that Ringrose leaves open. It’s a tough pass, but we may see the Wallabies attempt something similar?
On To The Reds
The Force was unlikely to be the Lions’ biggest test, though the challenges of jet lag and cohesion with nine new caps are notable. Given these caveats, games can act as a window into their tactical approach, even if reading the form and ability of this cohort is more difficult. As a result, Easterby will be happy with how the defence has begun to take shape, although there are some gaps in knowledge and connection which will need fixing. But the bricks are slowly falling into place.
The Lions tour is one of the biggest events in the rugby calendar, and we were treated to an enthralling encounter in Dublin against the Pumas. Argentina became the first team to beat the Lions in an opening game since 1971, but the game held promise for the Lions. We can already see the building blocks behind their attack shape. While we also saw how Andy Farrell’s deliberate squad construction is laying the foundation for the launch plays, which may become a staple over the series. However, it will still go down as a defeat for the Lions. One of the driving reasons is Argentina’s ability to control chaos. Join me as we delve into the details from Dublin.
Goodman’s Plan For Greatness
One of the main themes within the game was the Lions’ introduction of their attacking structure. As expected, there is a heavy Irish theme to the attack, with Andrew Goodman joining the staff from the IRFU. This attack from the 7th minute gave a good indication of his plans.
Ben Earl targets a midfield ruck to split the Argentine defence
Beginning from a goal line restart, Ben Earl drove in-field to create a midfield ruck. This split the Argentine defence and gave a target for the retreating forwards. A trio of England colleagues followed Earl into the contact and secured the ball. This gave the remaining Lions a chance to find their shape.
The Lions second phase from the Goal Line drop out sees them use a Super Pod to shift the ball
From the midfield ruck, we see two traits beginning to develop. First, the expansive style they want to adopt, as the Lions formed a four-man “super” pod. One interesting part of this shape is the use of Bundee Aki in the middle of the pod. This shows the role Goodman wants his midfield to play, acting as additional backrowers. Instead, the responsibility for organising these shapes is dependent on a 10/15 axis, which provided a dual playmaking threat.
The Lions settle into their 3-2-1-1 shape, playing off the edge to stretch the Pumas
Having shifted the ball to an edge, the Lions fell into their 3-2-1-1 shape, which provided plenty of different options to influence the defence. It is also noticeable how tightly these shapes are run. The Lions are clearly emphasising their forwards’ ability to play tight, compacting the defence to create possibilities out wide.
Another facet of the attack was an emphasis on the back line’s high work rate to steal numbers. Tommy Freeman is a great example in this clip, holding his width on the paint on the 2nd phase before he inspected the ruck. Once the Saints winger realised he was not needed at the ruck, he began racing to add extra numbers. He positioned himself outside Bundee Aki before collecting the offload from Cowan-Dickie. This work rate is epitomised as he gets a second involvement collecting an offload from Duhan van der Merwe to take the Lions to 10 metres from the Argentine line.
Lions show the use of tight compact shapes to tighten the Pumas before unleashing their wide talent
In this second example, we can see the Lions again made use of a 3-2-1-1 structure. A 3-man pod crashed up before the Lions, then used a tight combination of backs and forwards in the midfield. Again, the forwards sat in two tight pods, contracting the Pumas’ defence. This left the 15-metre channel unmarked, giving Freeman a chance to make a dent.
The Oasis Tribute “Park-Life”
Another staple of the Lions’ attack against Argentina was their use of the scrum half to attack the short side. This seems a role tailor-made for Jamison Gibson-Park. However, both Alex Mitchell and Tomos Williams proved incredibly adaptable. Bouncing out from the breakdown to fire wider passes on the edge. A useful weapon aiming to catch the defence narrow or flat-footed.
The Lions used wide passes from the 9 to test the Argentine short-side defence
The first example sees the Lions dragged into touch, but it underlined their intent. We can also see it forced the Argentine defence into a passive approach, and the opportunities a change of angle could create.
The Tommy Freeman break is a great example of the wide scrum half pass, forcing the defence to be passive.
This change of angle is what makes Tommy Freeman’s break possible. When Tomos Williams scooted from the breakdown, it drew Argentine eyes. This meant that Freeman had the element of surprise. This, combined with Argentina not advancing square in defence, gave Freeman the soft shoulder to target and break the line.
These patterns are a useful weapon for the Lions to hold the Australian short side. While tailor-made for Jamison Gibson-Park, the other scrum halves proved more than capable of throwing these punches against the Pumas.
Why Size Matters
Another tactical trend showed the thinking behind Andy Farrell’s squad selection. One of the standout omissions was Darcy Graham. However, the Lions’ launch plays from Friday night gave a partial explanation. Of the four out-and-out wingers on tour, Duhan van der Merwe, James Lowe, Mack Hansen and Tommy Freeman, each is at least 6 feet tall. And while Freeman is the lightest, he weighs in at a sizeable 89 kilograms. This points to a Lions’ selection criteria for wingers, which was partially based on their first-phase roles.
The Lions used tight launch shapes to create 1-on-1 carries for Tommy Freeman.
The first example comes from a right-hand side scrum. Freeman, hidden inside Fly Half Finn Smith, created a tight shape with Bundee Aki angling in. This drags the Argentina midfield tighter and allows Freeman to force the 13 into contact. This compressed the defence and gave the Lions front-foot ball.
Another Lions Launch making use of Freeman to give front-foot ball.
The Lions’ launch combination was exhibited again in the 29th minute. The Lions launched from a 61 lineout with Cowan-Dickie wrapping around and collecting the ball from Jac Morgan. This enabled him to target Julian Montoya. This left the Argentine hooker unable to cover the run of Aki. In turn, this dragged in the first Argentine defender, creating a 1-on-1 contact for Tommy Freeman.
While the ball goes to the ground following the offload, it shows the foundations the Lions are trying to establish. The need to quickly create an identity has clearly driven the squad selection, with big wingers poised to be a key part of their launch approach. The Wallabies will be preparing for these styles of launch, perhaps allowing the Lions to unleash a double bluff during the first test.
Argentina: Creating Structure From Chaos
As the final score illustrated, the Lions didn’t have it all their own way in Dublin. A large driver of this was Argentina’s utilisation of a kick-to-contest approach. Recent years have seen teams adopt a more contest-driven approach in the kicking game. A trend which has been exacerbated since changes to the escort laws in November 2024.
The kick contest is naturally chaotic. These situations can create a more even game by increasing the role of luck as a differentiator between sides. This has seen a change in how teams approach the kick contest.
By looking at the World Cup final, we can see how contests were treated before the rule change.
New Zealand use a pre planned launch to create a contest for Telea
In the first example, New Zealand use a pre-planned lineout move to win the ball back. The kick was well judged by Aaron Smith and allowed Telea to fight through the escort to win the ball. However, while the kick is planned, New Zealand don’t settle into a natural structure when the ball is won back. Instead, Aaron Smith scans both sides before hitting the short side and making the most of the transition platform.
This points to a loose policy rather than a pre-determined tactical structure. A similar theme emerges in the clip below.
After winning the ball back, panic ensues as All Blacks desperately chase width.
Again, New Zealand regained a kick. While the ball wasn’t clean, they looked to shift the ball to space. The Springboks profit from the chaos, and Etzebeth delivers a crunching hit.
This passage underlines the chaos following a regained kick. If we compare this with the Argentine approach, we can see how structure is being imposed on the disorder.
Argentina used a cross field bomb early in the game to force a contest
The Pumas used a cross-field bomb to create a 1 v 1 aerial battle against a retreating opponent. This shifted the chance of a successful contest in the Argentine favour. Kicking across the field introduces additional disarray due to the kick being directed to an area containing just backs. However, we still see Argentina’s aim to impose control.
Argentina win the back and immediately set about playing with a clear structure
The ball was won back, and although the Lions disrupted the ruck, we can see how Argentina began to establish a shape which enabled their wider attacks. At the first opportunity, they organised into a layered shape with 3 forwards and a back in the boot. This points to their intent to shift the ball early. The shape invited the Lions’ pressure while creating a series of 2 v 1 exercises from which the Pumas can prosper.
Argentina make use of a box kick to force a contest and win the ball back
The small details behind this tactic are clear in this second clip. The winger sits a yard behind the main chase line to give additional acceleration space, allowing him to lead the charge. Behind this are a well-connected group of chasers who form a net to contest for scraps or to resource the first breakdown.
Juan Martin Gonzålez was the first to profit from the loose ball. The openside flanker snaffled the ball before he made a few hard yards, and forced the Lions’ defence on to the back foot. This fight in contact also gives Argentina time to establish its structure.
Argentina used Super Pod religiously after regaining a kick to shift the ball
With the additional time, Argentina were able to form a 4-man super pod. This was designed to tighten the defence and force the wider defensive forwards into decisions, in this case, Tom Curry. This stopped the Sale Shark from pushing beyond the Fly Half, meaning that Morgan, Tuipolotu and Aki are left on the far edge defending an overlap. This allowed Argentina to force the Lions’ defence passive while an offload kept their momentum flowing.
Argentina aim to create a contest, even deep in their own 22.
This final example was the driving force behind Argentina’s winning try. It starts from another box kick, aiming to create a contest. The winger again started slightly behind the chase line, allowing him to accelerate and hunt the ball. The remaining chase formed a net before securing the ruck.
Argentina race to form a shape and trap the Lions defence incredibly tight
The ruck gave Argentina a chance to form into their super pod shape. The clean catch tightened the Lions’ defence with 9 players inside the 4th man of the pod. Tom Curry did notice a lack of action in the Argentine pod, allowing him to bring the pressure and stop Argentina playing wider. However, after a couple of missed tackles, the Pumas profited. An offload continued the attack, and they flooded through to take advantage. It was a wonderful try to secure the victory, illustrating how Argentina aimed to control the chaos.
Exceptional try sees Argentina secure victory
Positives For Perth
The Lions will have been licking their wounds following this defeat in the enthralling encounter with Argentina. But there were plenty of positives for the Lions, even though they left opportunities on the field. Most pleasing for the coaching staff will be the clear signs of an identity being formed. Whether it is the use of imposing wingers on the first phase, or the compact high ball movement forward pods, which can challenge defensive decision-making. There are plenty of positives to take down under.
The biggest series in Rugby League got underway this weekend, with the Maroons and the Blues going to battle in Suncorp. It’s the 44th series between the two sides, and since 2020, the Queenslanders have held the slight upper hand, winning three of the five series. However, the Queenslanders were keen to bounce back after a 2-1 series loss last year, and with the first game in Brisbane, they would have fancied their chances. So what were the deciding events in the opening game of 2025?
Brave v Brawn: Exit Variation
One of the clear differences between Queenslanders and New South Wales was how they tried to escape any pressure. The Maroons brought a more expansive approach to the game, trying to target the Blues’ edge defence, putting them under pressure early in the set. This was clear from the very beginning of the game; take this example from the 4th minute of the game.
This might have been prompted by a poor early set with the 3rd play the ball occurring within the 20 metres. However, we can also see how New South Wales is presenting a weak picture on the edge. Mitchell Moses sits tight to the inside defender, worried about the lead shape, but this leaves the edge vulnerable with a two-on-two in a third of the pitch.
Ponga works out the back of the shape and gives an early pass to the outside runners. This preserves the space, stopping New South Wales from recovering. This gives Toia an outside leverage and stops Mitchell getting a clean double on winger Coates, giving the Marrons the upper hand.
They show the same intent 11 minutes later, with the Queenslanders running from deep. Queensland approached the game with a plan of targeting Moses and isolating the edge defence. Again, using that lead shape, they create a 3 v 2 to attack the edge. A fast close from the Blues defence is still beaten by the hands of the Queenslanders. This leaves a chance for the Maroons to make the line break down the edge. A good catch-up from Moses helps to slow down the break while Mitchell finishes the tackle. Mitchell wins control on the floor, exhibiting the dark arts and slowing the ball down, giving the New South Wales defence a chance to regroup.
When they shift the ball to the far edge, the work Mitchell has done comes to fruition. Rather than attacking a disjointed line, the Blues have organised into a well-connected line with a clear understanding of their roles.
The time has given Crichton a chance to get the outside leverage on the Maroons’ shapes, allowing him to be more aggressive and pushing higher. The height of his defence allows him to cover the front door option before snapping on the back door option. While he is initially brushed off, Crichton regains his footing and can finish the job for the Blues with a strong second tackle.
While the Maroons looked to shift the ball on their exits, the Blues instead adopted a more direct approach. This often involved striking back into the space behind the previous play of the ball. In the example below, we can see how they manage to pick apart the different shoulder angles. Finding this hole gives them a front and gets them momentum.
This sequence from the 12th minute shows how they used these direct low-ball movement tactics to move the chains down the field. The first scoot from the tackle beats the front marker and gets on the front foot. Cleary’s is a strong carry, and the early momentum is critical for the Blues.
After the second tackle, Lomax takes it on himself to get momentum. The previous tackle has given the Blues the front foot, crucially, it forces the Queensland markers onto the back foot. This gives him the chance to break from the base, and he beats the two markers, fatiguing an additional two Queensland defenders. Cotter does get across from marker to be a third tackler, but we can see how the Blues have begun rolling down the field with their low-risk approach.
The Blues follow with a third punch straight to the guts. Another scoot from the half beats the first defender from the main line, who is distracted by the decoy runner. This creates the disconnect and gives a weak shoulder the Blues can exploit.
Tackle four sees a variation on the theme, and the carry comes off a single pass before digging back behind the tackle. This is helped by some excellent interference with the markers, which again stops them from recovering to fill this space behind the tackle. Again, Cotter has to cover in the tackle before a marker can recover and assist to finish the job.
While none of these attacks for either the Blues or the Maroons ended in a score. They show a difference in style and approach. The Maroons brought a braver style, aiming to challenge the edges for bigger gains. However, the Blues went for a more typical basis of brawn. Attacking behind the ruck allowed them to roll down the field consistently. The Blues’ dominance in this area led to an additional 105 metres made post-contact compared to the Maroons. While they made an extra 300 metres from the carry alone, admittedly aided by extra possession. This physical dominance laid a platform for an emphatic win in the first game of Origin 2025.
How the Blues Blended Edge Play and Physicality To Score
The ability to exit the deep areas of the field does not always lead to scoring points and winning games. For the Blues, their tries were an example of merging wide strikes with the physical attack explored above.
The first try is a great example of this. The Blues start from a 20-metre ruck just inside their half. High in the tackle count, it seems a scenario unlikely to result in a score. However, a dart into the short side and a quick offload means they get back behind the tackle situation with a big gain of ground. While it’s a slightly more expansive approach from New South Wales, containing two passes, the result is the same, with front-foot ball generated.
The importance of the offload here can’t be underestimated, keeping the move flowing and crucially only allowing a single tackler contact. This limits the chance for the Maroons to slow the ball. As a result, Queensland lost four players in a 5-metre channel around the play the ball. If we compare this to the actions of Laterell Mitchell shown earlier, the extra second is all-important. Rather than attacking a well-connected defence, New South Wales has a series of individual defenders to beat. While Payne Haas initially digs back into ruck, he is presented with a 1-on-1 contact and can quickly offload. This steals another body, and Cleary can then link with the wider attackers of New South Wales.
Penrith’s Cleary beats three defenders with a quick change of direction before linking with clubmate Dylan Edwards. An early pass gives Crichton all the important time, allowing Crichton to step past Holmes. Crichton angles towards the last Queensland defender, preventing him from detaching. This leaves Lomax unmarked and the try is unstoppable, as the Blues scored the first try of the contest.
The second score again comes from the basis of physicality. Having marched down the field, the Blues benefit from a call of 6 again, which gives them stability. Haas uses this to reset the attack, driving forward physically. This carry from Haas is quickly followed by a bludgeon from Captain Isaah Yeo. While the carry from Yeo generates a slow ball, New South Wales has managed to organise a double blocker shape to attack the right edge of Queensland’s defence.
A smooth pass from the base allows Cleary to attack the ball and dictate to the defence. This stops the first three defenders from adjusting out instead, they are tied down by the threat of Haas and Cleary’s digging back in. Cleary links well with Moses out the back, creating a four against three for the Blues. The Maroons bite hard, with Cherry-Evans leading the charge. Though they get beaten by the ball and To’o can score in score.
Now this underplays the skills of Latrell Mitchell, whose intervention deserves its own paragraph. Catching and delivering the ball while in mid-air is an incredible feat, only made more stunning with To’o barely breaking stride on collection. The big man’s speed of hand beats the tackle of Coates, leading to the score in the corner. Simply stunning.
The third try was really a statement of ruthlessness built on a bullying dominance from the Blues. The first came from a half break inside their own half, whilst the second relied on incredible individual skill. On the other hand, the third followed a building of constant pressure underlined by three set restarts, one from a missed intercept and two from penalties.
The final execution involves a cool head from Nathan Cleary again as the first receiver. Working out the back of a lead shape, he can interest the second and third defender, creating a two against one on the edge, which Edwards and Lomax calmly square away.
The block shape is excellently run with Crichton picking a perfect angle to hit the inside shoulder of Queensland’s two-in-defender. The threat that Crichton poses has a big impact, especially given Cleary’s double pump tightening the Maroon defence and allowing Edwards to strike out the back. A very well taken effort that emphasised the Blues’ dominance of the opening game.
The final score sealed the deal as Edwards burst over. The sequence starts with the Maroons on the attack in the forties. Again, they look to play wider as highlighted earlier, however, some exceptional work from the markers closes down this threat. Hudson Young, probably finding life easier than most on an Origin field coming off the bench and with a lead to defend races from the marker and can interrupt the passing lane. This inside pressure forces an error from Cherry-Evans and chips away at Queensland’s hopes of a comeback.
From the following attack, the Blues slowly rolled up the field again using their trademark midfield carries to establish dominance. Instead, they waited for a Liam Martin offload before they sparked just a little. They followed up this phase with Cleary squaring up and attacking back behind the tackle, which took the play into the final 10 metres. They also benefited from a 6 again call, meaning they had time to play with. They kept battering away before another 6 again continued to build pressure.
A wide shift allowed Stephen Crichton to carry up to the line, setting a wide play with the ball. Queensland pressure well and stop the ball being shifted wider before they kick back to the old ruck. This speculative effort benefits from some outstanding skill by Lomax to take the ball. While it goes to the floor, the Blues react first before another offload helps Edwards crash over.
How The Game Was Won
State of Origin is always an occasion, and once the formalities of the anthem and a Welcome To Country were out of the way, we were treated to a demonstration of the finest rugby league skill by the Blues. This was underpinned by a physicality exploiting the seam behind the tackle. This, coupled with their higher possession, led to them controlling the game. This laid the groundwork before cool-headed execution saw them score four great tries.
Both teams will have areas to work on ahead of the second game. The Queenslanders will look to get their attack truly firing, with just one try coming against 12 men and from a high turnover. Certainly not the foundations they need to bounce back in Perth. On the other hand, the Blues will look to secure the series relying on their same physical weapons. One area of improvement will come in the kicking department, but if their try scoring allows them to miss as many again, they will be in a good place.
As the World Cup’s return rapidly approaches its time to look at one of the more likely sides to force an upset – Fiji. The Flying Fijjians are the highest ranked side in Pool C competing with Australia, Wales and Georgia, who are all ranked 8th or lower on the World Rugby rankings. Riding in on a wave of historic success, having beaten England at Twickenham, Fiji will certainly be a side to watch at RWC 2023.
Flying In Attack
Unsurprisingly Fiji brought an incredible attack to the table, having scored over 30 points in every game of the Pacific Nations Cup. Their attack was primarily driven by a desire to spread the ball and stretch the opposition. This is shown in the Bajad8ta Database, with Fiji playing 19% of their phases off the second playmaker. Only Japan in international rugby play more rugby Off 12 than the Flying Fijians.
This try against Japan shows how Fiji’s intent to spread the ball looks on the grass. Coming off quick ball following a break a few phases before Fiji are in control. The first receiver takes the ball wide off the scrum half and drifts out further looking to engage the Japanese defenders. The Box shape Fiji are running gives 3 options for the ball carrier and he pulls it back to a sweeper. The sweeper beats the first up tackle and is able to then offload to the 11. The left winger then attacks for the line but offloads as he is dragged down metres short assisting a great Fiji try.
We see the same strengths in this play against Samoa: a late sweep into position from Semi Radradra allows the Fijian’s to spread the ball. The key enabler of their wide attack is how deep the Fijianm 13 receives the ball. This draws out the outside pressure of the Samoan defenders and means he can fire the ball across their face to the unmarked 8 on the outside.
Another enabler of this wide attack is Fiji’s excellent ball skills. They have thrown 0.1 offloads per carry more than any Tier 1 nation apart from France in their 7 games since 2021. Take their fourth try against Japan, again we see the sweepers working behind the backline. This stretches the Japanese defensive line, opening the hole for Fiji’s forwards to run through. Two great offloads keep the ball alive and allow Fiji to carve through.
This shows the great benefit of the Fijian Drua in Super Rugby Pacific, 18 of the 33 man squad are from the Super Rugby side. This results in an increased cohesion and a team regularly playing with the same mentality as the national team. For example, Fijian Drua’ threw more offloads per carry than 95% of professional teams.
The Drua’s radar (driven by Oval Insights Data) could point to one area they might struggle – with the lowest kicks per game of any side in the Oval Insights database covering games across Professional Rugby. The Drua’s average of 13.8 kicks per game while the national side are not much higher at 15.1 per game. Game management will be key for Flying Fijian’s otherwise sides may manage to pin back their excellent attack.
The other impressive feature of Fiji’s play is how physical they are on defence in spite of a lower line speed. We saw this in the pacific nations cup, as Fiji used their defence to establish control. Take a look at this clip against Japan. They aren’t necessarily racing off the line but instead absorb Japan and slow the ball down at ruck time. This ruck policy is also shown in their team style radar with the Fijian’s winning more turnovers than the average side.
Against England their ability over the ball was an important reason for their success. Look at how these two pieces of breakdown work stop England’s attack and allow Fiji to relieve some pressure. The ability of the jackal to get hands onto the ball and be set in a strong position before any clear out is key to their success. As you can see with the first one, even the 9s are in on the action, with the jackalling ability perhaps a result of the popularity of sevens.
Pool C Favourites
Fiji enter the tournament in a new role, favourites with a great chance of escaping their pool. They face a Wales team they outrank on the World Rankings, as well as an Australia side at their lowest ever world ranking. There will be struggles, with their kicking game a possible achilles heel. However they have all the weapons to cause teams problems once they get further up the pitch. Entering the tournament having beaten England away will bring the side a great deal of confidence and their game against Wales will certainly be one to watch as they kick start their tournament next week.
Uruguay became the darlings of the 2019 rugby world cup with their win over Fiji, ranking as the biggest upset at the tournament. The South American side have gone from strength to strength since, making history by beating the USA overturning a 3 point deficit in the second leg of the play off to secure their ticket to France 2023.
The most impressive aspect of the Uruguay side is their wide play, their scintillating backs will be key if they are to cause another upset this time around.
The graph below shows the centre field carry % for each side in international rugby. Uruguay make 62.77% of their carries between the 15m lines, compared to an average of 66.63% for the rest of international rugby. This difference is even starker when we consider it by zone on the field. When playing outside their own 22, Los Teros make fewer centrefield carries than over 75% of International teams.
This wide carrying is key for Los Teros who will look to stretch teams and unleash their speed out wide. However the manner in which the Uruguayan side achieved this is of particular interest. They rely on their backs to shift the ball, while allowing their forwards to focus on simply carrying hard. The South American’s backline averages more passes per carry than the average in international rugby but their forwards are much more direct, making 0.36 passes per carry compared to the average of 0.47 passes per carry.
Now we know the numbers behind their attack, let’s look at how they use the wide channels to pick sides apart. This attack has two key elements, firstly how Uruguay stretches the field during phase play.
Filling the Field: Los Teros in Possession
The first example of this wide attack comes from the Los Teros game versus Romania last year. Having just turned over the ball they look to play the ball wide. They regain their shape quickly during the transition which allows them to find the edge of the Romanian defence.
The Uruguayan set up in a 3-2 shape. This simply means they have a pod of three players followed by a pod of two players. Within each pod shape there is a player who operates out of the boot. The player in the boot acts as a linking player, and as such it is a role filled by the Uruguayan backs using their superior handling to add width to the attack.
The beauty of this setup is that there are multiple options for each playmaker when they receive the ball. Using this set-up allows them to narrow up the Romanian defence and attack the edge. The pink pod holds the tight defenders, and the orange pod pins the edge. The orange pods are targeting the defender circled in Orange, which helps to create the 3 on 2 in the wide channel and enables Uruguay to make ground.
Strike For Success
Width is a key component of the Los Teros strike as well, with Uruguay often using strike plays to reach the far touchline. Let’s start by watching the first phase in the build up to the try against Tonga.
The play starts from a lineout just over the 10m line in Tonga territory. Uruguay have called the play to start from a 5 man lineout, this allows them to use additional forwards as carriers within the backline.
The South Americans utilise a double layered strike move with the chance to hit both short and wide from this lineout. This helps fix the inside players and prevents the drifting defence taking all their space on the edge. The first part of this move is to get the ball into the hands of 13 (first black line) Felipe Arcos Pérez who fixes the defence with the 8 on the outside.
The player in the red circle, number 10 Felipe Etcheverry, acts as the linking player between the first and second waves. By starting on the inside off the hard runners, Etcheverry, hides himself from the defence. The Fly Half can then receive a back door pass before creating an overload on the edge of the Tongan press. This is best seen in the screenshot below.
The first wave of the attack has done their job, with the black options tying up the initial Tongan defenders on the solid Yellow line. Their aggressive line and the sweep from Etcheverry in the red circle has played an important role in disconnecting the Tongan’s defensive corner in the Yellow Circle.
This helps isolate the two final defenders in the Tongan press. This isolation has caused the final defender to begin over chasing, and a slight dog-leg has begun to form with the two runners in the Orange circles poised to expose it.
This disconnect is something the Uruguayan hard runners are able to expose, striking back into the gap between the final two defenders. The looping Etcheverry plays flat to the line meaning that the Tongan defender over-exposes his inside shoulder. This allows the hard Uruguayan runner allowing Los Teros to get over the gain line.
The play continues as we have seen with the Los Teros backs working around the corner to score in the corner. The driving themes of this strike move are similar to those that underline their phase play attack. The use of multiple layers to create disconnects in the defence with backs playing a crucial linking role to unpick the opposition.
Uruguay at Rugby World Cup 2023
Los Teros will be looking to build on the growth of South American rugby, and look to cause another shock at the World Cup in 2023. With the presence of Namibia in their group 1 win should be the minimum target. The wide attack discussed above will be key if they are to cause issues for Italy, the most likely shock for Los Teros. Regardless of their results though uruguay are sure to put on a show and are a good candidate as a second team to support.
The World Cup in France is fast approaching and this week we turn our focus to Los Pumas. The Argentines secured a victory over Australia before going down by just one point to South Africa in the Rugby Championship. Michael Cheika’s side are sat on the easier side of the draw and will look to take full advantage by topping a poll containing England, Japan, Samoa and Chile. To do this they will look to empower their strengths; their kicking game, their defence and their ability from the tee.
The Pumas Kicking Game
We can see how kick heavy Argentina are by looking at their team style radar. The Dashed line represents where the average side would lie and as you can see the Argentine are incredibly kick heavy. They kick more than 81% of teams across professional rugby as they look to assert control and strangulate teams. Obviously this trait is more common in international rugby, but at the World Cup only four teams kick more.
However kicking a lot isn’t necessarily the best strategy, there’s a reason a kick is only as good as its chase. Argentina regained more kicks by catches than 85% of the sides, a sign of their aerial pressure. This catch from the second test vs Australia last year shows their prowess well. The winger starts pinned right on the touchline allowing him to circumvent the escort runners and get to the landing zone.
We see the same picture with their chase line when kicking from 10 against the Kiwis. The right winger is pinned right on the far touchline meaning that his run to the catch zone is unimpeded by any All Black players. While they can’t reel the ball in, it is a great example of their kick chase looking to start wide and angle through to the catch zone.
They also used their kicking game to apply pressure on the ground. The Pumas use low kicks more often than 90% of teams aiming to twist the knife in the wide channels.
Take this clip from their first game vs NZ last year where we can see the approach. A turnover means the NZ defence is disjointed and Argentina’s Fly Half picks from the ruck before immediately dropping it on the boot. While they don’t regather the ball, it shows the intent to kick to space and apply pressure just behind the defensive line.
This clip from their game vs Australia in the Rugby Championship which again shows the Argentine approach of dropping the ball in behind. On this occasion they flow around the corner and kick into space. The ball bounces in behind and targets the no man land between the Australian Winger and Fullback. The kick is well measured and confusion in the Australian ranks sees Argentina race away for their opening score.
The Pumas Bite: How Argentina Defend
Argentina are a side who face more carries than the average partially driven by the high kicking game. Given this, their defence will be a crucial part of the charge at the Rugby World Cup. Argentina are a side who look to tackle slightly lower than the average, however this doesn’t impact their tackle with more big hits than the average side. Lets break down this defence and how it may pave the way to the upper echelons of international rugby.
Last year against Australia we saw their defence set the tone, with a big hit forcing an error just in front of the Wallaby posts. Feeding their defensive aggression will be key for the Pumas if they are to disrupt the opposition.
The low chop and stop tackle was the main defensive tool for Argentina as they looked to build their defensive wall. This chop tackle from Julian Montoya is a great example which enables a challenge over the ball. Of their World Cup rivals Argentina sit fourth for defensive rucks challenged, a sign of the disruption they will look to cause later this year.
This focus on the breakdown and causing turnovers was an important part of the Argentine attack. This best time to attack an opponent in rugby is often during transition, and for Argentina this is undoubtedly true. The Pumas have created more breaks from turnover per game than all but four sides within the World Cup later this year (including Chile who have just 3 games in the database).
Take for example this try from the game versus Australia in the Rugby Championship last year. Australia’s attack is blunted from a tackle targeting the ball which allows Argentina to turnover it over. Despite the ball slow Argentina are quick to set and they attack a lethargic Australian defence. The space they are given allows the Pumas to stick the ball in behind, and Argentina score another try.
This try is a great example of how Argentina combined their weapons. From a physical defence which slowed the Australian attack, before ruck pressure and a turnover which allowed the Pumas to go onto the attack. During the follow up attack the Argentine’s make a break and kick in behind creating a pressure situation that the South American’s can control and score from. A great example of how Argentina will look to counter punch teams at the Rugby World Cup.
Keeping the Scoreboard Ticking
This brings us to the final part of the Argentine strategy, strong goal kicking. This again buys into the theme of counter punching or strangulation of opposition teams. The Pumas are a side that do not need to get to the 22 in order to score, but are instead happy to keep the scoreboard from moving anywhere inside the opposition’s half.
Argentina have some of the most accurate goal kickers in world rugby, they have converted a higher percentage of their tries than any other side apart from Wales in international rugby. This allows them to keep building scores and stay in games longer even if they are struggling to break through the defence.
One way of seeing how teams like to build scoreboard pressure is by looking at which teams kick more penalties vs those that target more tries. For Argentina the picture is clear, they love taking 3 points, only Italy have taken more penalty attempts compared to total tries scored in international rugby.
It’s this trait which gives me the feeling that Argentina will be a dark horse at the World Cup in France later this year. They seem to be tailor made for knock out rugby where winning by just a single point is enough.
World Cup Dark Horses?
Argentina are a side with a more established reputation across international rugby having secured semi final rugby at the 2007, and 2015 editions of the World Cup.And there’s no reason they couldn’t replicate this in France. Argentina bring a strong kicking game which will allow them to both pin and pressure opponents while their defensive work is a steel edged accompanier. If Argentina can get both of these aspects of their game right, then they have a scoring profile which may help drive them to World Cup glory.