
The Crusaders are the standard setter in Southern Hemisphere rugby having underlined this status with a 7th Super Rugby title in a row. Today we dive into the building blocks behind their triumph. First we look at how they use forwards in their attack before focussing on their ability to change the point of attack. Afterwards we turn our focus to their kicking game, before examining their defence which conceded 36 tries across the competition – the fewest in Super Rugby Pacific.
Stretch And Speed: Crusaders Attacking Mindset
The Crusaders had the fourth best attack in Super Rugby before the playoffs recording 32.6 points per game. The basis of this attack was their ability to stretch teams the Crusaders made more passes per ruck than 95% of top level professional teams.
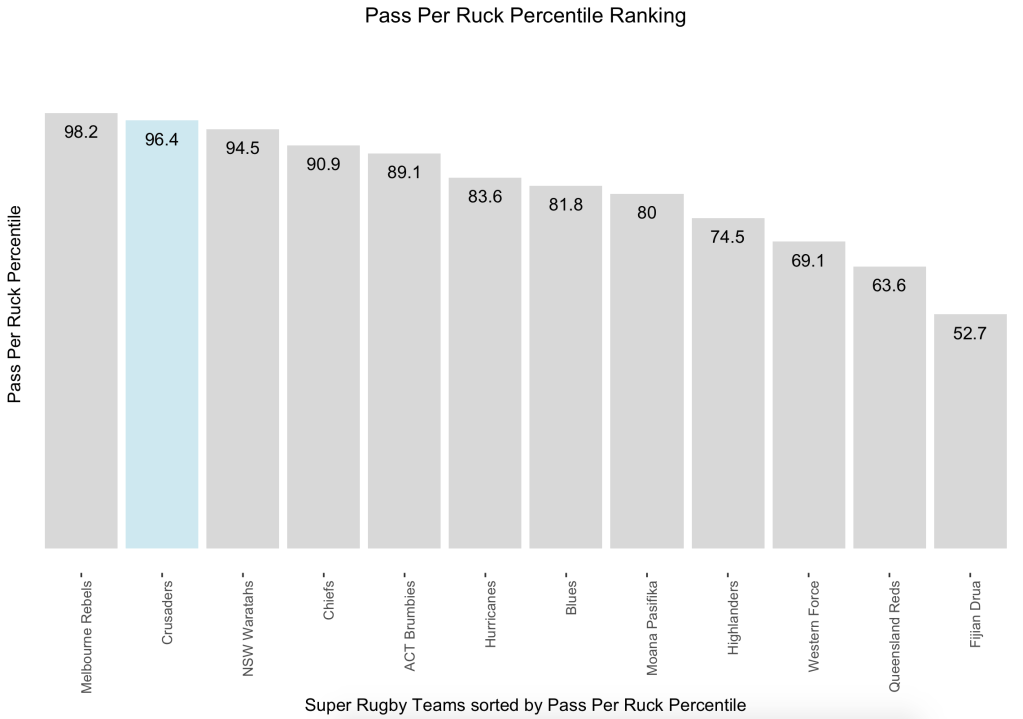
One of the driving forces behind this wide attack was the ability of their forwards with ball in hand. What is noticeable is that most Super Rugby sides have their forwards pass more per carry than average. Given this it’s no surprise the Crusaders sit in the top 20% globally.

Dynamic Forward Attack
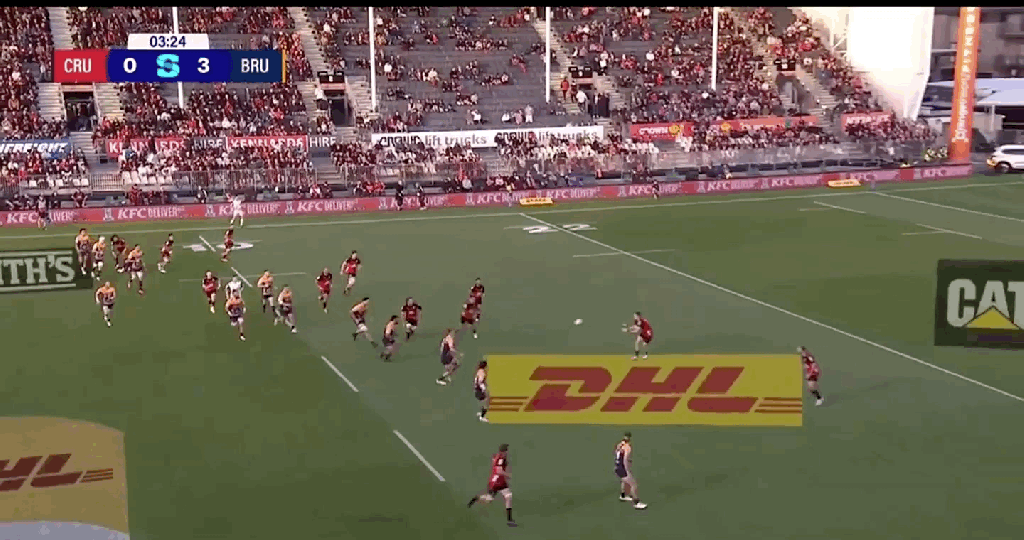
The use of forwards helped to maintain the flow of their attacks, for example in the build up to their 8th minute try versus the Waratahs.
Having played outwide the Crusaders look to spread their attack. The first pass goes to Richie Mo’Unga who then hits Sam Whitelock in the middle of a forward pod. The set up isn’t perfect but Whitelock is able to attract the Waratahs press before pulling the ball behind allowing Fergus Burke time to make the wide pass.

From the touch line the Crusaders then strike into the midfield. Having crossed the gainline ont the previous phase Sam Whitelock is able to move onto the ball against a Waratahs defence on the backfoot. The second rower’s tip pass allows a half break and keeps the Crusaders moving forward.

The scoring phase, a little later in the attack, shows how strong the Crusaders are when they have momentum. They strike off the left edge, with scrum half Mitchell Drummond hitting Cullen Grace. A great line from Fergus Burke means he appears unsighted.
Burke then passes to Sam Whitelock, allowing the lock showing his class. The 143 cap All Black breaks the first tackle before offloading to blindside Lio-Willie. The number 6 accelerates through and one final offload sees the Crusaders open their account.

The use of offloading particularly among the forwards really helped the Crusaders pick teams apart. It allowed them to keep the pace in the attack and alongside tip passes also meant they could find soft shoulders enabling them to build momentum by winning the gain line battle.
Swing To Win: Maximising the Second Play Maker
Another key factor behind this try is the Crusader’s use of secondary playmakers. Both their Full Back and Inside centres sit above average on their passing contribution. The use of a second playmaker was also key in enabling their swing attacks.

This swing attack was particularly effective against the Blues during the Semi Final.
The 11th minute try comes directly from the work rate of Will Jordan. Initially the full back positions himself on the blindside but noticing the change of direction Jordan loops around to be behind Richie Mo’Unga. The impact of this late appearance is clear as the Blues Winger shoots out of the line to tackle the wrong man allowing Jordan to break through.

Using the overhead angle we can see how the Crusaders change the point of attack which shocks the Blues defence. Mo’unga hits up a forward pod just outside the right hand post. The fly half then positions himself behind the ruck before switching to attack against the grain. Will Jordan notices this change and runs a very flat arc, hiding behind the forward pod, to get become an option outside Mo’unga.

Later in the game we see how Mo’Unga takes advantage of a mismatch against a prop to break through. Again the Fly Half starts directly behind the ruck, before moving to launch the attack The swing is well timed with Drummond hitting Mo’Unga early to keep the element of surprise. This allows the 10 to receive the ball in motion and isolate the prop before stepping back on the inside and creating the line break.

So as we round this section to an end, what can you steal from the Crusaders attack to make your attack more effective. Firstly their ability with the ball in hand. Having 15 players comfortable with the ball allows them to stay fluid in attack. Second, their use of the swing attack and especially the starting position of the Fly Half allows the Crusaders to change the point of attack with ease. This coupled with excellent individual play and skill allowed the Crusaders to be one of the leading attacks in Super Rugby.
Kick To Victory
The Crusaders also had an incredibly strong kicking which helped lay the foundations for their attack. The main driver of this kicking game was control, a trait they showed to great effect against Fijian Drua in the Quarter Finals.
We can use a metric called Field Tilt to show a team’s control. In the quarter final game we can see that the Crusaders Field tilt dropped below 50 just once, while their opponent had just 5 small periods which scraped across the halfway line. A truly dominant display.

So let’s look at how the Crusaders used this kicking game to apply pressure and strangle sides out of the game. One of the main driving forces was simply the quantity of kicks that the Crusaders made with more kicks per game than any other Super Rugby side. While kicking is not a silver bullet the Crusaders add another piece of evidence that it is often the foundation of a title winning side.

This kick versus the Drua though is a good indicator of one way they looked to apply pressure. Starting from a centre field scrum the Crusaders spread the ball and then kicked down the tramlines. The Drua are unable to gather the ball and the Crusaders start an attack less than 10 metres out from the try line.

Kicking down the tramlines was an important part of the Crusaders building pressure on the opposition. This example from their game versus the Brumbies doesn’t result in a turnover but shows a willingness to kick once they enter the 15m.
They also used kicks to move down the field during transition. This from the 1st minute from the Semi Finals demolition of the Blues is a great example. The Crusaders kicking down the tramlines and win a 50/22.

The strength of the Crusaders kicking game is that it applied pressure and often created a chance to win turnovers. This is backed up in the Oval data with the Crusaders retaining the most kicks of any side in Super Rugby.

Controlled Aggression: Crusaders Defence
The saying “Defence wins championships” has become a common phrase in sports, and the Crusaders demonstrated how defence can lead teams to glory, even in the high-scoring world of Super Rugby. Under the guidance of Scott Robertson, the Crusaders proved their defensive prowess by allowing a meagre 36 tries, the lowest in the entire competition. Their outstanding defence was built upon a foundation of aggression, with their wingers and breakdown threats playing crucial roles in stifling the opposition’s attacks.
The radar shows this aggression. The Crusaders challenged more rucks than over 94% of teams, while recording more turnovers than any side in Rugby’s top professional leagues. Their wingers also made more centrefield tackles than 90% of teams, an aggressive trait that helped the Crusaders rank in the top 20% for tackles behind the gain line.

One of the main traits in the Crusaders defence is how high their wingers get. A trait that is also synonymous with the Springboks and their run to world cup glory. By allowing their wingers to get higher defensively the Crusaders looked to impose themselves on the opposition. But what does this aggression look like on the field?

The Crusaders are defending here following a kick chase and set up narrowly. The winger (red circle) sits outside of the 15m ready to angle in on the Waratahs playmaker (yellow circle). By targeting the playmaker the winger aims to shut down the attack and prevent them utilising their numerical advantage.

This aggression is rewarded with the winger making the tackle behind the gainline allowing his teammates to attack the breakdown and win the penalty.
We can see the mechanics of the defence better by looking at a play from the Final v The Chiefs. The Chiefs, shown in Orange, are set up with pod options before and after 10. The second pod will see the Number 11 loop out the back.
To defend this the Crusaders again use their winger aggressively. Starting well inside of the 15m line, Fainga’anuku looks to shut down the attack early. The Crusader’s 11 decision to fly early places the emphasis on the 6 and 2 to cover the space left behind. These are the catch up defenders and try to prevent any huge gains if the Chiefs are able to play around the pressure.

In the video of the play we can see this in action. Fainga’anuku flies out the line to apply pressure but is beaten by the ball. This allows us to see the work rate of the catch up defenders who minimise the ground gained by the Chiefs.

The catch up defenders are a crucial element of this defensive set up allowing the Crusaders to tilt the risk reward balance in their favour. Using Oval’s data we can see how well the Crusaders minimised risk by calculating Tries Conceded Per Line Break. No other professional side stopped breaks as well as the Crusaders, with a rate of just 0.48 tries per line break conceded.

The other key part of the Crusaders defensive system was their ability to turn over the ball.
Super Rugby had plenty of sides all looking to target the ruck. The Melbourne Rebels ranked last but still challenged more rucks than 65% of top level professional teams. The Crusaders were a clear part of this trend challenging the fourth most rucks in Super Rugby.

While the targeting of the ruck is clearly a part of Super Rugby’s DNA, the Crusaders were particularly effective. Scott Robertson’s chargers recorded more turnovers per game than any other side in top tier club rugby.

Defensively the Crusaders looked to choke their opponents out of the game. Whether it was with their wingers restricting access to the wide channels or at the breakdown. The Crusaders brought a great desire to their defence as well, restricting their opponents conversion rate. All this created an incredible defence with the Crusaders conceding the fewest tries in Super Rugby.
A Dominant Dynasty: Summary
The Crusaders’ title-winning journey was forged through a formidable wide attack, enhanced by the exceptional skill level of their forwards. Sam Whitelock’s masterful touches in their try against the Waratahs epitomised the momentum-generating prowess that fuelled their success. Their ability to swing and shift the focus of their attack added another dimension to their already potent offensive arsenal. Their dual playmaker set up helping exploit the gaps in opposing defences. Alongside this they brought a strong kicking game and suffocating defence which applied relentless pressure to their opponents. In the Quarter Final against Fijian Drua, they applied a strangle hold which paved the way to success. While across the season aggressive wingers and ruck pressure system stifled their opponents.
Scott Robertson and the rest of the Crusaders coaching staff have created a legacy in Christchurch that very few professional sports teams can match. The title this year represents a great sign off for one of rugby’s most dominant set-ups.
